Home » Home Improvement - Page 3

Add Heat Under Your Feet With a Radiant Flooring System

Installing an electric floor heating system can be a do-it-yourself project if you’re armed with the right skills and information.
It’s bad enough that you have to get up in the middle of the night to go to the bathroom, but that tile — it’s so cold!
The notion of warming floors for comfort is hardly new. Archeological digs reveal that, as early as 5,000 B.C., cave dwellers were drafting smoke through stone trenches in an effort to warm their subterranean floors.
These days, the two most common types of radiant floor heating systems are electric and hydronic, both of which are installed under your flooring.
Hydronic systems: A whole-home heating solution
Hydronic systems heat floors by using loops of plastic tubing to run hot water from a boiler or water heater under flooring. They have lower operating costs than electric systems but, because they generally require a boiler, pump and gas lines, they’re also far more complex. Hydronic heat might be a good option if you’re looking to add heat to your entire home or, at least, a large portion of it. Even if you have plumbing and electrical expertise, you’ll likely want to consult with a heating pro to ensure your system is well designed.
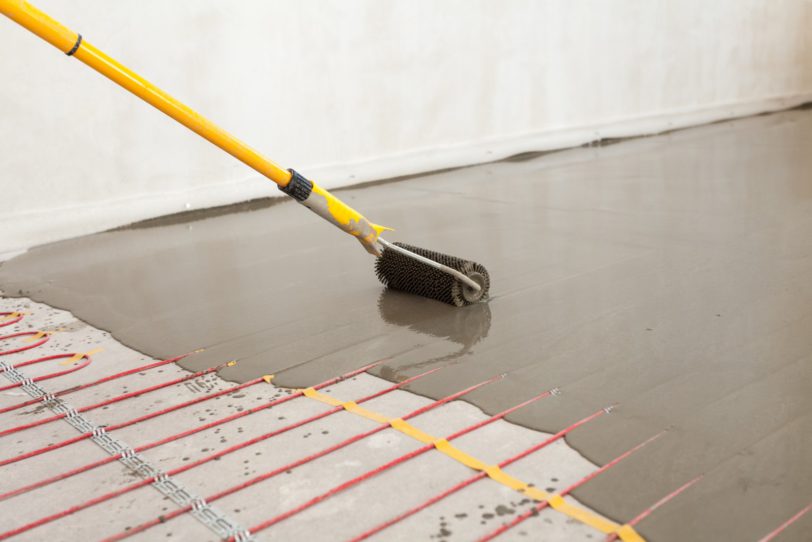
Electric systems: Good for small spaces
Electric systems come in a few options. The most popular of these systems relies on a continuous, pre-spaced heating element that’s woven into a plastic mesh mat and installed beneath your flooring. Electric radiant floor heating systems are easier and more affordable to install than hydronic systems, but they’re more expensive to operate, making them best suited for use in small spaces, such as kitchens or bathrooms. A DIYer with basic skills can install electric radiant heat, even if you need to hire an electrician to do the final hard-wire connection.
If installing an electric floor heating system is on your to-do list, here are some tips to keep in mind:
1. In addition to mesh mat, electric heat can be applied using a loose cable which you must position in a serpentine pattern, fasten with hot glue or staples and then “embed” with thinset or a self-leveling compound. Solid mats are the third and most expensive type of electric heat system. The cable is completely enclosed in synthetic fabric, plastic sheeting or foil. The real advantage to solid mats is that you don’t need to embed them. Do your research before deciding which type of electric in-floor heat is right for you.
2. When installing heat over a wood-framed floor, fiberglass insulation between the joists can make the system more efficient by driving heat upward. If you’re installing an electric system over a concrete floor, double-check the manufacturer’s recommendations; you may need to place a layer of foam insulation over the concrete before the heat cable is installed.
3. When calculating the square footage of a room, figure in only the areas where you can walk. There’s no need to spend money on heat that runs under the refrigerator or behind the toilet.
4. Because most electric heating must be installed under your tile, hardwood, stone, laminate or concrete floor, this is a project you’ll want to hold off on until you’re building or are ready to change the floors in an existing room. If you’re intent on adding heat without replacing your floor, you may be able to use solid mats that are sized to fit between joists, allowing you to heat the floor from below.
5. Many electric heating systems can be used under carpet but they’re often not as effective. If the carpet pad is thick, it will act as an insulator and won’t allow much heat through.
6. When you purchase your electric radiant system, pay special attention to the thermostat. Most models are programmable, allowing you to run the heat only during the hours when you’re home and awake. Others come with “smart” features that learn your routine and automatically adjust the temperature.
According to the U.S. Department of Energy, radiant heat is more efficient than baseboard or forced air systems. Rather than just blowing hot air around the room, radiant systems slowly and steadily charge the floor with heat, keeping it where you want it, longer. Additionally, the California Energy Commission reports the lack of moving air can be advantageous to those with severe allergies.
Originally published February 2014.… Read More

5 Tips to Declutter Your Closet in a Day

Streamline your wardrobe, and help others at the same time.
I recently had a closet collapse. I came home from a day at the office to find heaps of what had been neatly hung, color-coordinated clothes in one giant, messy mound on the floor. Worse than picking up the pieces of chipped drywall? Admitting that maybe it was time to get rid of that favorite shirt of mine — from college. In the ’90s.
So I sought the help of style expert Darcy Camden to find out what she tells her clients. Camden has been cleaning out closets and styling men and women for more than a decade (read: she spends a TON of time in strangers’ homes). The busy fashionista (she’s a mother, too) insists there are easy ways to declutter that tangle of t-shirts or pile of old papers. And you can do it in as little as an hour.
A little goes a long way
Purge a little at a time, says Camden, who has helped more than 900 clients in her career.
“Most of my clients think that purging a closet is a huge all-day endeavor, but it often makes more sense to do a little at a time,” she says. “I encourage everyone to keep a Goodwill donation bag in their closet or bedroom, and add to it here and there as you discover items that don’t fit or have gotten worn out.”
If it doesn’t fit, you can’t wear it
“It rarely makes sense to keep something that physically doesn’t fit you — even if you love it,” Camden says. Put it in a pile to donate, and imagine how much joy the next person will get from that item.
New season = new chances
When the weather warms up or cools down, it’s a great opportunity to think about what you’ve worn — and what you haven’t. “If you didn’t wear it last winter, you probably won’t wear it next winter,” Camden says.
Use the “plus one, minus one” method
Fab new pants? Great! But only put them in the closet after removing a pair that’s collecting dust.
“I tell my clients to subtract one old item for every new item you purchase,” Camden recommends. “If you spend an afternoon shopping and come home with five new things, spend some time reviewing your closet. Remove five older things you’re no longer wearing.”
Finally, donate!
Think of how much you can keep out of the landfill by gifting your giveaways to a good cause.
“I’m constantly amazed that my clients are worried their castaways aren’t good enough for Goodwill,” Camden says. “Will they really want this stained old t-shirt? Or this single sock? Yes!”
“Working closely with Seattle Goodwill over the years has given me tons of insight into what happens to donations,” she continues. “Your smelly socks and stained clothing provide jobs and can be recycled or reused. Never throw away clothing to a landfill.”
Last year, Seattle Goodwill kept more than 53 million pounds of useful goods out of landfills. In addition to helping the planet, those donations also help fund job training and educational programs, adds Seattle Goodwill’s Katherine Boury.
Happy cleaning!
Related:

Originally published April 2017… Read More

Chic Holiday DIY: Fragrant Herb Chandelier and Custom Treat Bags

Easy handmade decor and trimmings set the scene for a festive holiday get-together.
Holiday entertaining is all about one-of-a-kind decor, and we’ve got some show-stopping looks that you can make yourself. You don’t have to be an expert crafter to accomplish these easy DIY projects. Creating a custom hanging herb chandelier and dessert takeaways will really impress your guests at this year’s seasonal get-together.
Create a rustic vibe by wrapping the dining table in brown kraft paper. Arrange leaves, loaves of bread and open bottles of wine along the center of this setup. Lovely butter knives atop neatly placed cloth napkins seal the deal.
[embedded content]
Serve tea or coffee with your homemade treat bags after the meal to brighten everyone’s day. Taking the little bit of time to make this thoughtful goody that your guests can break into right away or take home really makes visitors feel special. Taffy, cookies or a slice of pie are all great sweets to bag up for later.
Hanging Herb Chandelier Materials

3-foot cut of wood (or desired length, depending on your table)
Cup hooks
5-foot length of multi-purpose rope
Baker’s twine
Ribbon
Herbs/flowers

Stamped Paper Bag Takeaways Materials

Videography and photography by Mikal Marie Photography. 
Related:

Originally published December 2015.… Read More

5 Easy Improvements to Get Your Home Guest-Ready for the Holidays

This is no time for major updates, so stick with simple tasks to make for a festive celebration.
Hosting a holiday gathering can be a lot of fun, but perhaps a bit intimidating, too. You want your house to look its best, but now isn’t the time to undertake any major updates.
Chances are, you’re busy enough get ready for the event. So, focus on just the areas of your house where your guests will spend time.
Whether you’re a first-time party host with a few jitters or an old pro looking for some new ideas, these tips will help you ensure that your home is ready for any gathering.
Light the way
The sun sets early this time of year, so it’s important to make sure the entrance to your home is clean and well-lit.
If you have a large front yard, focus on the entryway and the path leading up to it. Install porch lights or replace the bulbs if needed. Cut back any shrubbery that is obstructing the walkway.
On the day of your party, open the blinds on the front windows so your guests can see into your warm, festive-looking home as they approach. It’s a great way to create a sense of welcoming anticipation.
Pro tip: The easiest way to create instant lighting for walkways and paths is with the solar lights that you just stick into the ground. The sun does the rest of the work!
Take care of the bottom line
Our mothers used to say this, and it’s true: If your floors are spotless, they make your whole house look cleaner.
Even if you’re unable to do an in-depth house cleaning before your gathering, make sure your floors have been cleaned before that first guest steps over the threshold.
Pro tip: If you have carpeting, clean the carpets a minimum of three days ahead of your affair so they have time to dry fully.
Brighten up your bathroom
If you’re bothered by grimy-looking grout in your bathroom, try this easy, inexpensive, and non-toxic method to get rid of it nearly instantly: Just spray on some full-strength hydrogen peroxide, let it sit for 10 minutes, and then wipe clean. That’s it!
Next, add some flowers, holiday decorations or pictures on the wall to further spiff up your powder room, and it will be ready for your guests.
Pro tip: Get the buildup out of a slow-moving sink drain with a Zip-It. This inexpensive tool looks like a giant zip-tie. You just work it down into the drain to pull up hair clogs — all the other gunky stuff will come up with it.
Tune up kitchen appliances
Your kitchen appliances will be the workhorses of your holiday party, whether you’re hosting a big family dinner or a cocktail party. You want them to be fully functioning and ready for action.
Make sure all stove burners are working. Now’s the time to clean the oven if you haven’t done that for a while.
Clean out the refrigerator, and check to see that the fridge and freezer are running at their optimal temperatures.
Make sure your dishwasher is in good working order. You can clean it easily with a dishwasher cleaner that you run through a cycle.
Pro tip: Sharp knives will make easy work of preparing the big meal. Make sure all your kitchen knives are newly sharpened, and also check the batteries in your electric carving knife, if you have one.
Make your space kid-friendly
If you make your home welcoming for children, you’ll ensure their parents have a great time as well.
If you happen to have kids that are the same ages as your young guests, you’re in luck. But if not, think about adding some considerate touches that will make parents more comfortable and alleviate kid boredom.
Here are some ideas to get you started:

Turn a spare room or an upstairs bedroom into a private nursing/changing area for a new mom.
Toddlers and younger children will want to be near their parents, so a good idea for them is to set up a corner of your living or dining room with toys, books, a tablet for watching cartoons and some comfy pillows or throws.
One of our favorite strategies for older kids is to turn the dessert course into an activity. For instance, you could bake a huge batch of sugar cookies in holiday shapes, and then put out different colors of icing to let kids (and adults) go to town with decorating their own cookies.

Pro tip: If you don’t have children, or if yours are older, don’t forget to kid-proof your space. Put away anything expensive, breakable or unstable. Do some baby-proofing, if necessary. This way you and the parents can relax and not have to worry about safety hazards.
Want more DIY tips? Watch more of See Jane Drill’s home improvement videos. 
Related:

Originally published November 2016.… Read More

1 2 3 4