Since it’s the day after a long weekend, we thought we’d repost a beloved post…Our EHD Reader DIY Backyard post. It’s full of amazing ideas in case you were “inspired” to take on your outdoor space after a weekend of hopefully being outdoors. So sit back and take in all of the DIY creativity:)
There really is something so special and inspiring seeing people take charge of their own homes and let their creativity flow. And since last year really showed us the importance of not only our homes but our outdoor spaces, a lot of people really made a concerted effort to maximize those spaces (even my own dad which you are about to see:)) So here are 22 spaces and projects to help inspire you to maybe get those hands a little dirty and create an outdoor space you can really enjoy this summer…and I promise you WILL be inspired. Let’s start with a project that anyone with a paintbrush and a dream could do…
Two Joyful And Modern Deck Murals
Ok, now Liz Kamarul is an incredible artist/designer. If you want more proof take a look at her Instagram. She also has a deep love for checkered patterns (we are the same in that way:)) #foreverchecked
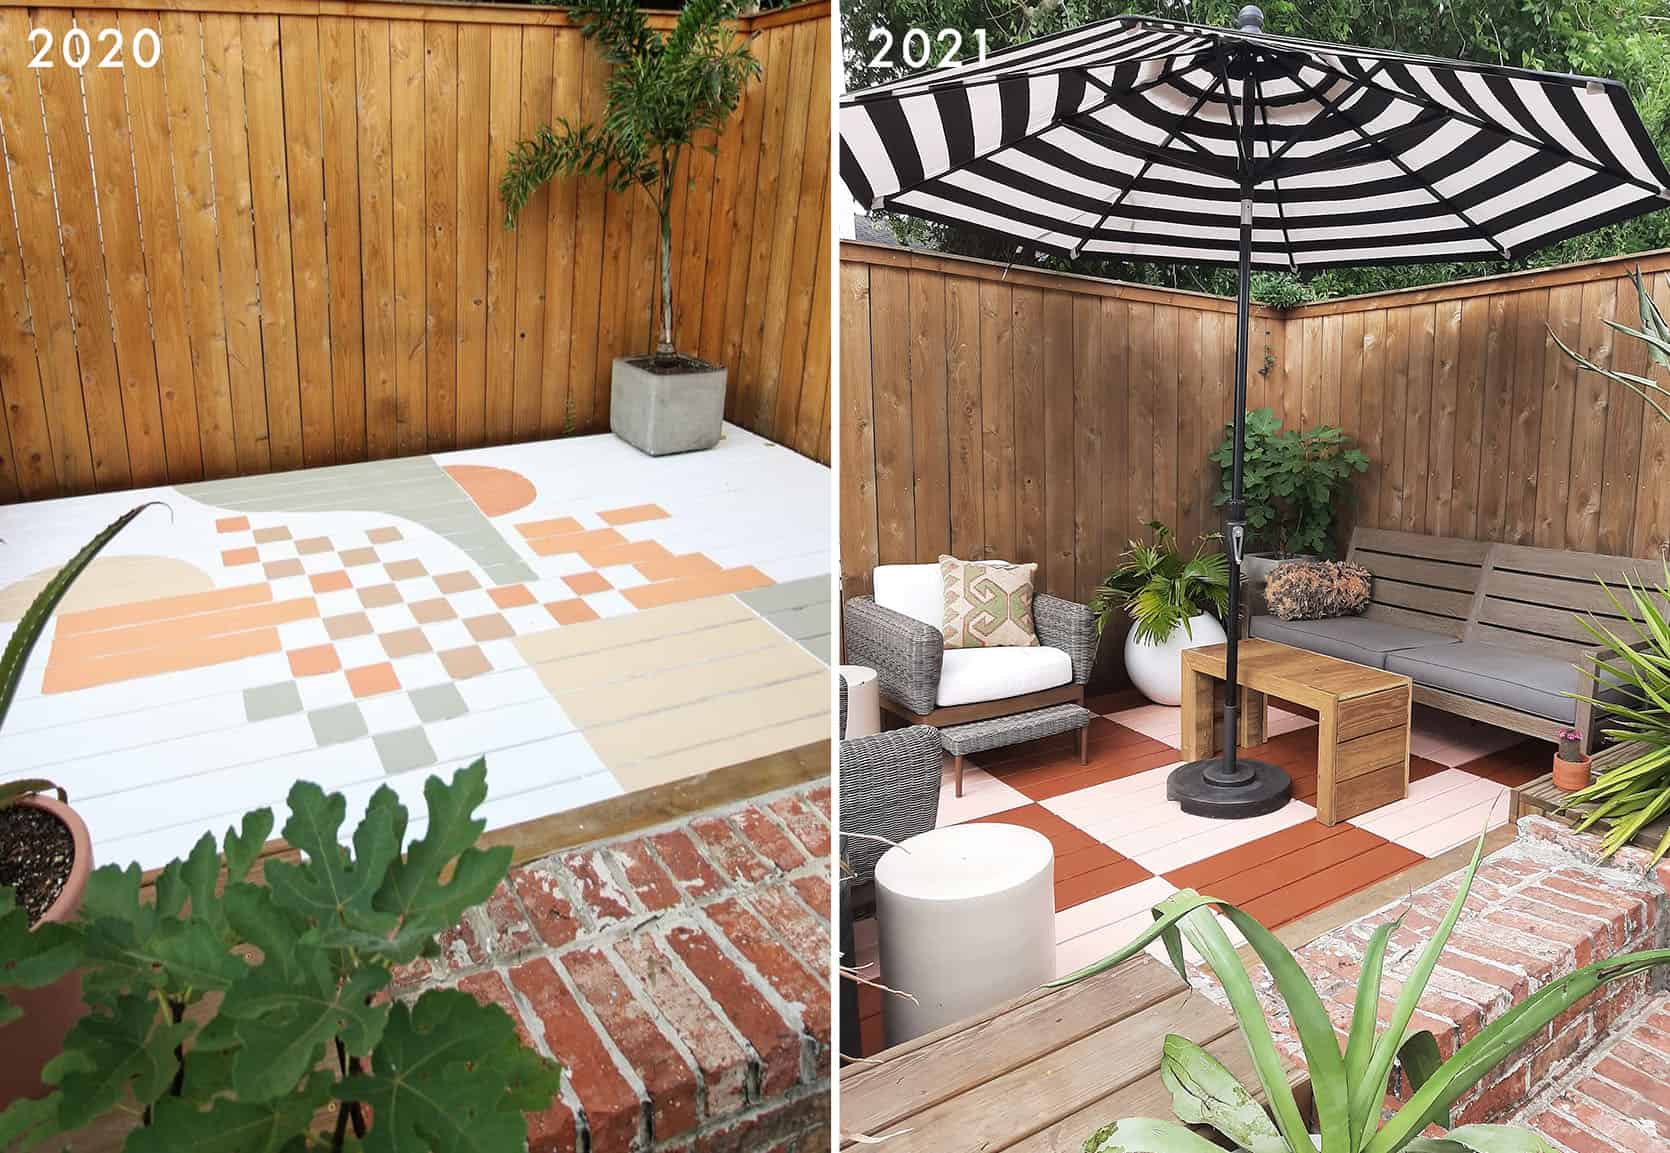
So in true Liz fashion, she decided to paint a mural last year on her wooden deck. She started with using two coats of paint and primer and then just let her mural evolve naturally (I’m extremely impressed as I would have absolutely needed a plan. But that’s clearly the difference between artist and non-artist). So if you love the design from last year that’s how she did it.
But this year Liz wanted to give her deck a fresh look and did this very cool checkered pattern in even cooler colors.
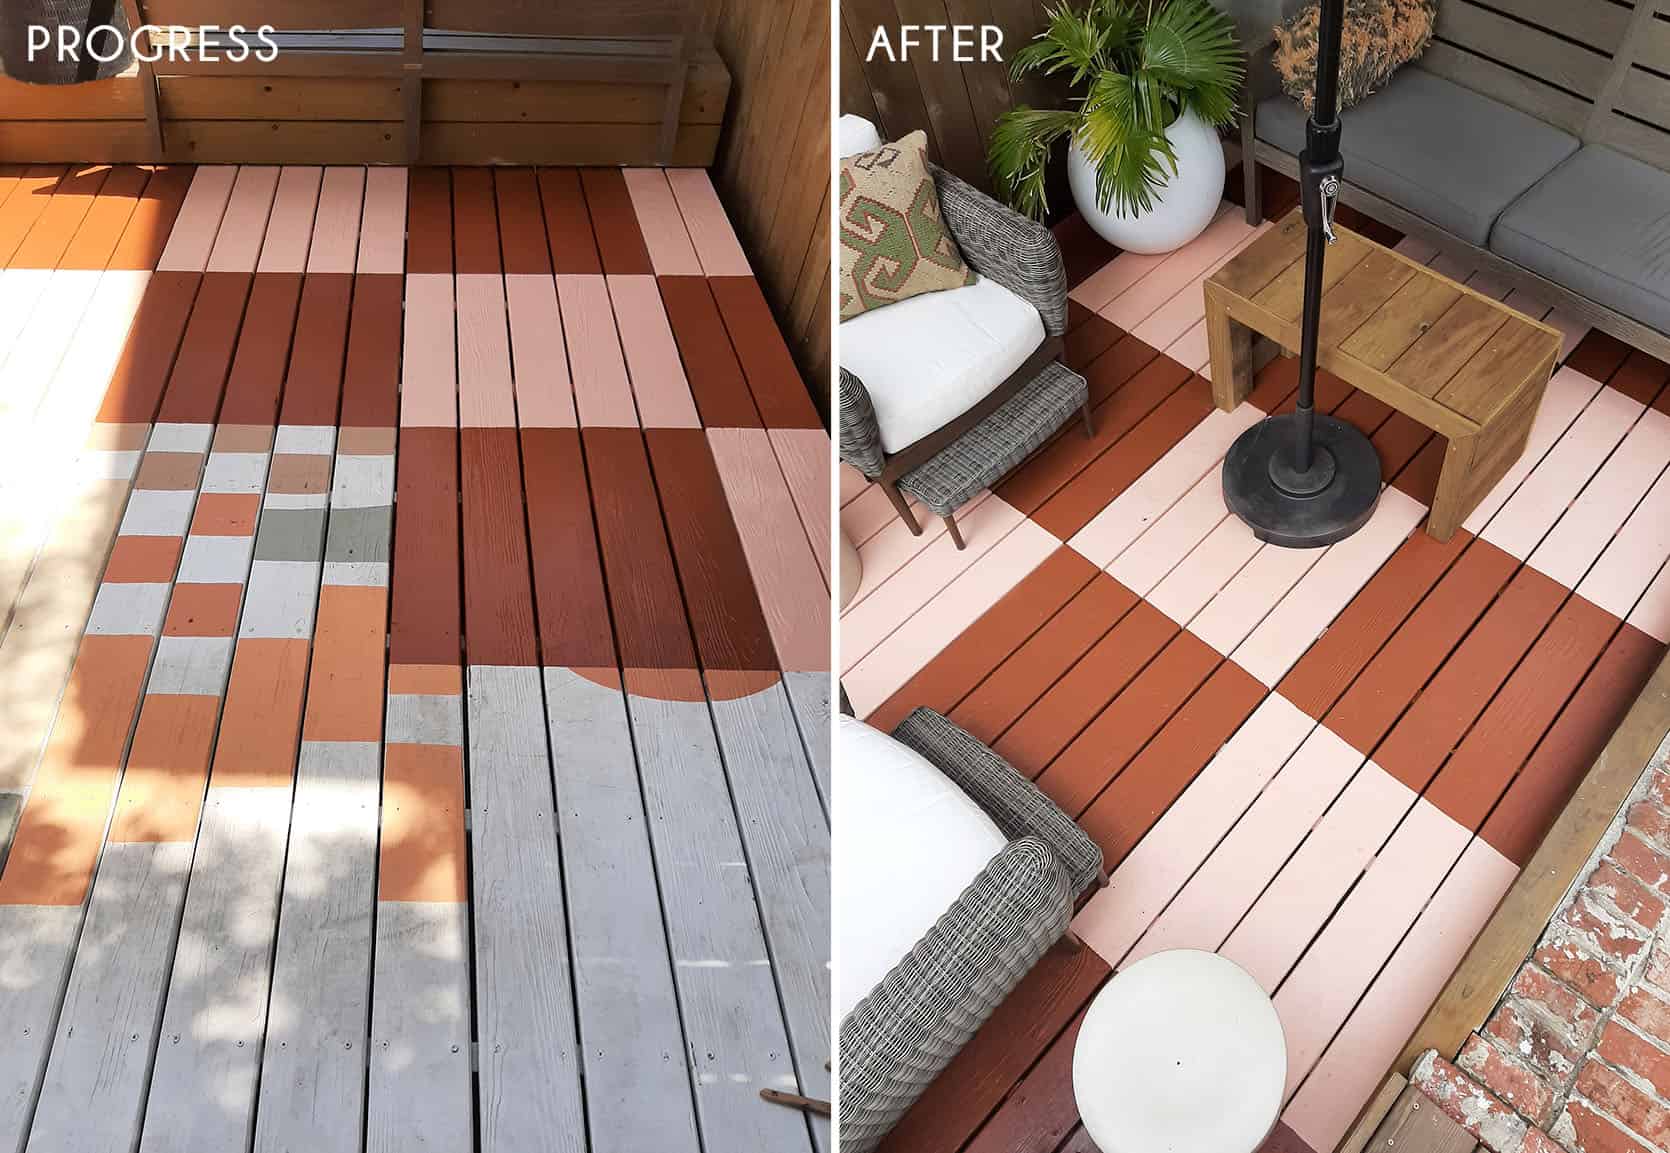
The lighter peachy color is Sunset Drive by Behr and the darker color is True Copper also by Behr. This pattern seems pretty user-friendly. So if you are wanting to do something cool/modern to your outside patio this may just be it! Here is a highlight on her Instagram that takes you through the journey with more tips.
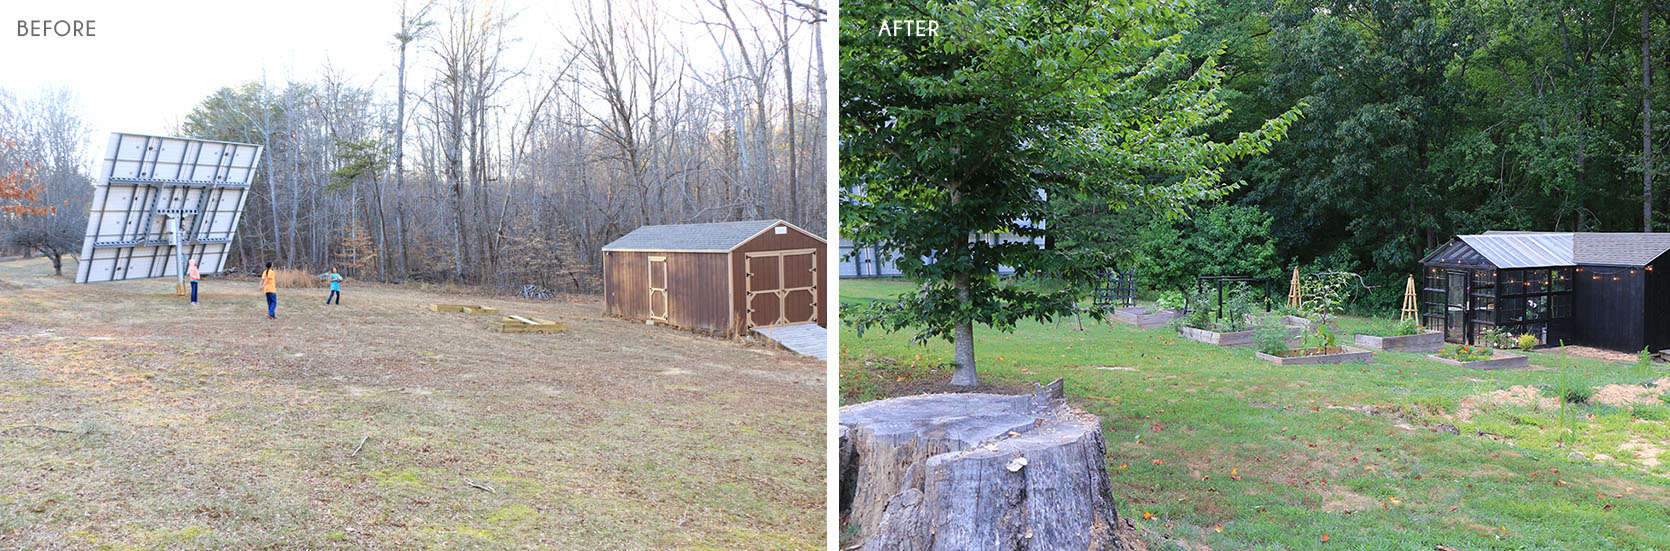
Now let’s take it up 5000 DIY notches and talk about Ursula’s Greenhouse…
The DIY Greenhouse We All Need Now
I also am in awe and cannot believe this project.
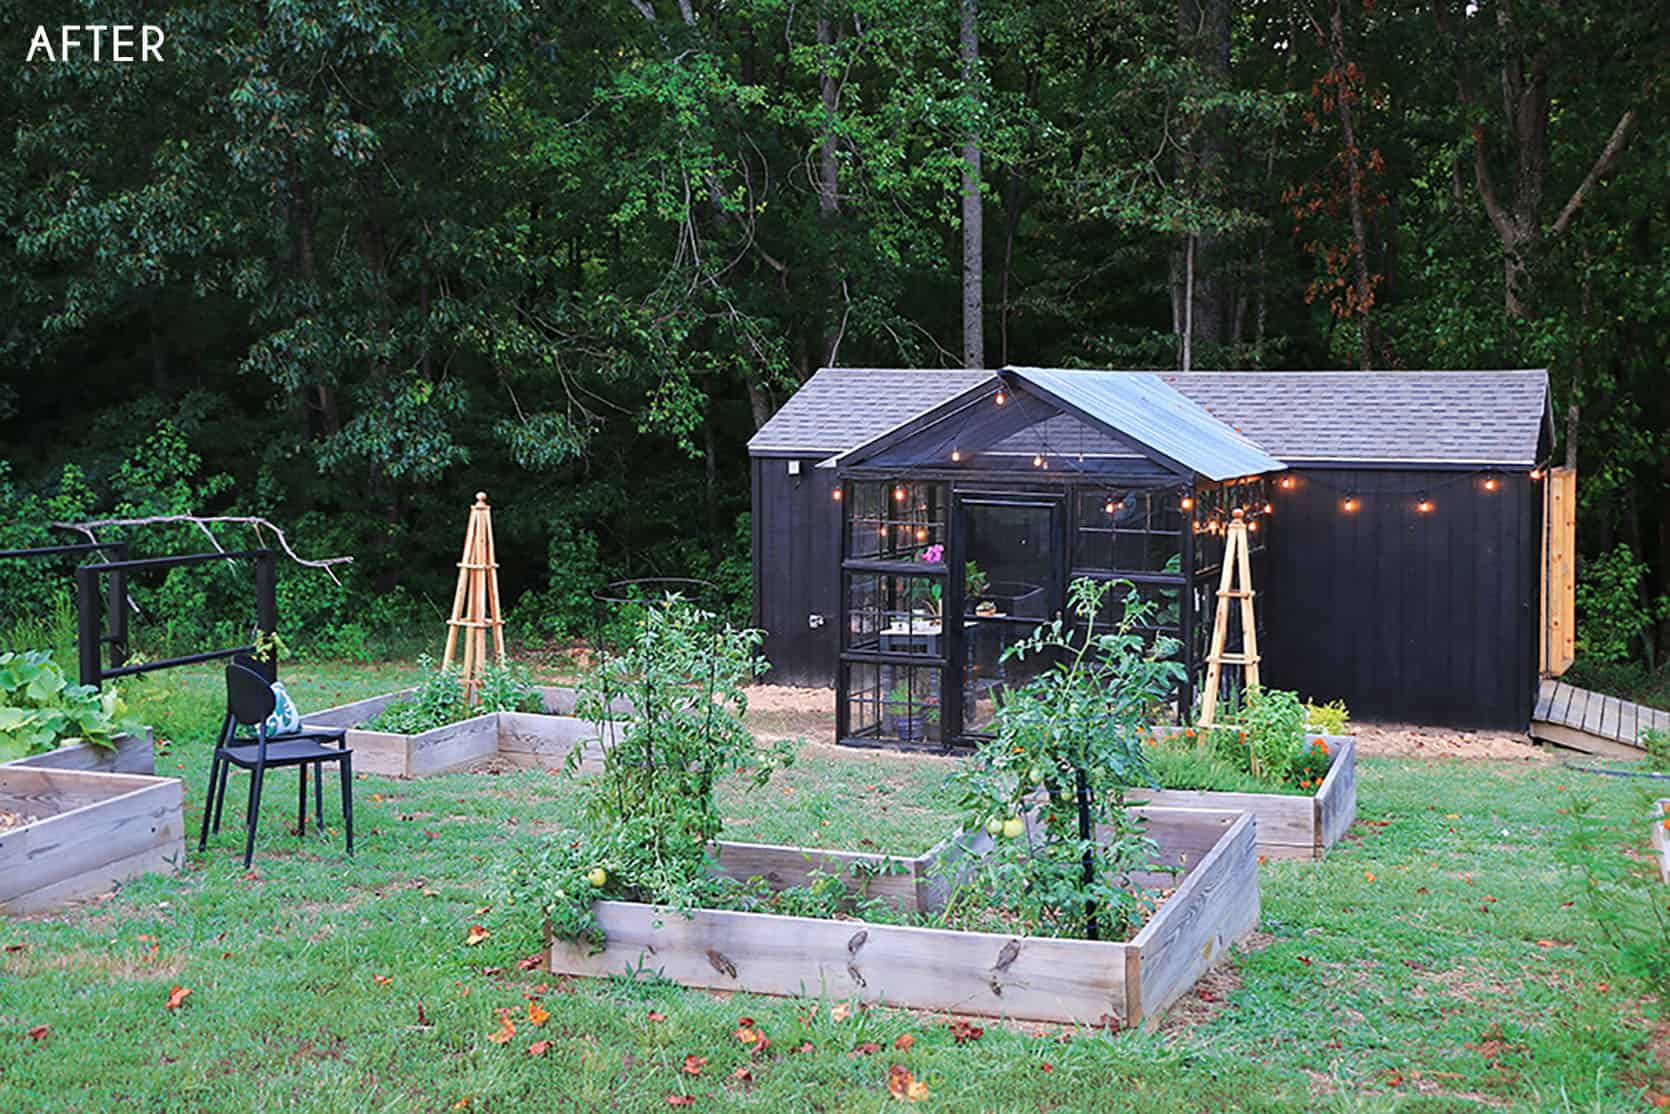
This is not a beginner DIY but if you are handy (or someone in your life is) you too could have a greenhouse like this one. Ursula has a detailed materials list here but for the cliff notes version, she painted her already great shed and then added this wonderful little greenhouse to it using recycled windows to keep the budget manageable. So for about $1000 Ursula was able to make this little slice of heaven!
How great is this before and after?!
If you aren’t quite at DIY greenhouse level, she has A TON of smaller projects that are much more beginner-friendly like this DIY Copper Obelisk Trellis or this Garbage Can Privacy Screen.
The Cutest Vintage Salt Bath
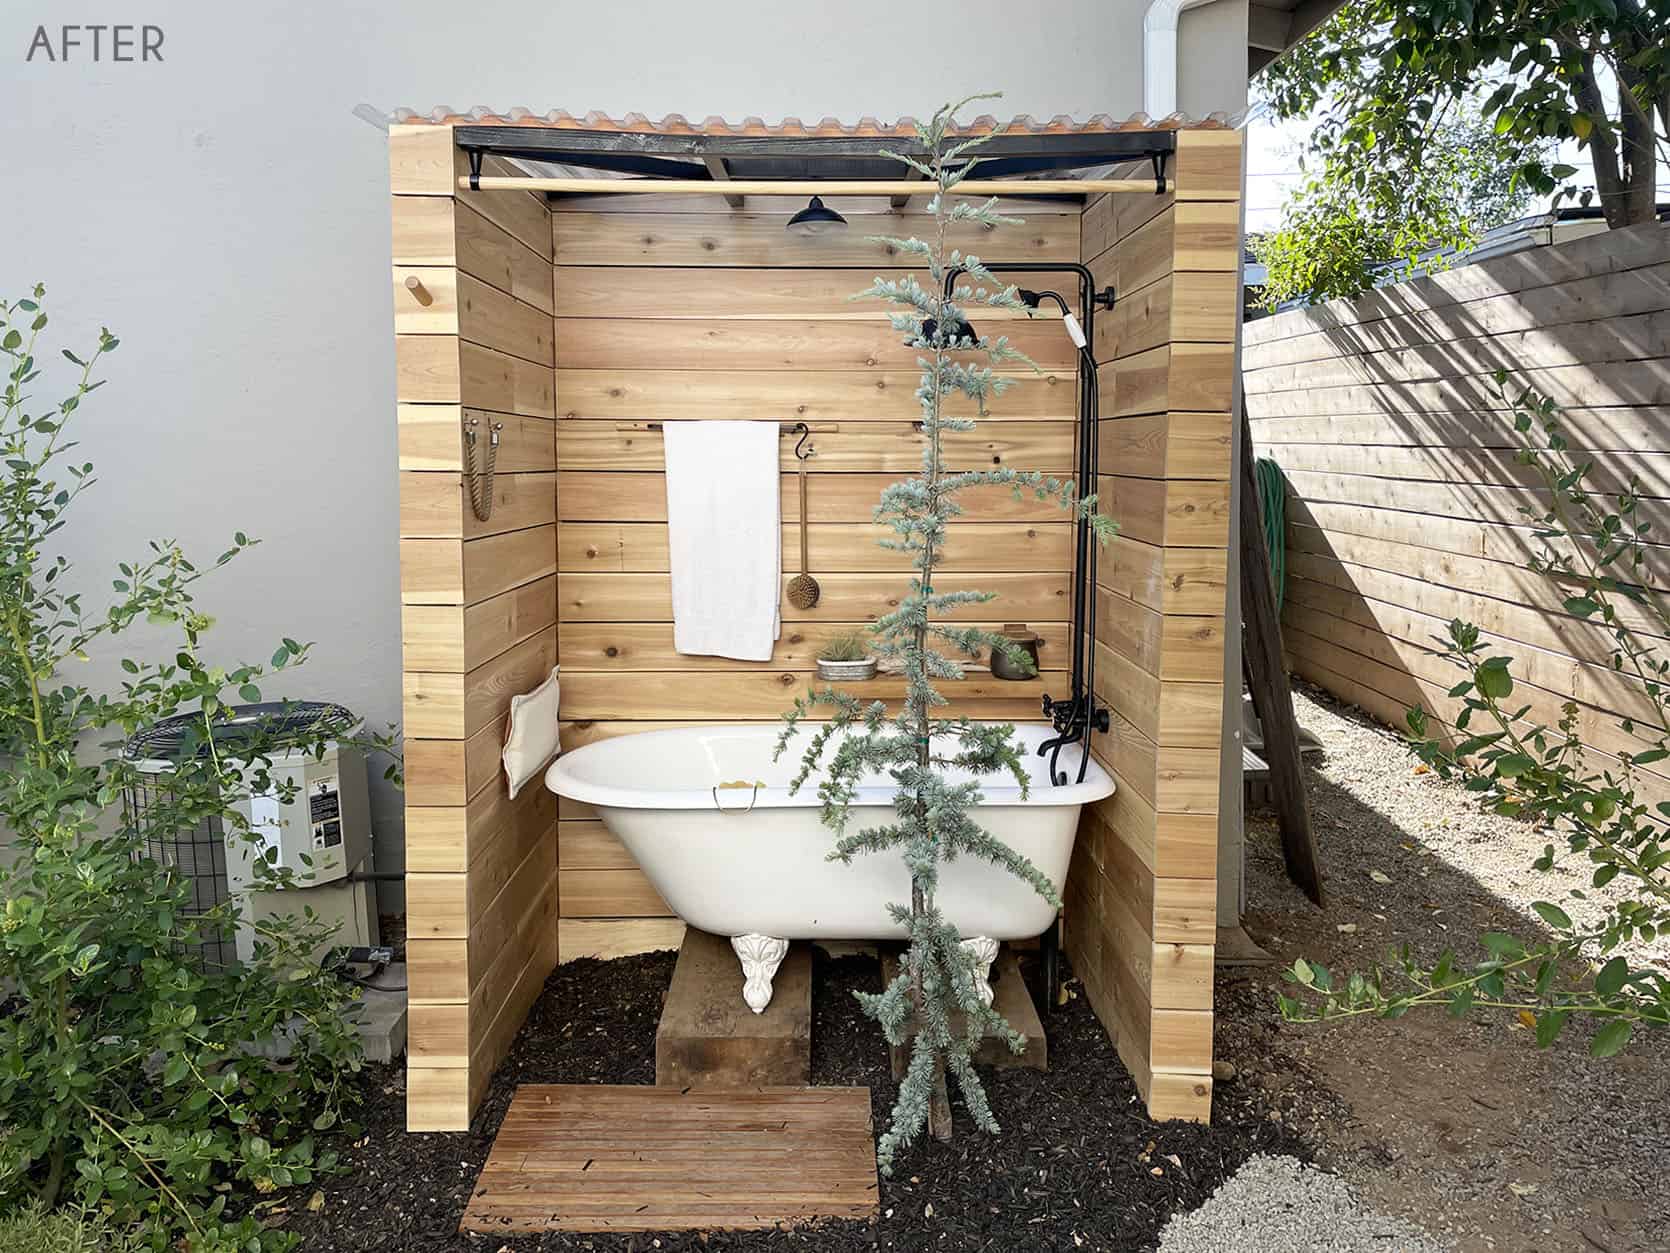
As I was writing this post, I remembered that my dad literally just finished a VERY cool DIY project and really wanted to share. He didn’t say it but I could tell he was excited that he was going to be featured:) So here is his new, totally DIY’ed Salt Bath and Shower:
Shower Fixture | Solar Pendant Light
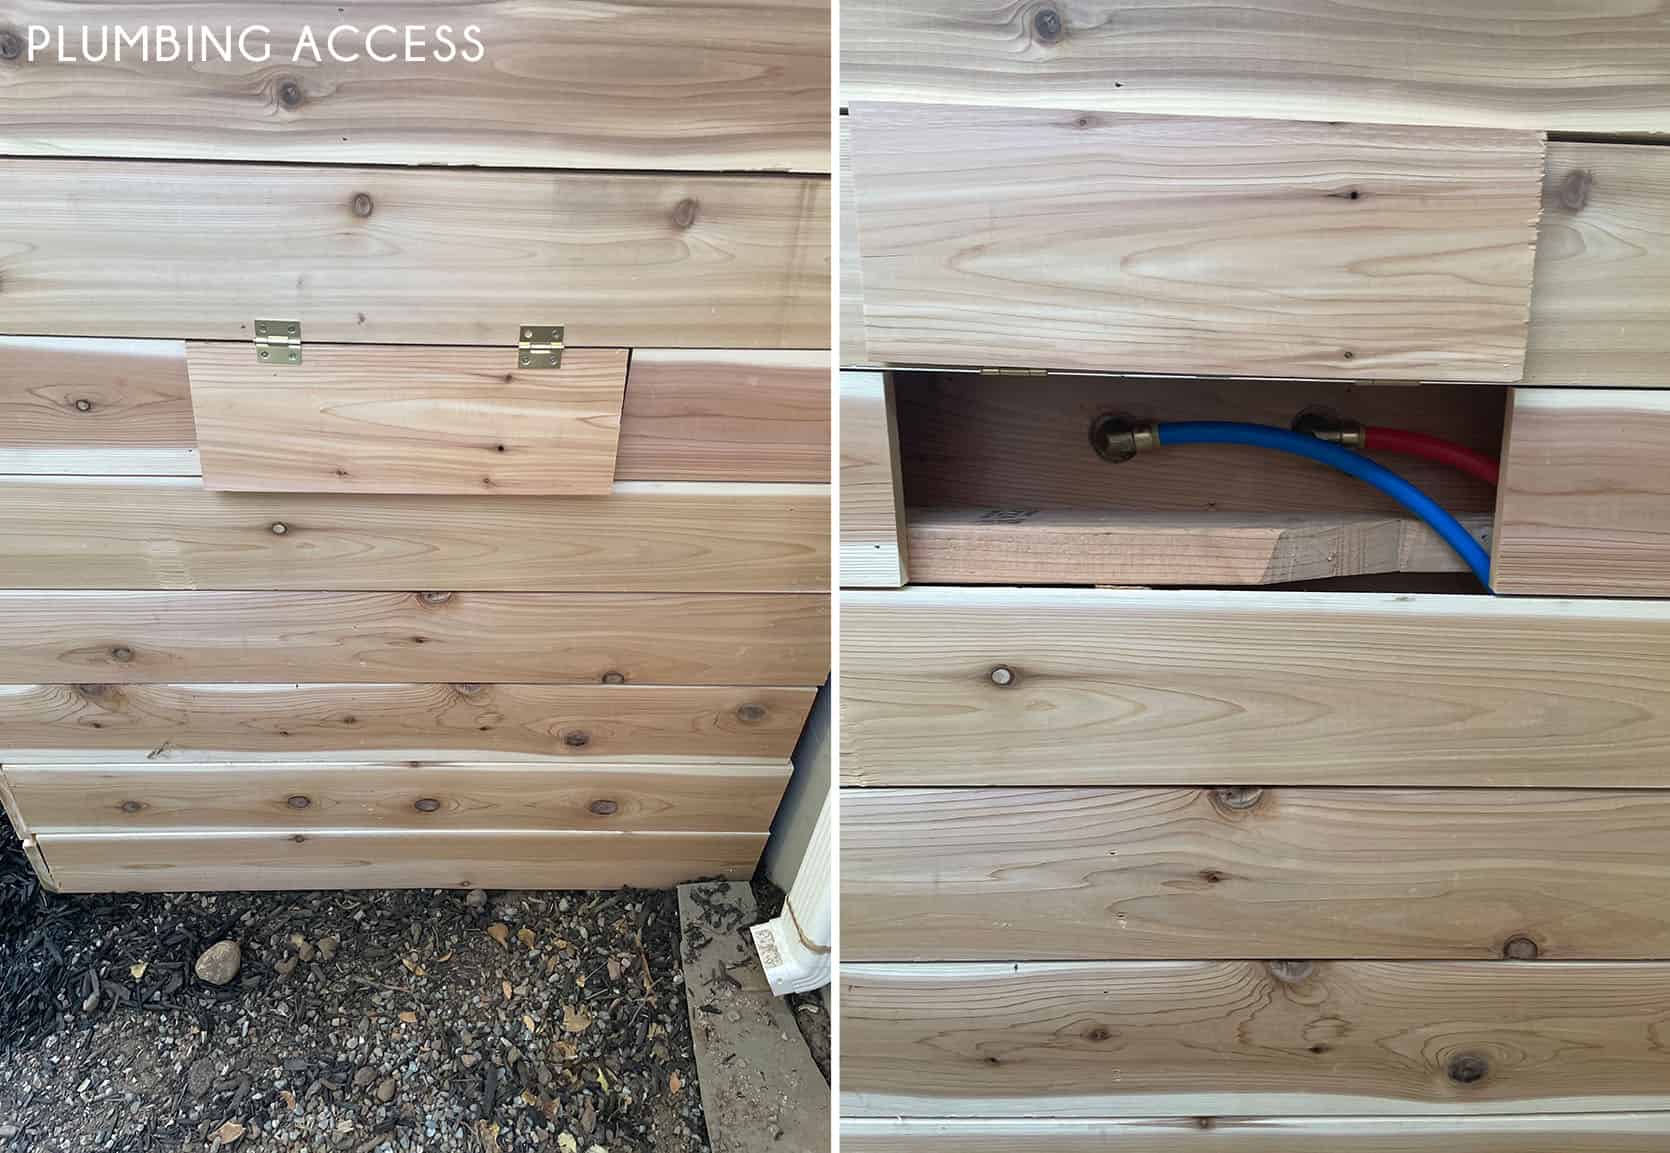
“So my neighbor was getting rid of her clawfoot tub. I thought it might make a nice outdoor bath at my place so I bought it from her ($200 a steal). I figured a good spot was across from my guest quarters in the backyard (which I just finished) because I had access to hot and cold water. My girlfriend likes to take salt baths so I figured it would be used plenty. I thought I could just drain it with a garden hose but as fate would have it I was very close to my sewer line. After a little digging, there she was. What luck. I have never tapped into a sewer line before. When I did I was promptly made aware of the definition of the term “fecal gravity”, yikes! I would suggest hiring a plumber for that particular chore if you want to connect to your sewer line. It was not pleasant and once you cut into it you are at the point of no return. I will save you (and me) the graphic details of that day. (I am forever scarred). Anyway, as you can see all is well that ends well. I raised it off the ground on a huge piece of lumber I’ve been lugging around forever. It gives it character. The teak floor mat warms it up a little. I also made a floating shelf out of a piece of alder wood I had laying around. I am quite pleased with the outcome. It took me about three days to complete. The most expensive part was the cedar enclosure. The price of lumber has skyrocketed. I was shocked. What would have cost $500 last year was $1000. Yikes, again. That’s life I guess but painful. Now for a hot outdoor bath. Woo hoo!”
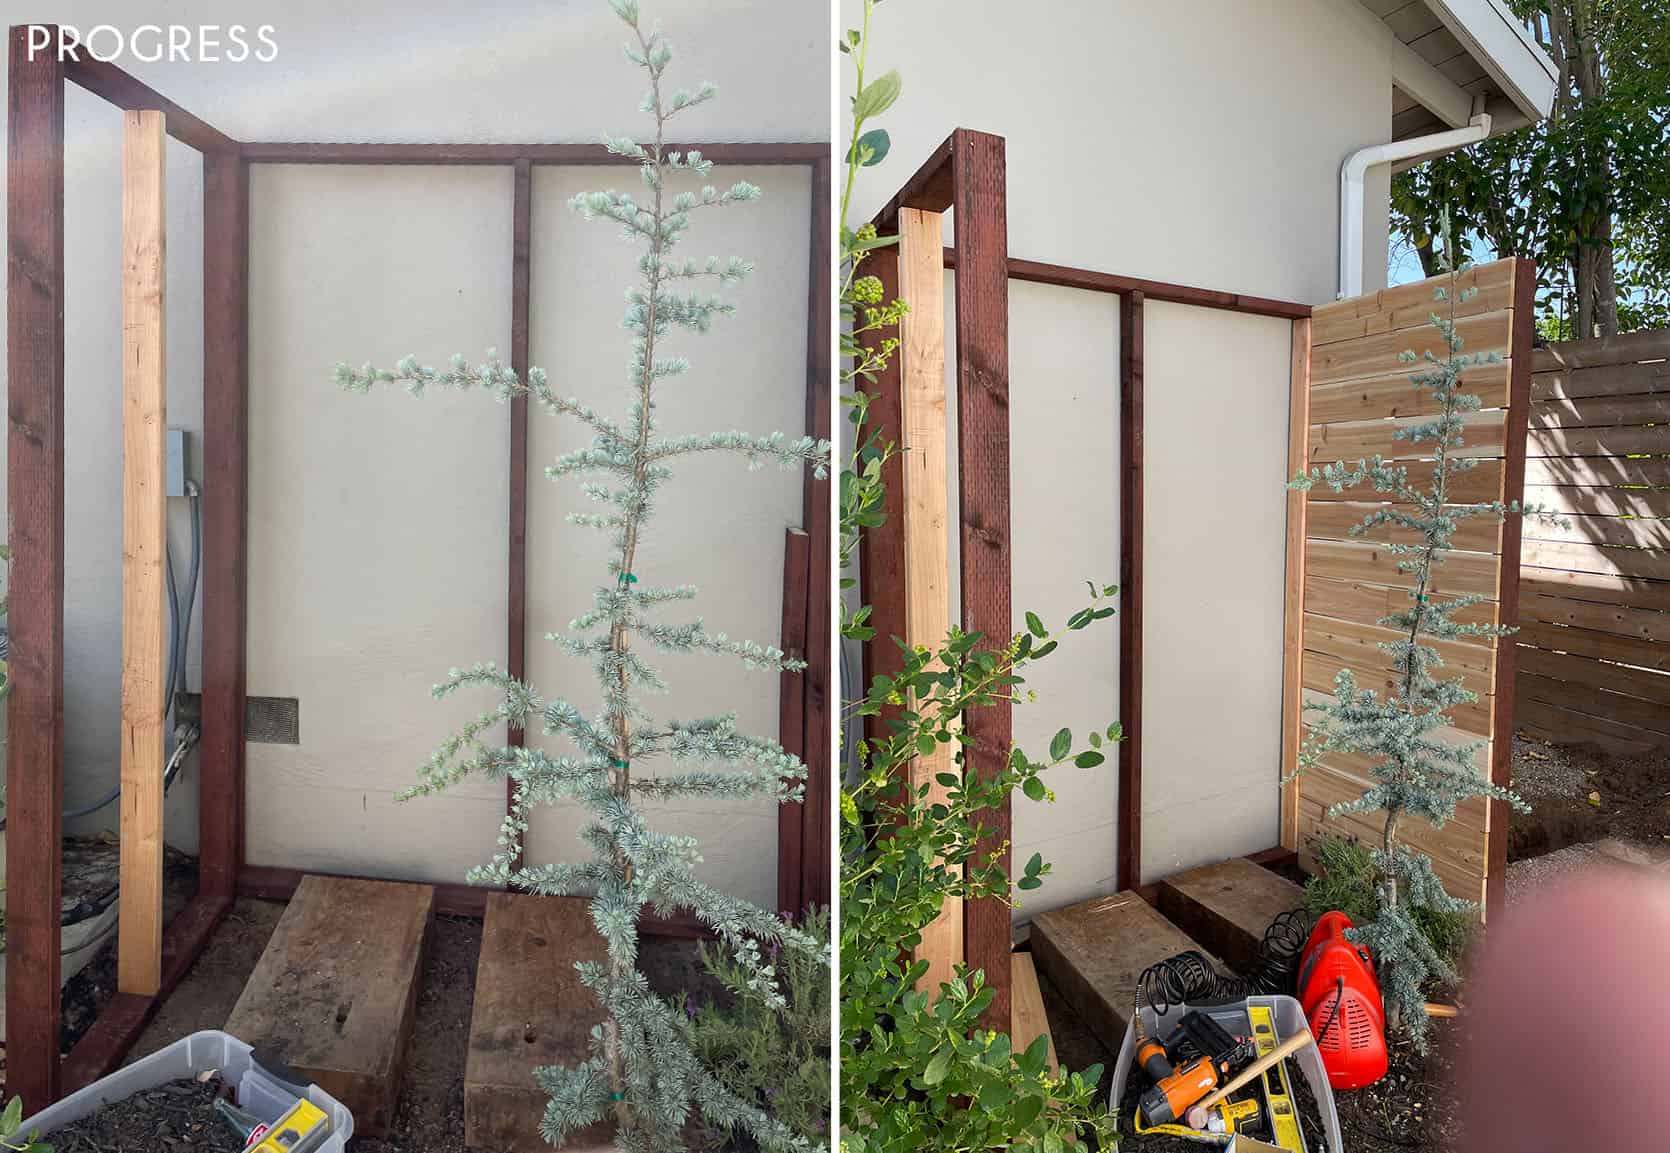
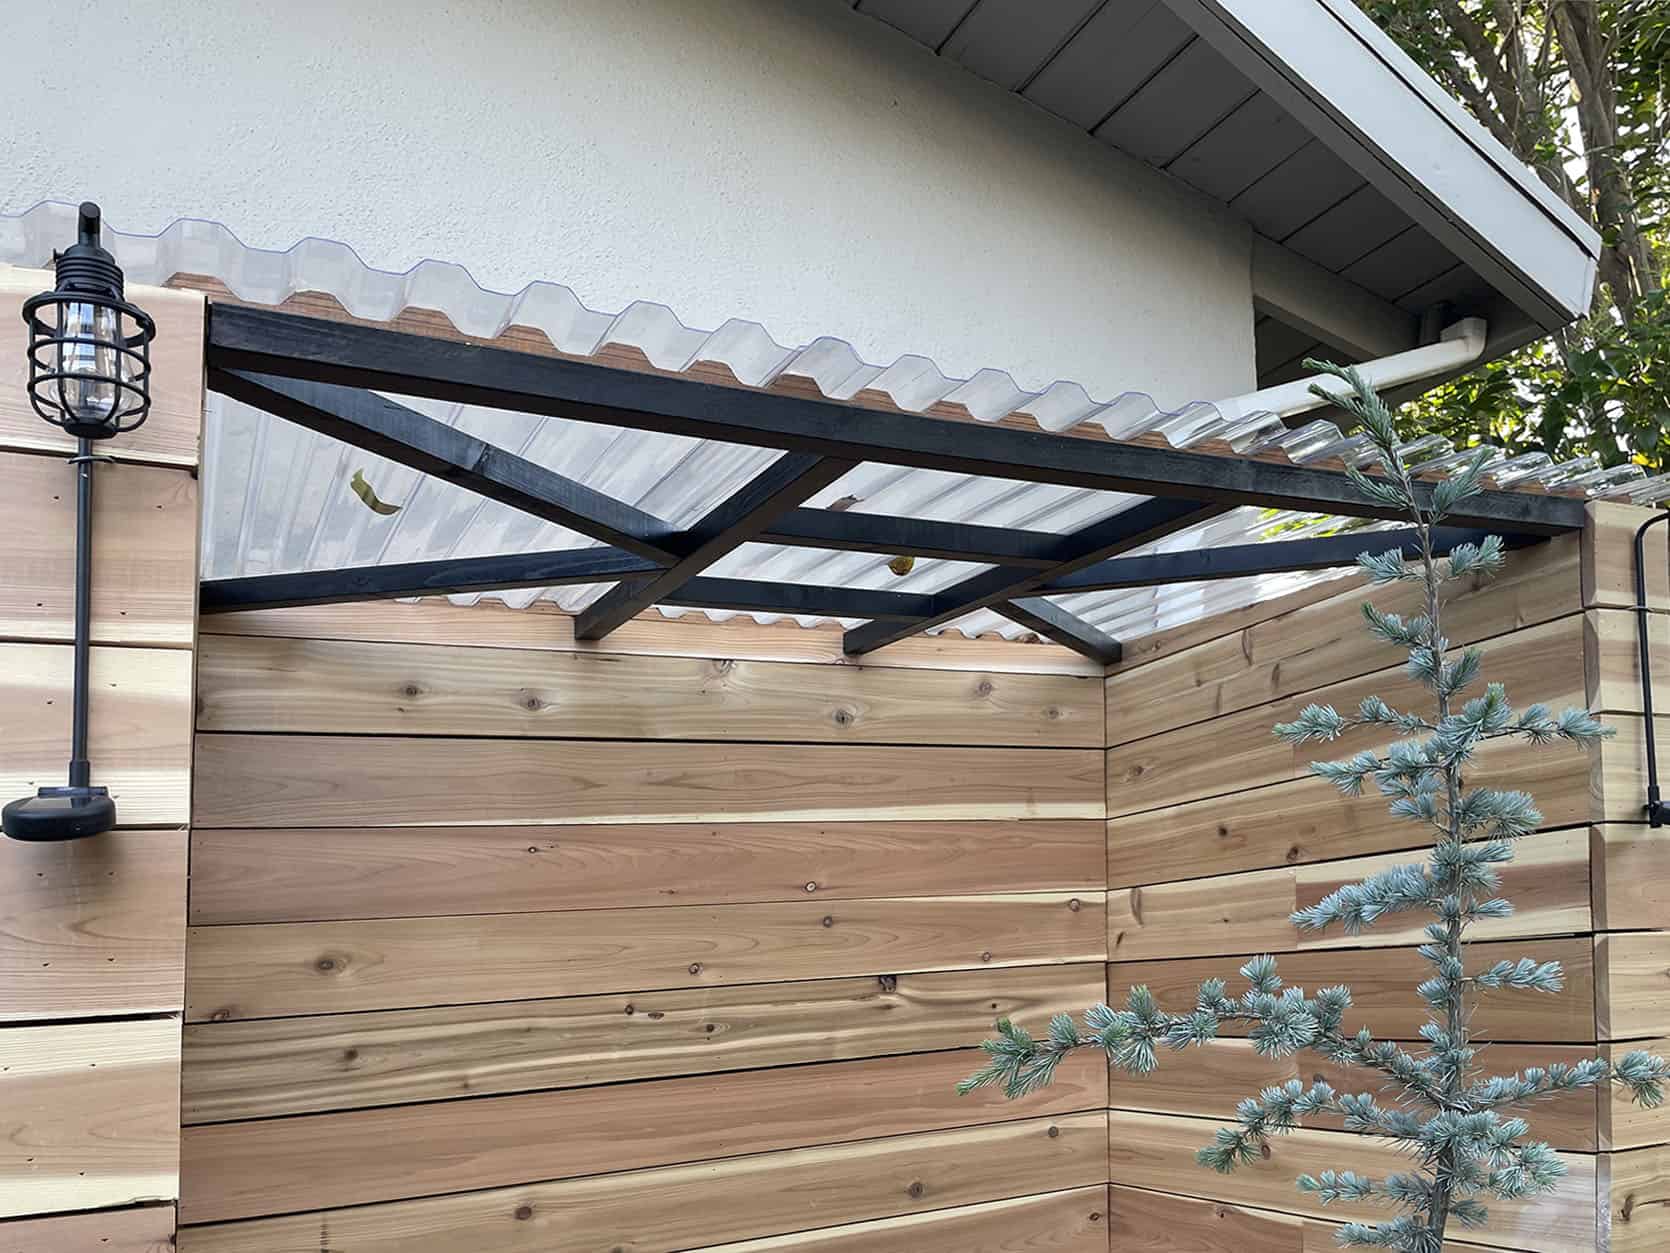
To get a little more technical, the sides were made like boxes to be both pretty and hide the plumbing on the shower side (he made sure to make a little trap door so he could get to the plumbing. Then for the roof, he used clear corrugated plastic that’s being supported by his cool wooden geometric design. Also, the rest of the decorative pieces were all picked out by his girlfriend. I think it turned out so great and I’m so proud of him! (P.S. I never knew about his sewage issue… YIKES is right and major palm to face, dad)
Ok, now get ready for some real DIY magic…
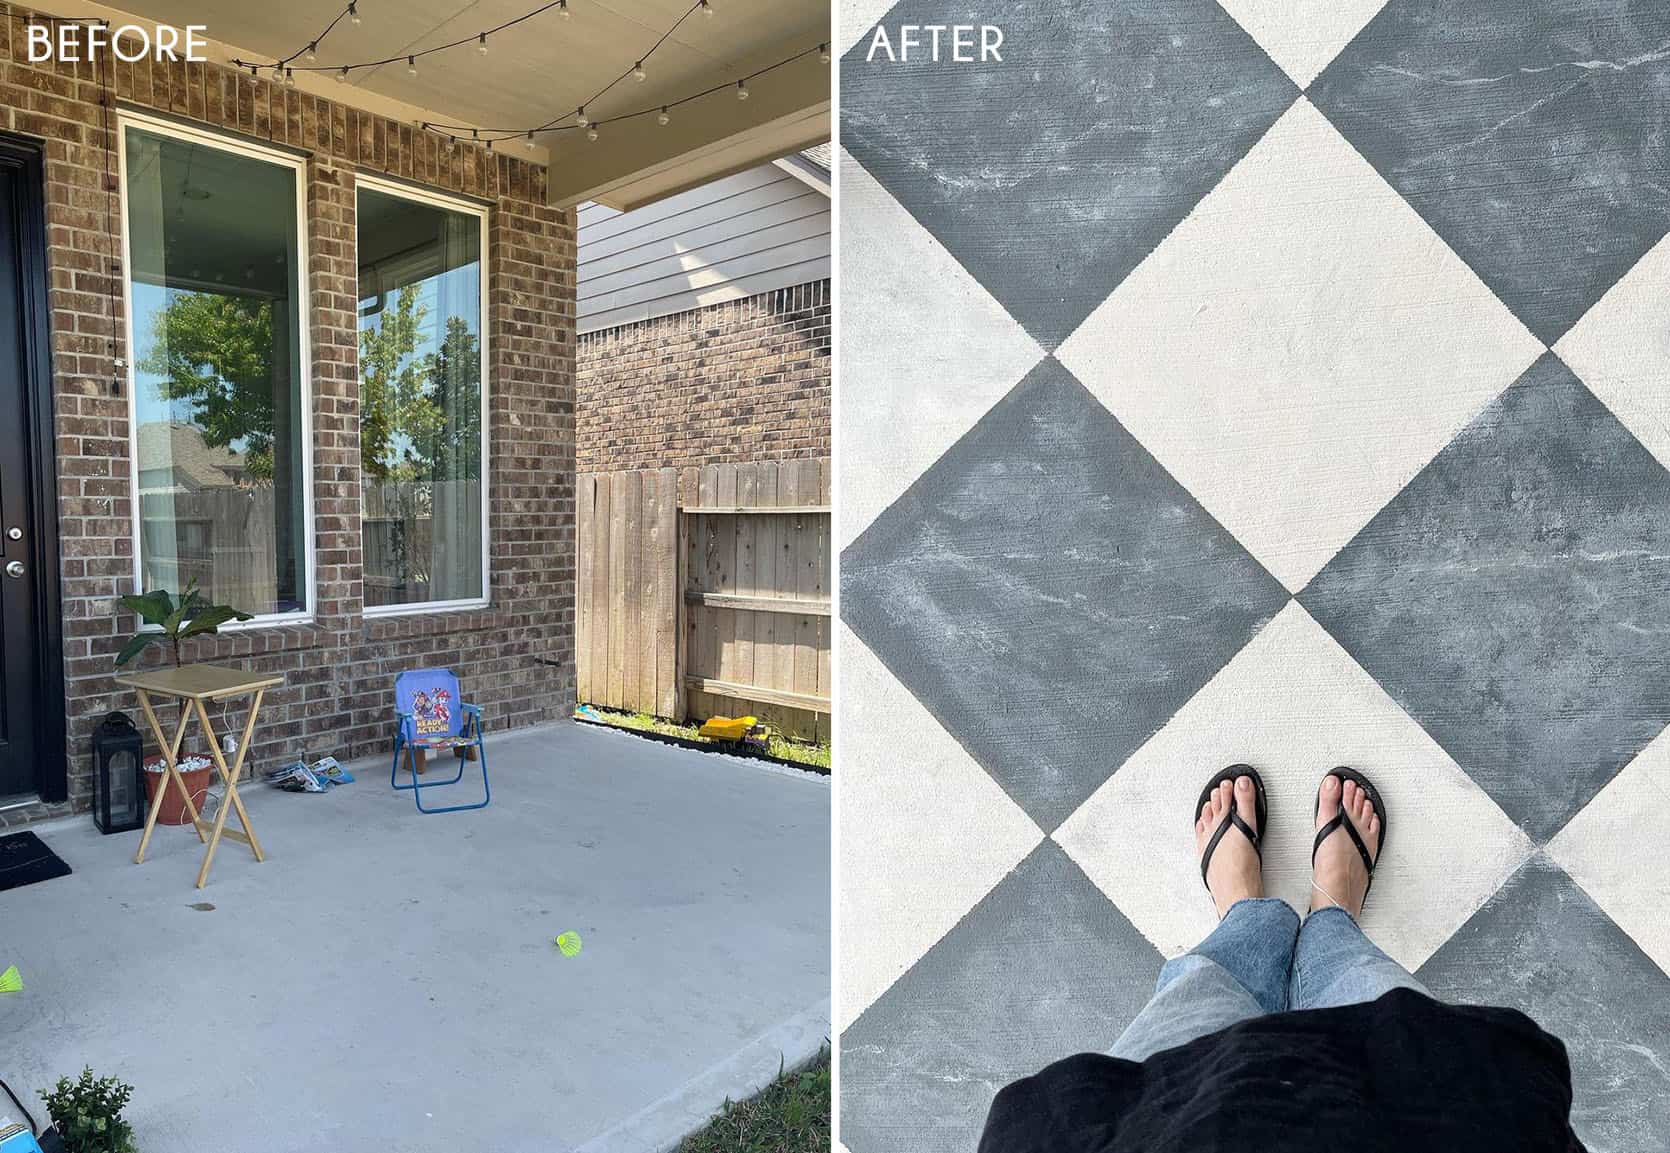
A Totally Classic “Marble” Patio Floor
Nope, that is NOT real marble on Fariha Nasir’s patio!
This very talented DIYer handpainted this faux marbled flooring and I think it looks so awesome. Large scale diamond floors are never “out” as they are completely classic, but they sure are “IN” this year and it’s all about them being painted.
If you go to this highlight on her Instagram, she walks you through the main steps:
- Rent a pressure washer
- Use a concrete primer
- Paint with exterior paint (Aged Beige from Behr)
- Stencil pattern
- Paint diamond pattern with Binary Star from Behr (also exterior paint)
- Marble it up!
- Finish by sealing the paint with polycrylic.
I asked Fahira if she could give us all tips on how she got her awesome marbled look and she delivered:
1. To get the marbling effect you will need to mix a few different shades of the paint colors you’re working with. The first two shades will be the paint straight out of the can (the base colors of the checkered tiles). For your third shade (dark 2), mix 1 part of the light color with 2 parts of the dark. For your fourth shade (light 2), mix 1 part of the dark with 2 parts of the light color. Now you have four different shades to work with.
2. Use a natural sponge and dip into your Dark 2, wipe off excess, and dab onto the dark tile, going in a 45-degree angle across the tile to mimic the natural veining of marble. Make sure to not cover the entire tile with this color but leave some areas empty.
3. Come back in with the dark tone straight out of the can and blend in the edges so the edges aren’t defined.
4. Use a thin paintbrush to take some light 2 and with a light hand draw veins going in the same direction as before. Use a reference image of an actual marble tile for reference. Another tip is to use a turkey feather for the veining part – it makes very natural lines
5. Soften edges if needed with the base color and repeat the process for the other tiles. Remember to use the lighter tones for the light tile and the darker ones for the dark ones.
6. To create some highlights or lighter areas in the dark tiles you can use a tiny bit of the light paint to create some contrast.
Thank you, Fahira! She also has a marbling highlight too if you are a visual learner:) O and check out the rest of her backyard here!
A Stunning (User-Friendly) Pergola
Now…this incredible pergola!
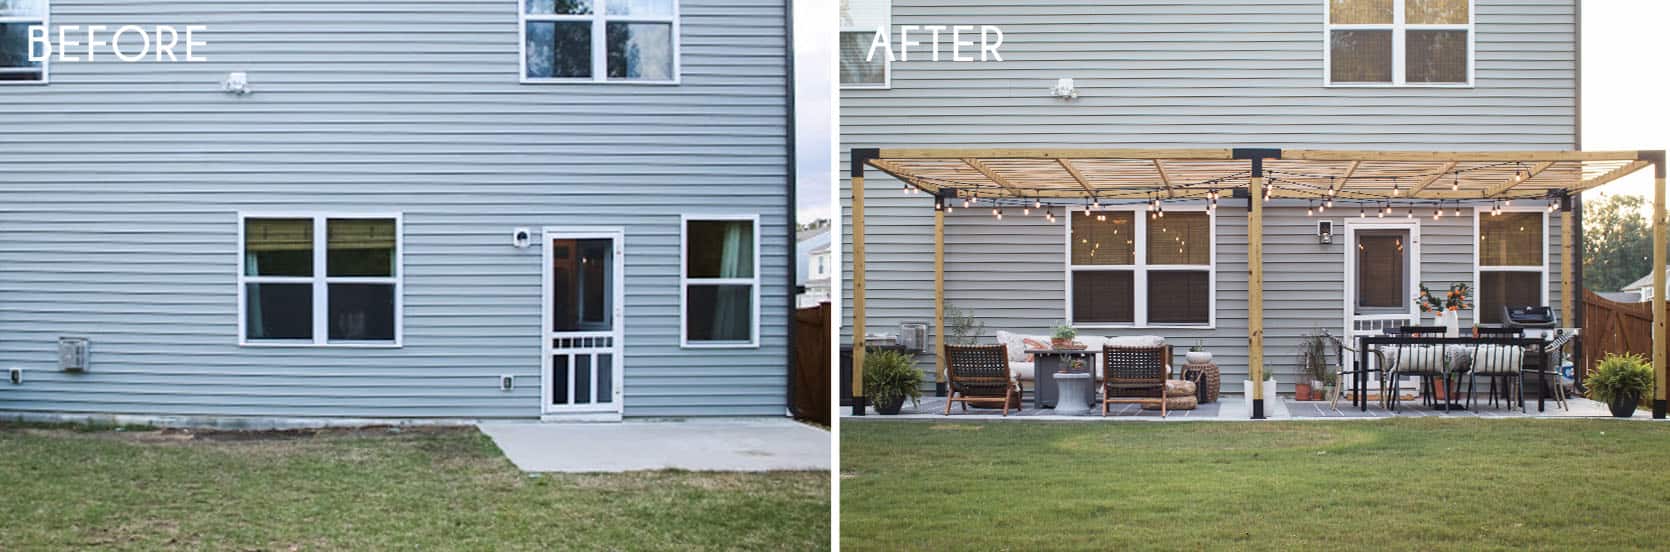
Last summer, Tiffany of Pretty Real, decided it was time to tackle her backyard and create a dream lounge/entertaining area. She started with extending her concrete slab (the more budget-friendly option to a floating deck at $2,500) to fit her soon to be DIY’d awesome pergola. The idea of building a pergola has always been intimidating to me. I mean what if it came crashing down because I didn’t support it correctly?! Luckily Tiffany found Toja Grid. It’s a company that sells those black brackets you see above. This way you can confidently DIY a pergola without any fear of it “unexpectedly falling down.” Tiffany wrote a whole post on it here but the dollar breakdown was around $800 for the Toja Grid hardware and about $300 for the lumber. So for $1,100, her whole family can enjoy endless summer nights in their backyard under that pretty epic pergola.

Two updates in one post? Yep! Tiffany said that staining the pergola black was always the plan but you know… life happened so they waited a year to finish their project. Both versions look great but I LOVE the black stained version. If you are thinking about staining your current pergola for a needed facelift or plan on DIYing one after seeing this, here is the stain she used. However, if you want some more info check out her post about the whole process here. Also yesterday Tiffany wrote a post about her DIY outdoor movie theatre (What can’t this pergola do?)
The Perfect Sunroom
Now let’s head inside, we’re just dipping our toes into “outdoor” but it’s actually a sunroom because that’s kinda outside, right?
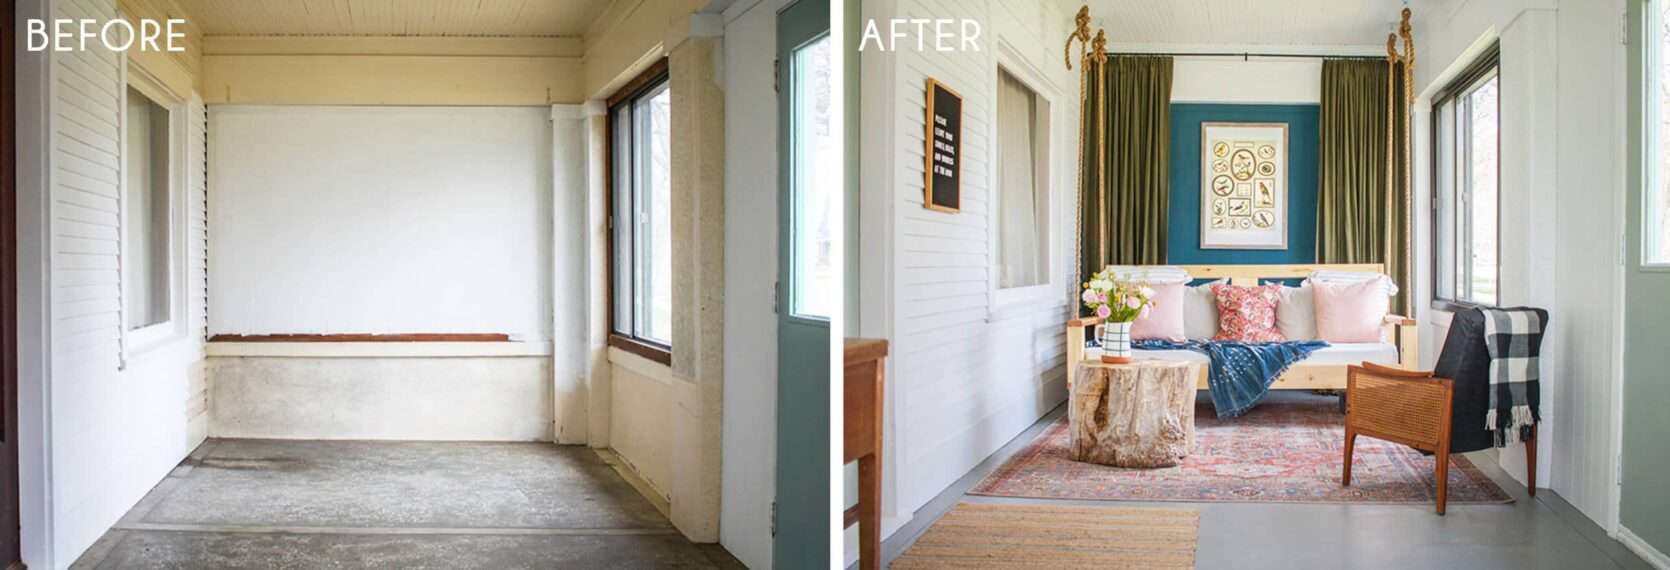
Fun fact, we actually have already showcased Avery’s handwork in the DIY kitchen post where she transformed her kitchen for $250. But when she heard about our DIY outdoor space callout, she emailed us this room and it was too good to pass up. We play by our own rules and definitions here. This awesome transformation took six weeks and cost $650 (minus the rug and curtain dye). She first painted the space with Sherwin Williams’ Extra White, the accent wall with Aubusson Blue from Annie Sloan and the floors with gray epoxy paint. She then, with the help of her brother-in-law, built a bed swing, transformed free tree stumps into coffee tables, and then made custom olive drapes by dying basic white IKEA curtains. For the rest of the pieces, she either owned them or thrifted. My biggest question to her was how did she feel secure about the swing and her advice was to just make sure that “you screw your eye hooks into ceiling joists.” Noted for the future. It looks awesome and if you want more info go here and for the swing DIY go here.
Shall we officially head outside again?
Stenciled Concrete (YES it’s painted)
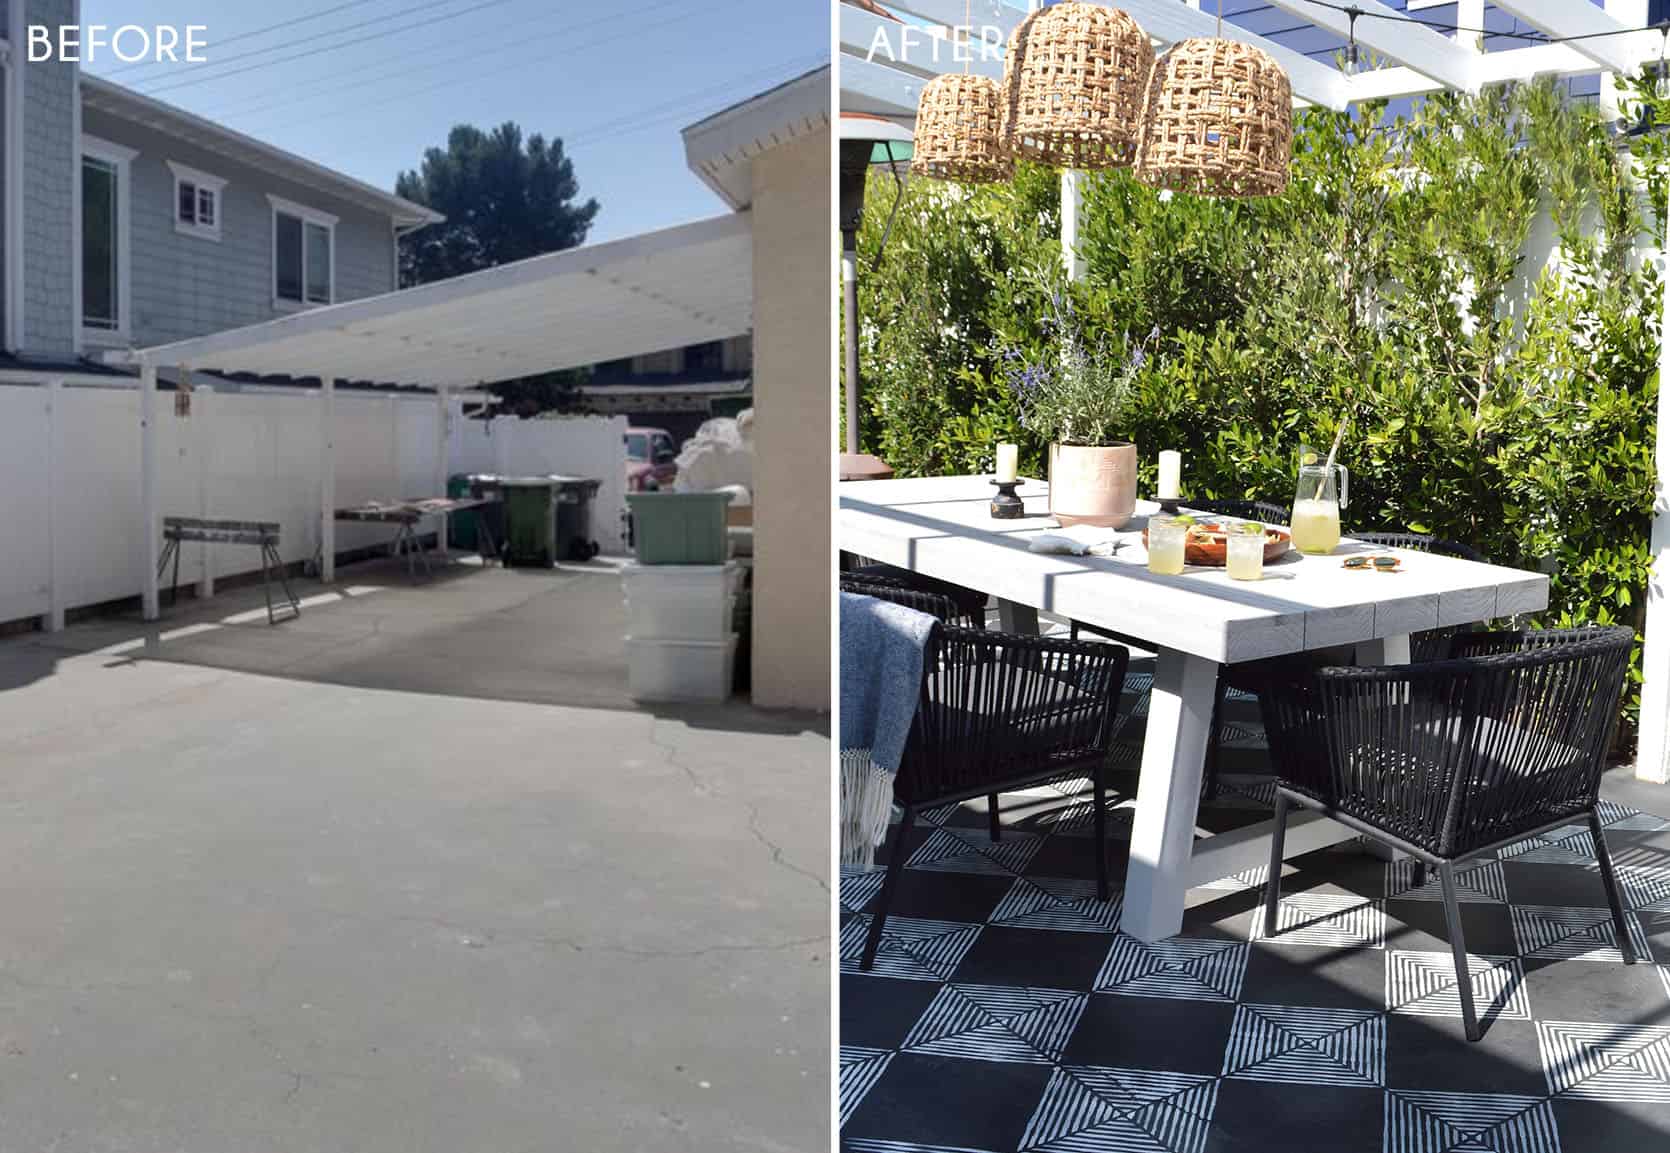
I mean this entire transformation is insane but likely the most impressive part of Kristin’s outdoor space is her DIY concrete stencil. Y’all (I’m stealing “y’all” from Caitlin:)) the total cost was $90. Yes, your eyes don’t deceive you! So for under $100 you too could make your bland gray concrete into something so fun and special. Kristin has a whole highlight on her Instagram for you to look at and learn all of her tips and tricks.
The Gravel Marvel
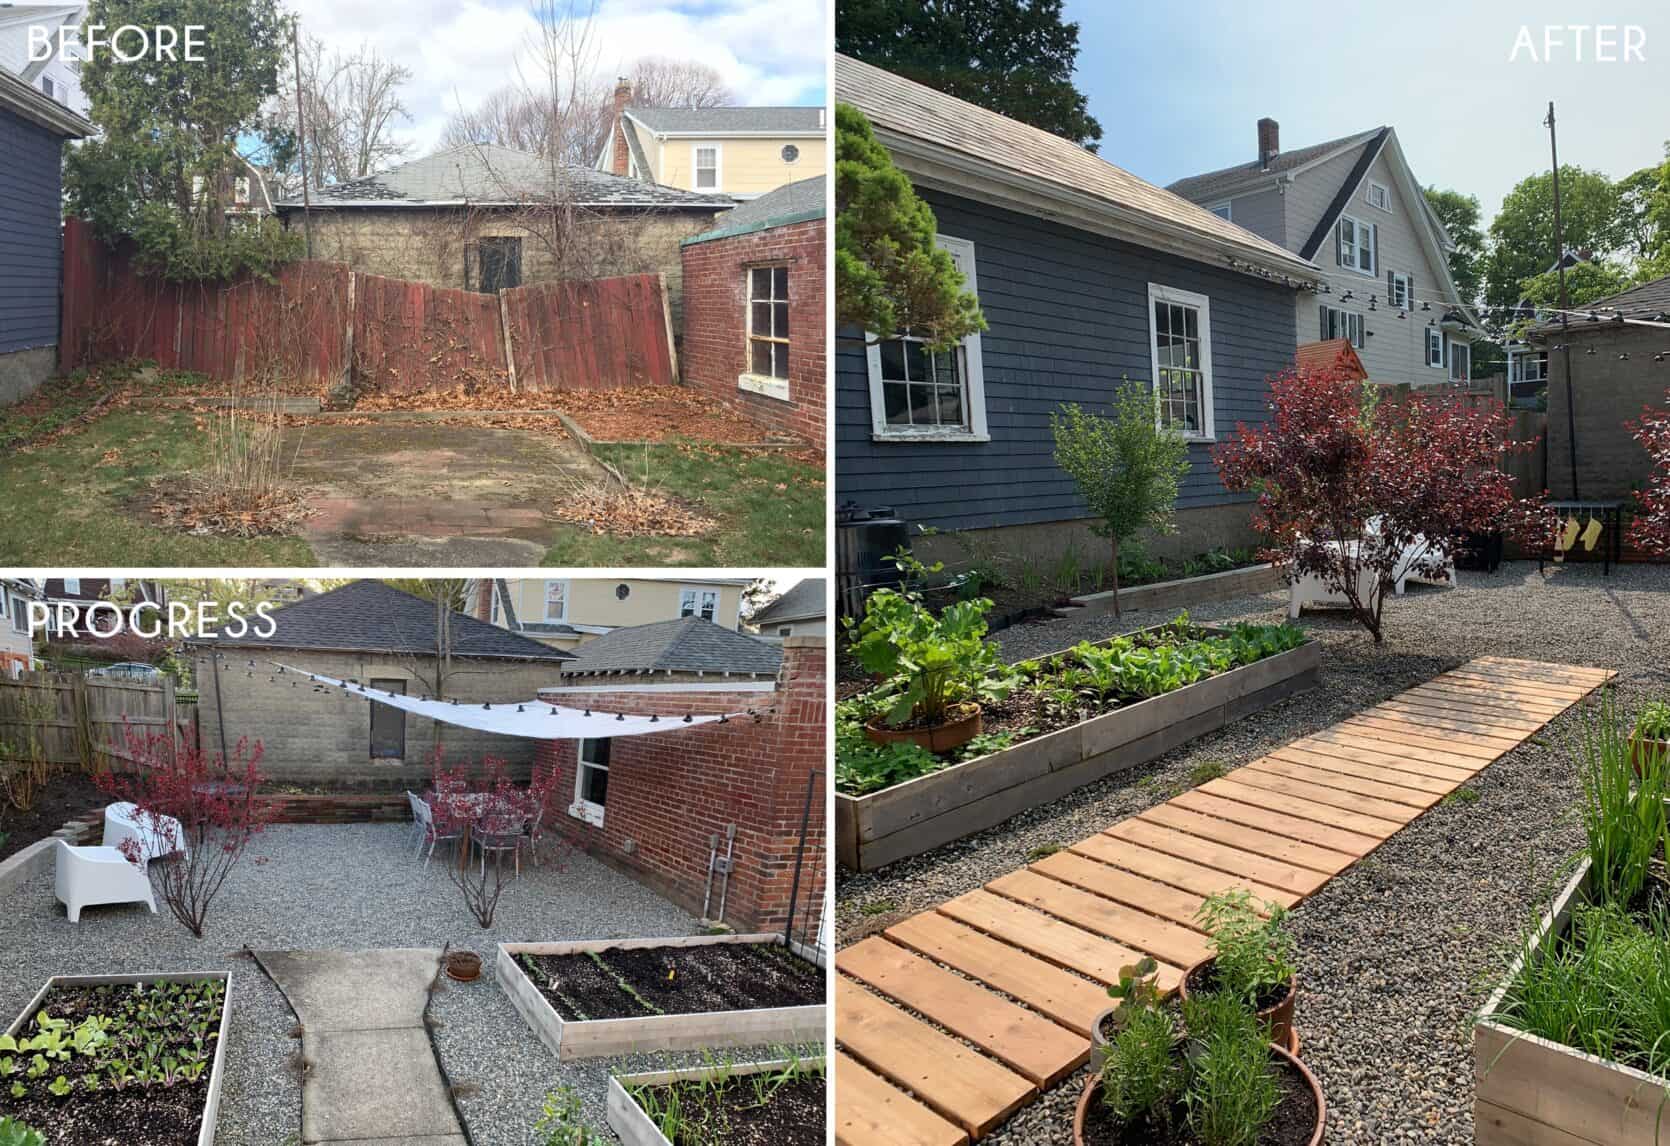
When Melissa and her husband bought their 90+-year-old home they knew a lot of love was needed for their backyard. So over 2.5 years, their yard went from falling apart to looking brand new. The first thing they did was tear down the old fence. Instead of rebuilding it, they repurposed some of the pavers from the ground and created a small retaining wall (needed due to the sloping of their yard). They then dug out all of the grass and built those great garden beds and added pea-sized stone all over. The last DIY was that awesome cedar walkway. Since the rest of the yard had gotten a facelift, they decided to say goodbye to the cement walkway because it looked out of place. It was definitely the right call and the whole space looks fantastic. Like I said before, this project took them about 2.5 years and a rough total of $2,700. Well worth the wait!
Let’s talk more about gravel, shall we??
Stairway to Backyard Heaven
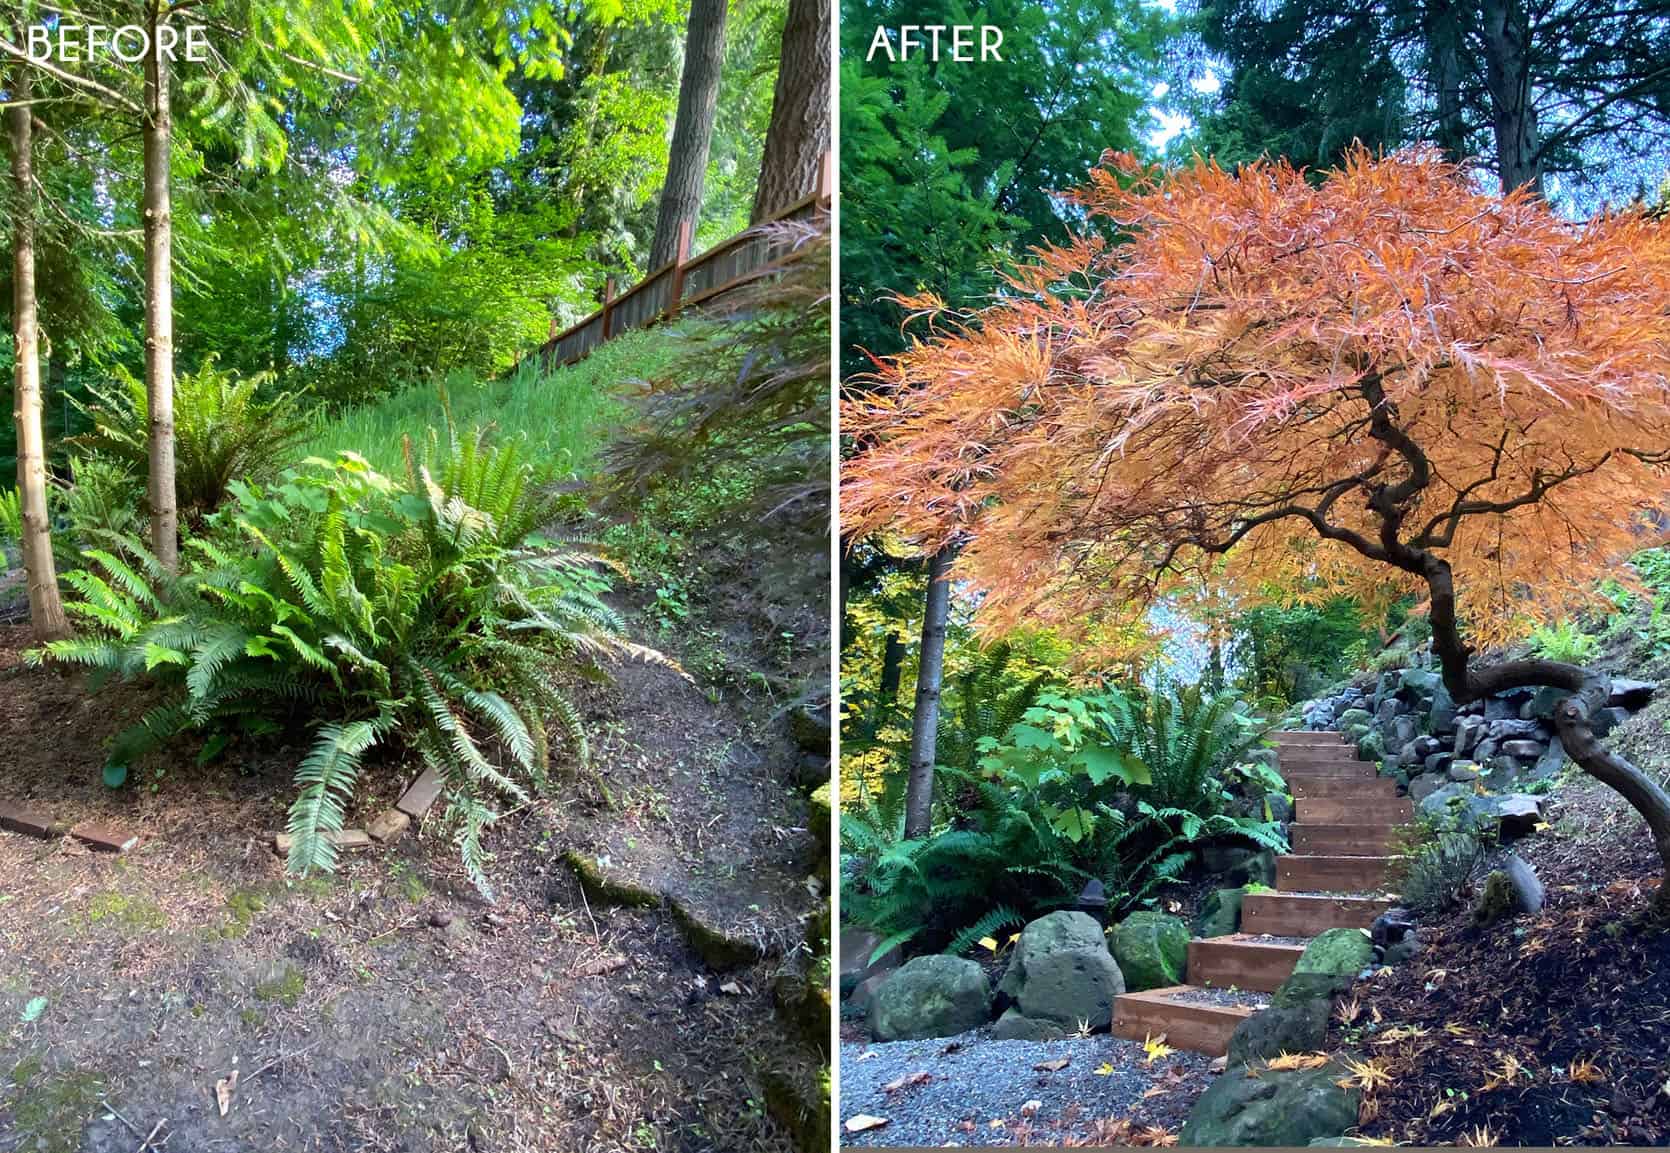
Cathy and her husband needed stairs in their backyard and boy did they turn out great. Here’s how they did it and some general advice for all of you (also here are visual instructions on Cathy’s Instagram):
“We made nine based on the steepness of our slope. Each project would be different based on the slope. So the diy-er would need to calculate the rise and run of the steps. To determine the number of steps, measure the total height in inches from ground level to upper level divided by 6 (the height of each step). This will give you the number of steps you need. Then measure the full length of the stairs (in inches) by the number of steps. This will give you the run of each step (tread width).
For our project, we made nine steps and the tread width was 15.5” (if tread width is longer, then make side pieces longer than 18”).
Each step is basically a U-shape. To make a step, we used a circular saw to cut the 8’ long pressure treated lumber into 18” and 24” pieces. Our steps were 24” wide and we used 18” pieces for the sides.
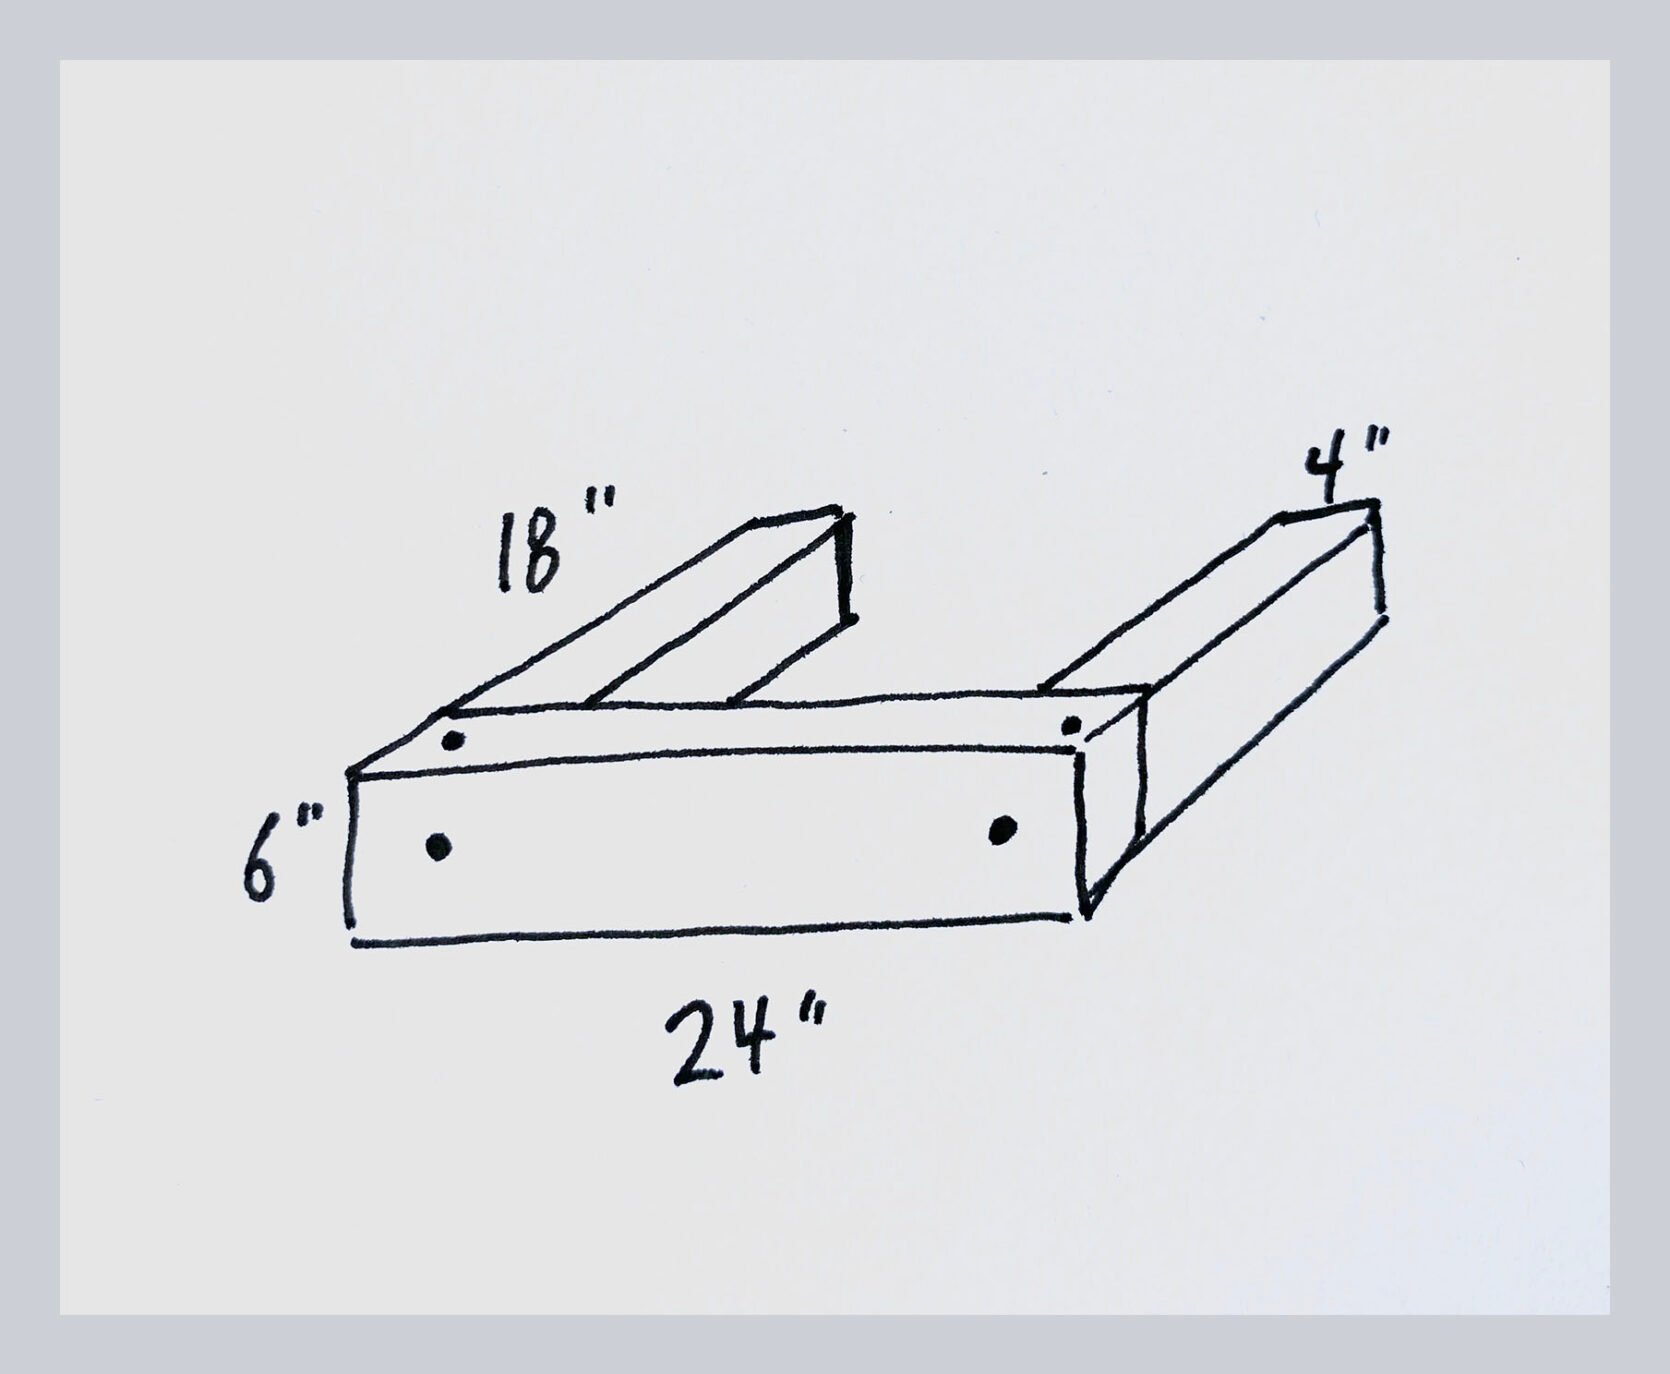
We pre-drilled holes for the 8″ lag screws that would attach the front board to the sides. We drilled the holes 2.25” in from the edges. And since we wanted the bolts flush with the wood (wouldn’t want to kick a bolt with a bare toe in flip flop), we used a countersink bit after predrilling. Use a ratchet wrench to tighten the 8” lag bolts. (This part can be a little tricky because you need to secure the wood pieces when drilling and tightening the bolts. We eventually propped up each step and I sat on it like a sawhorse while my husband tightened the bolts, haha.)
Because the first step is secured to the ground with rebar, you’ll also have to drill two holes at the back of the first step. After drilling the two holes, spray any freshly cut sides with wood preservative and let dry (takes a few minutes).
Place the first step where you want it and check to see if it’s level. Then you’re going to hammer the rebar through the first step into the ground for stability. Once the rebar is flush with the board, double-check the step is level and fill the step with dirt about halfway. Then proceed with making the second step.
Before securing steps on top of one another, spray any freshly cut sides with wood preservative. Once dry, place the second assembled step onto the first step, making sure that the steps are level. Use a measuring tape to place it at the appropriate tread width. Again, ours was 15.5”. Mark two holes at the top 1.5” from sides. Predrill the holes going through both the second and first step. Use a countersink bit again and then use a ratcheting socket wrench to tighten the 10” lag bolts. Fill the step with dirt half-way and repeat for the rest of the steps.
After all the steps have been built, fill with pea gravel.
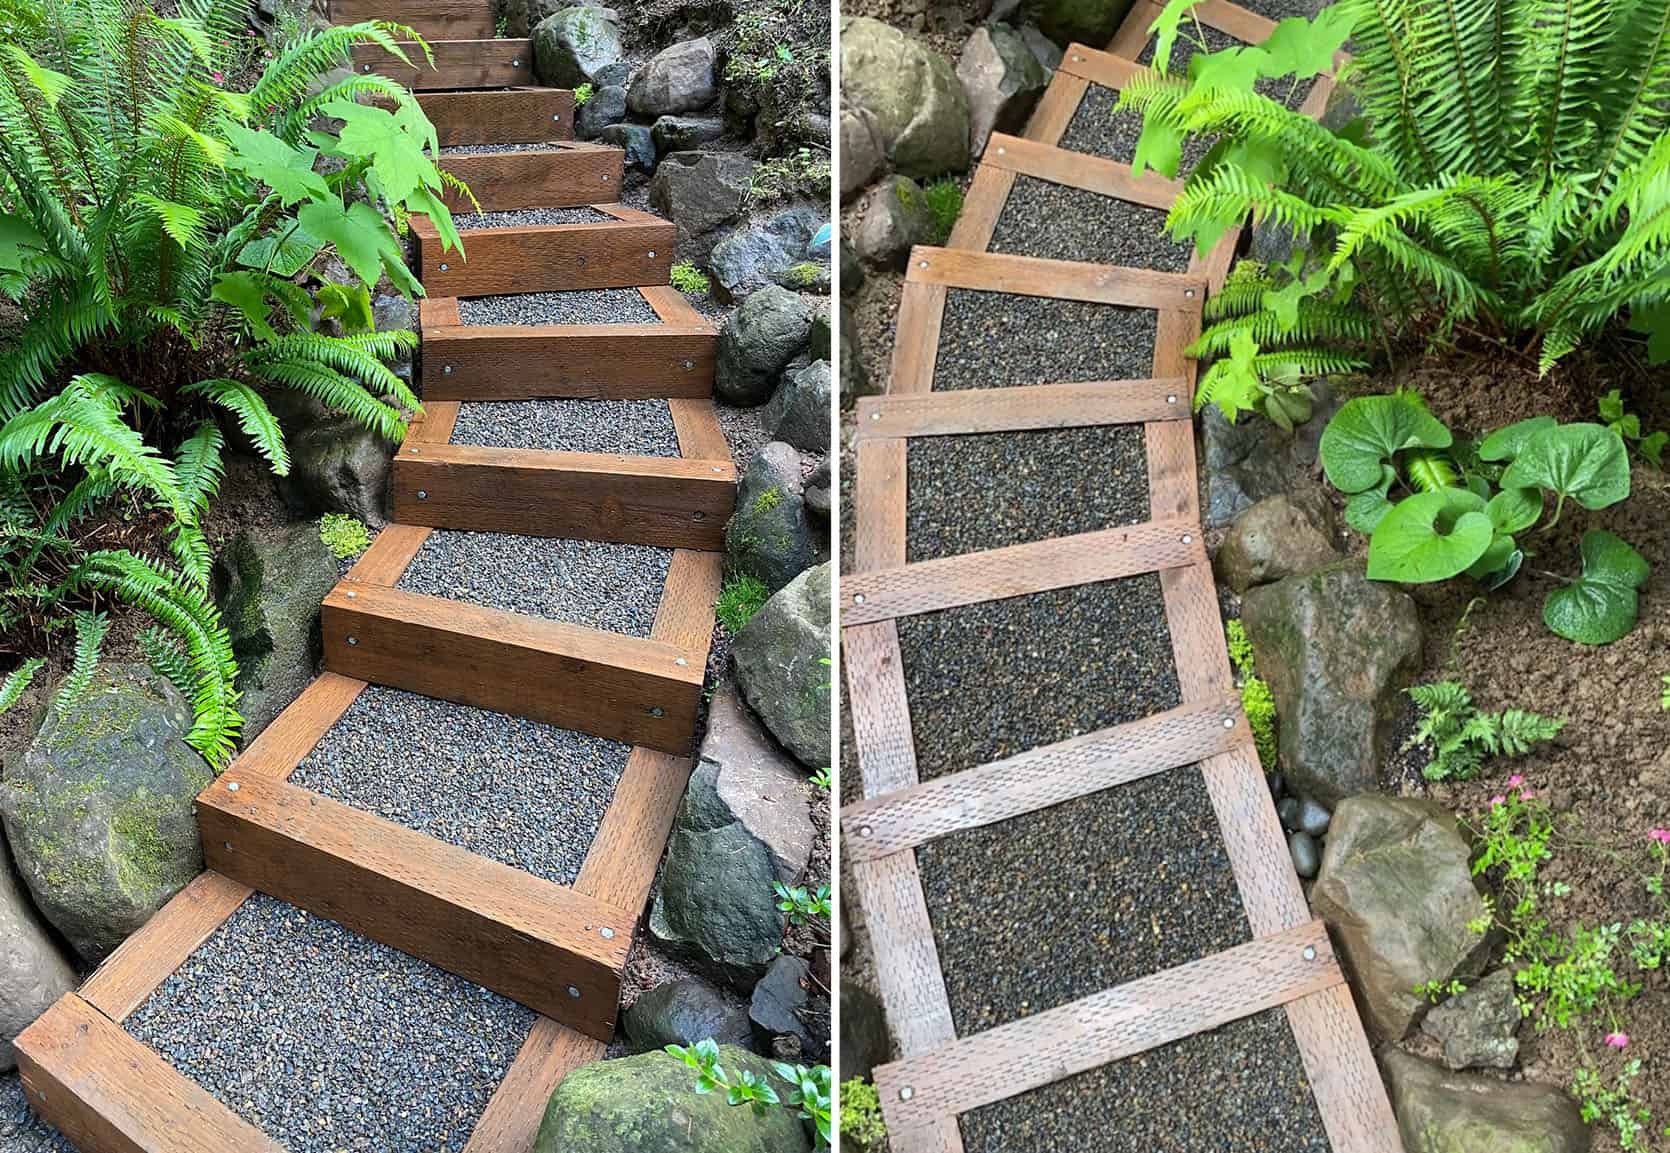
Materials List:
– 6 pressure-treated lumber, 4” x 6” x 8′
– 2 three ft rebar
– 18 eight inch lag screws
– 18 ten inch lag screws
– wood preservative spray paint (like Copper Green Brown Wood Preservative)
– pea gravel
Tool List:
– circular saw
– measuring tape
– pencil
– socket wrench
– drill
– countersink bit
– level
– sledgehammer
Basic Instructions:
1. Cut lumber into 18” and 24” pieces. Each step is comprised of three pieces. Predrill holes and finish holes with a countersink bit. Secure the front board with the sides using 8” lag screws.
2. Spray any fresh cuts with wood preservative and let dry.
3. Bottom step is secured to ground with rebar. Drill two holes in the back. Level it before and after installing rebar.
4. Fill the step halfway with dirt.
5. Place next step on top of bottom step. Measure the appropriate tread width and level. Secure the steps together with 10” lag bolts (predrill)
6. Fill the step halfway with dirt and continue assembling and installing the remaining steps.
7. To finish, fill steps with pea gravel.
Project Cost: $400 (depends on the number of steps)
The Modern Wall Disguise
Now I’m pretty excited to show you this next DIY because I feel that A LOT of people deal with similar less-than-ideal backyard plaster walls. This is how Anita made her’s nearly disappear.
Anita decided she was tired of looking at her old plaster walls so she and her husband DIYed these very cool modern wall panels to help disguise them. They started by digging holes for the posts followed by pouring a bit of cement into the holes to create a foundation. Next, they sanded the posts down, set them into the holes and finished by securing them with filling the holes with gravel. Once the posts were all set, Anita and her husband painstakingly sanded the rest of the slats with an electric sander and then decided to leave them natural instead of painting which was the original plan. Once the slats were up, she added the flower boxes to add some more visual interest. They also wanted to give their cement pad a fresh look so they painted it with a soft grey. In addition to that, Anita learned how to limewash brick so the previous 90s red bricks that would have been in front of the wall now look brand new! Now for the grand total…the fence (all materials included) was $244 and the plants/planters came out to $481. Anita said that weather prolonged the process but that someone could easily do this over two weekends or even a long one (weather permitted). This is really such a clever and budget-friendly DIY.
Want another killer wall idea but for a patio??
The (Faux) Green Wall of Privacy
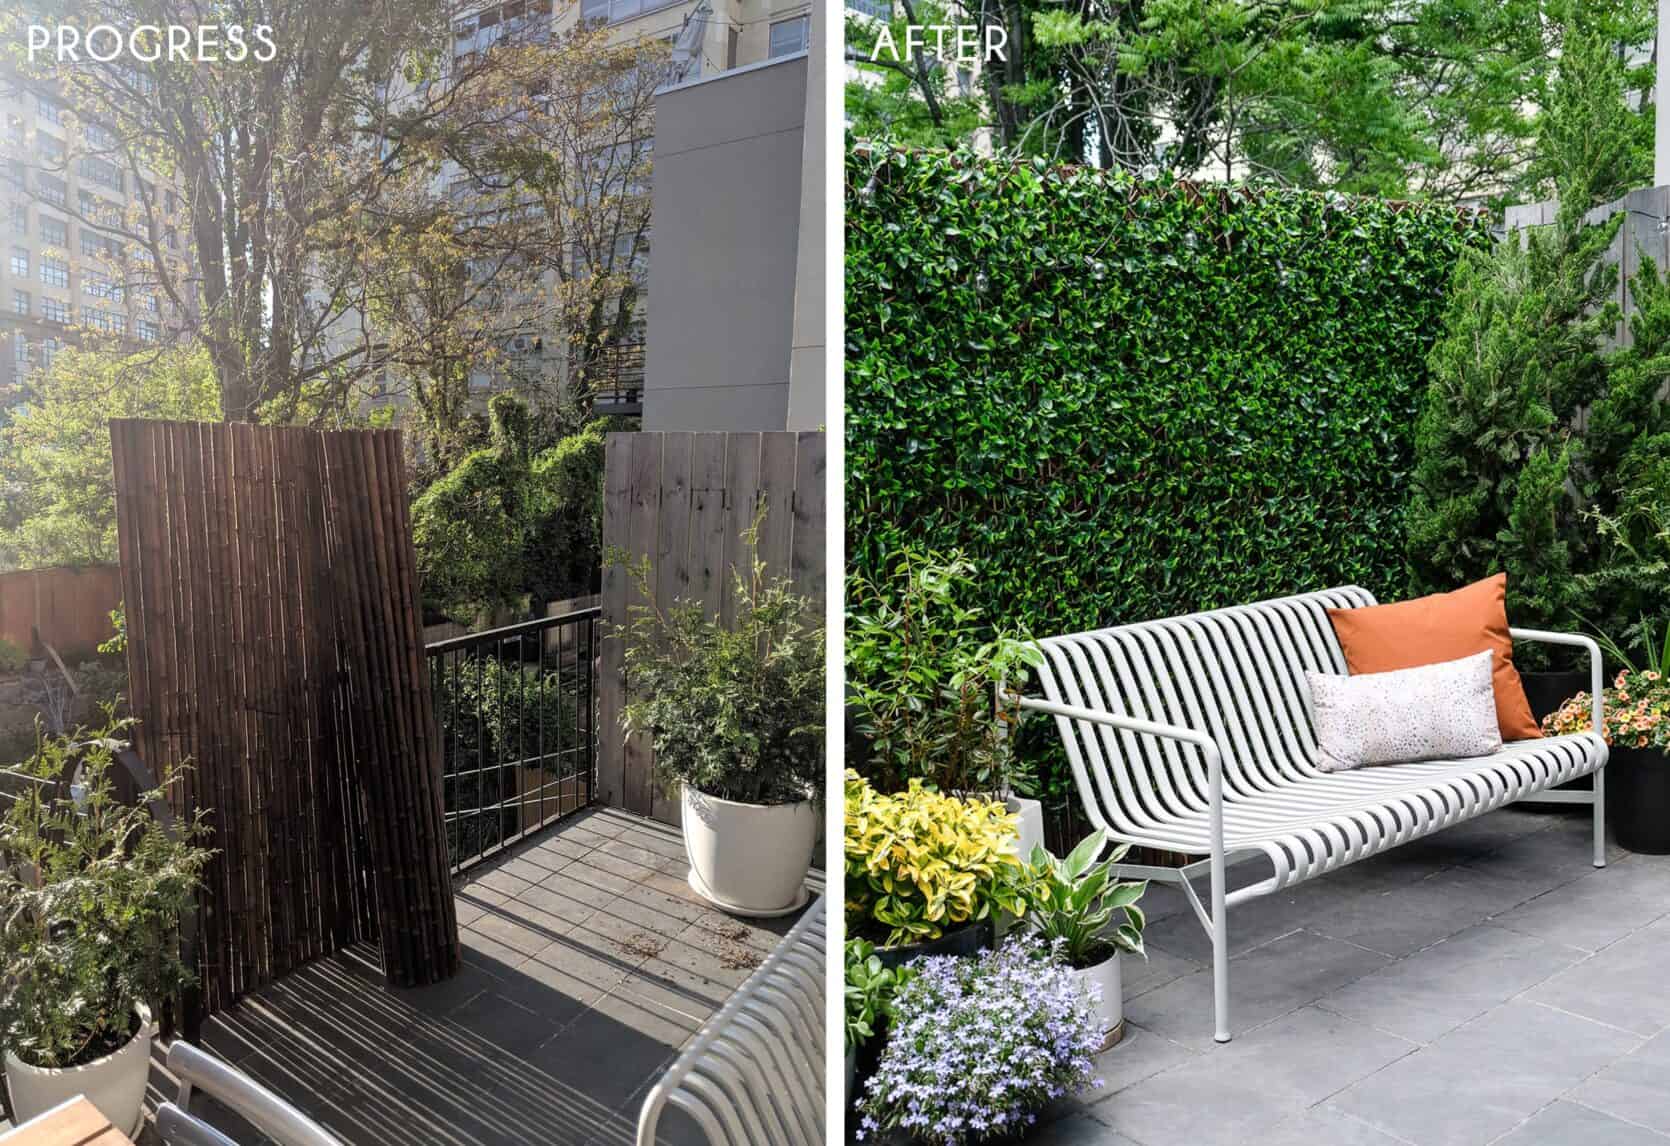
Bev is one of the lucky few in New York (Brooklyn specifically) to have outdoor space (especially now). But as expected in a big city, it lacked privacy. In a stroke of genius, she decided to figure out a way to create a green wall and I think it’s safe to say she nailed it. With a bamboo fence, a faux trellis, and zip ties, her patio looks like a slice of serene outdoor heaven. She calls it “The Easiest DIY Green Wall Ever” but it’s also the smartest. Since NY experiences all of the seasons, her bamboo and faux greenery should hold up beautifully. This is incredibly renter-friendly (no tools needed), small space friendly and for a rough total of $500, you can make one yourself. She wanted to point out that the $500 is for two panels so if you need only one panel then slash that price in half. 🙂 Head to her blog post to get the full how-to.
Let’s head into a very real garden now…
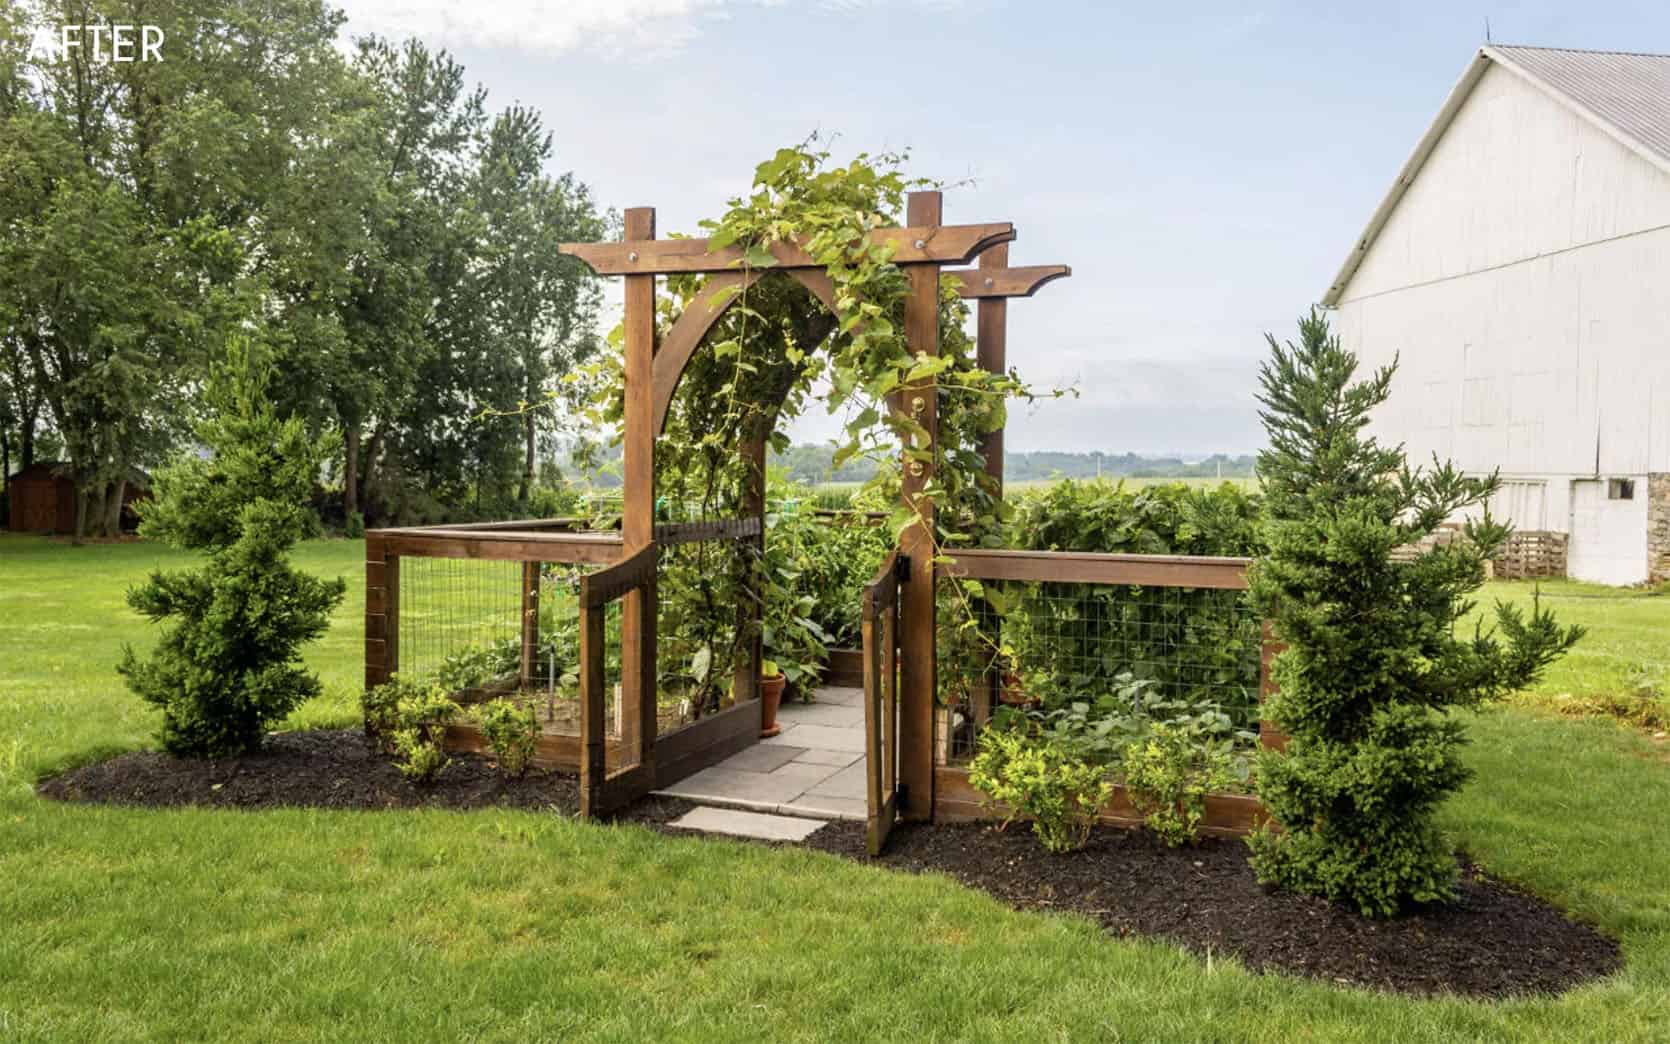
The Sweetest Vegetable Garden
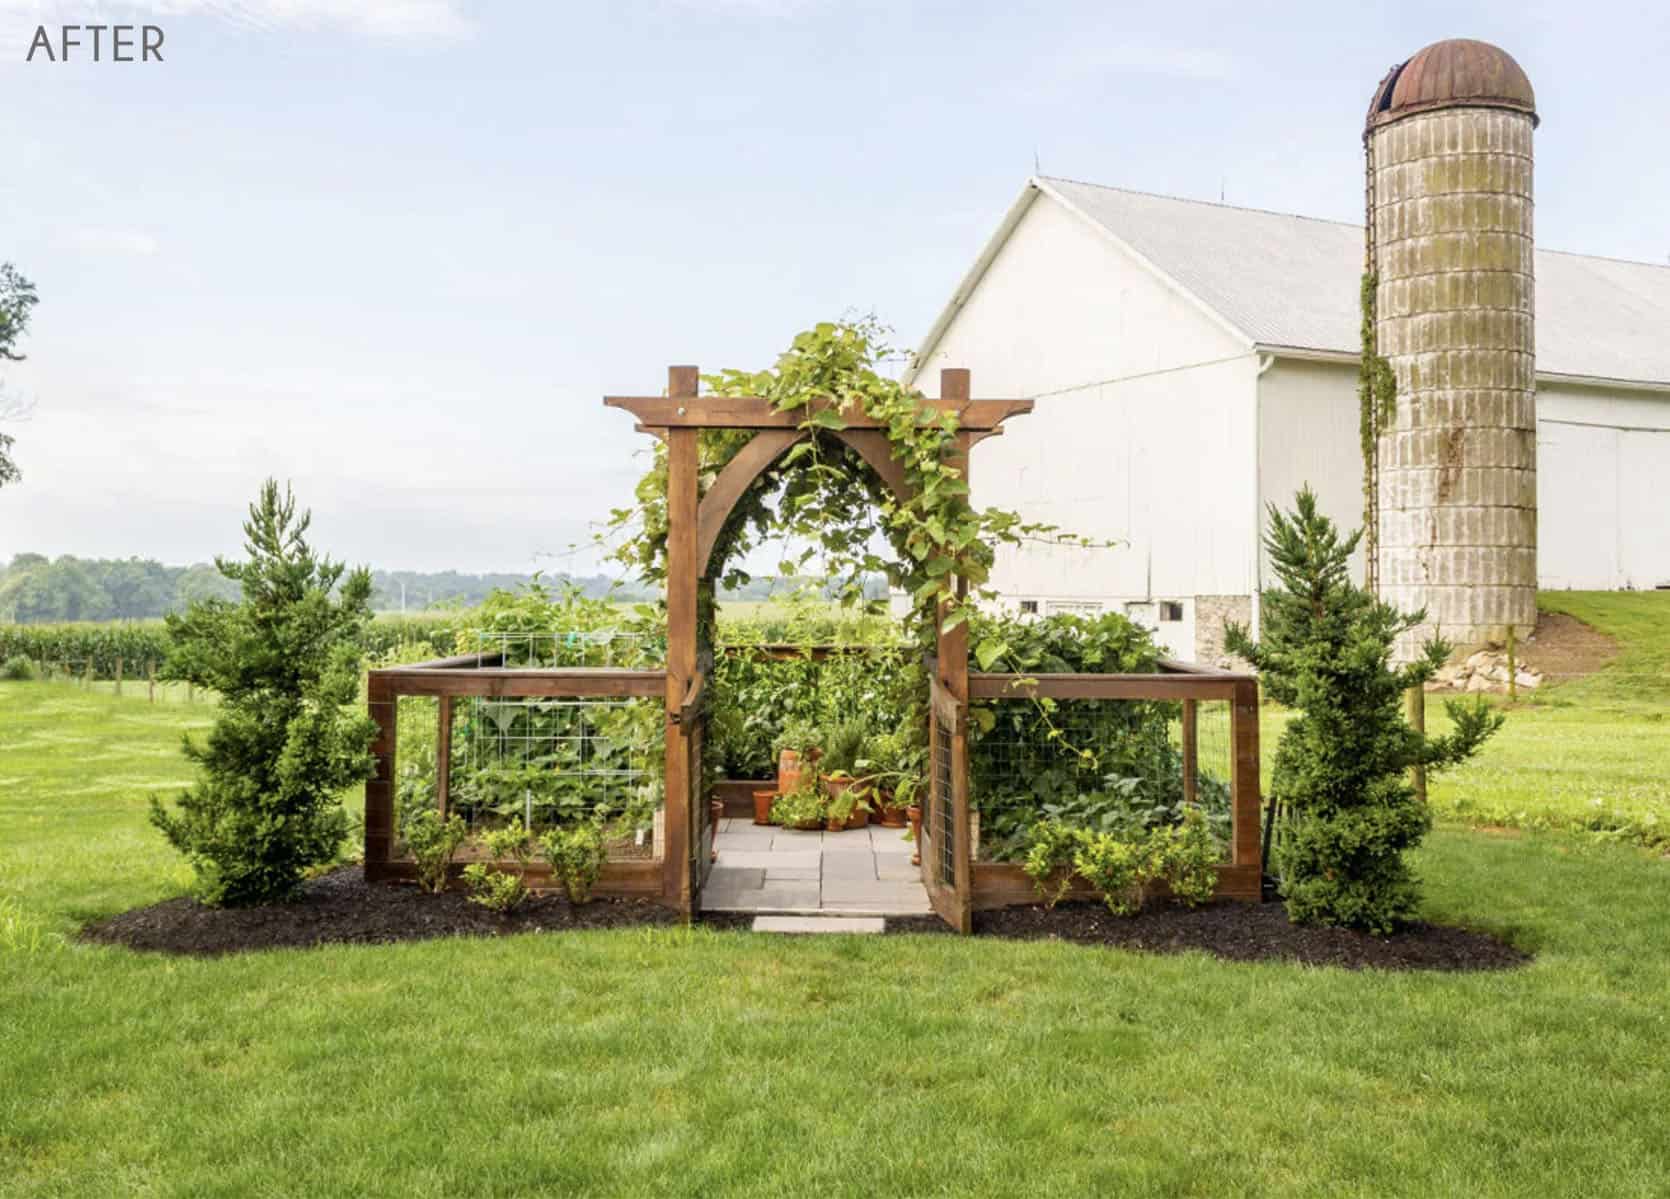
This doesn’t look real with how stunning this photo is but it is and you can build it too! Erin took these purchasable plans and really made a beautiful vegetable garden. I love how that arch and makes it look super special.
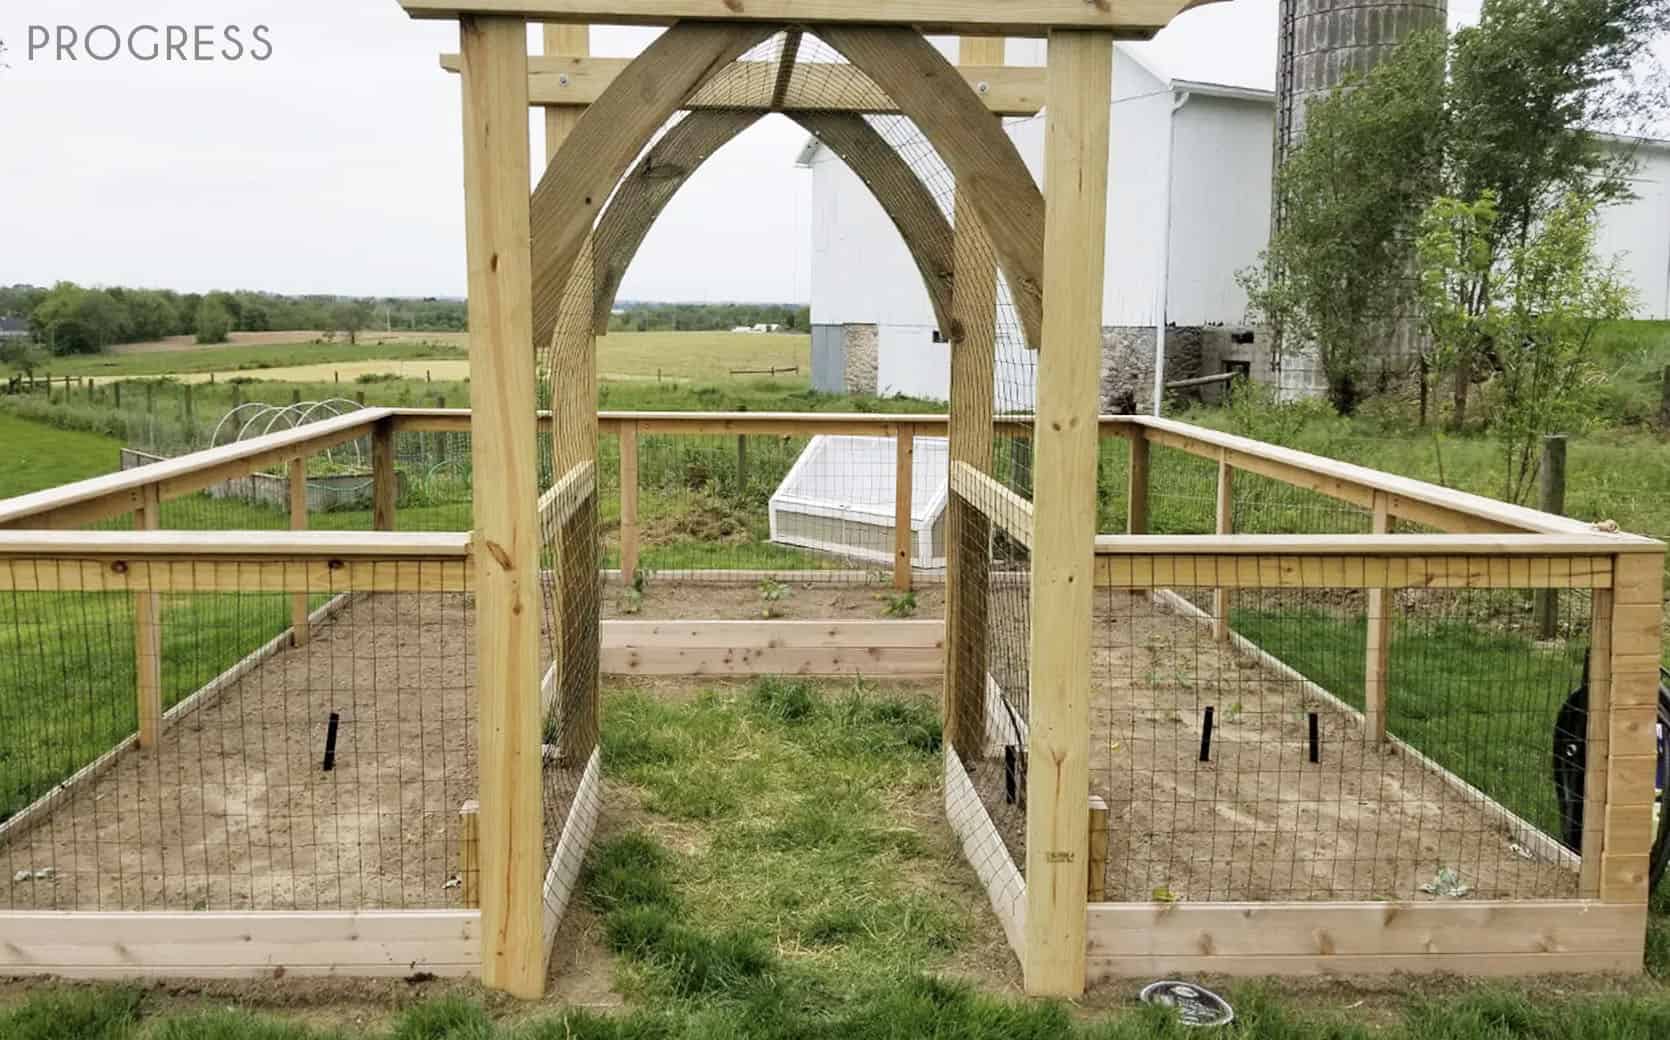
Erin has two blog posts where she lays out all of the planning and installation so it’s as user-friendly as possible. So if you’ve been dreaming about a vegetable garden, this is such a good one.
The Cutest Budget Pool
Did you even summer if you didn’t dip into a pool? Bri thought, no…
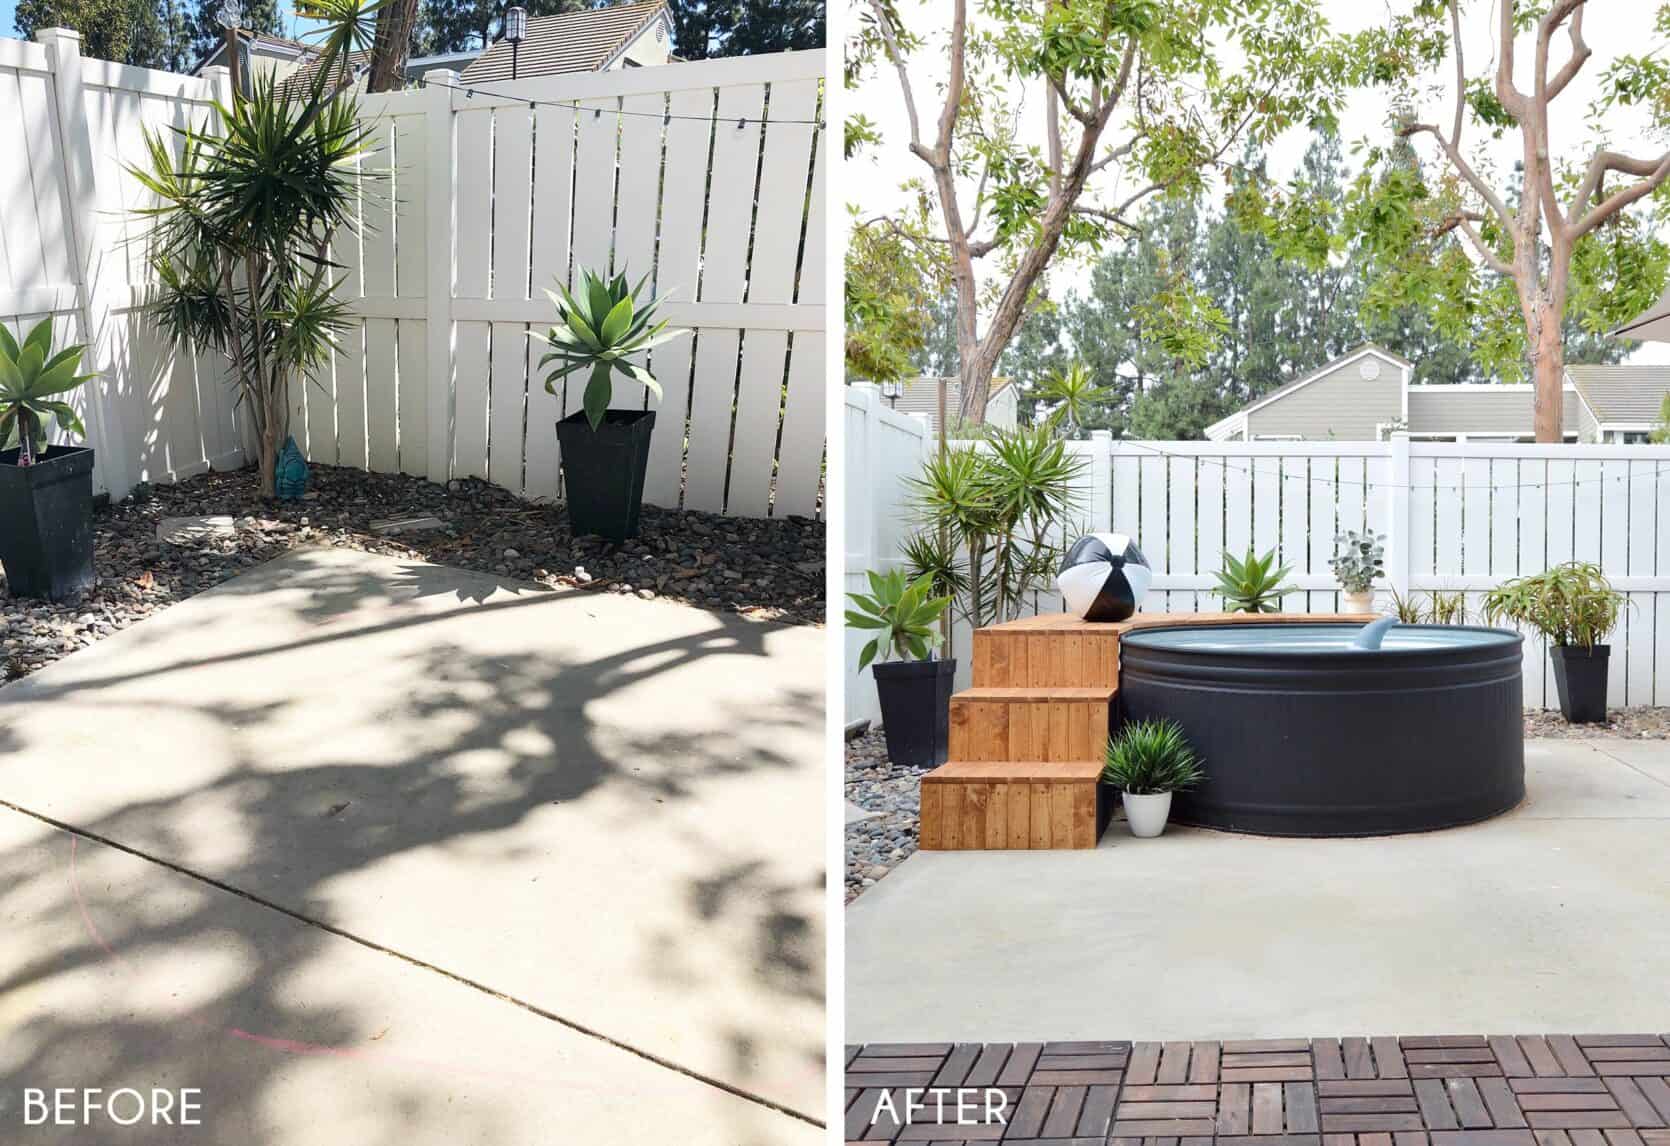
After being inspired by other DIYers on Instagram, Bri decided she wanted to put in a stock tank pool in her backyard. While she and her husband are already very handy, she still did a lot of research, read blogs and watched YouTube tutorials. After all that, she and her husband were confident they could make it happen. To add more style and avoid the pool looking “like a giant cake pan” as her young daughter so lovingly described it as, they decided to build a little deck. Bri said, “from there it was calculating our plans on how to build the deck, level the pool with sand, purchase the wood for not only the structural base but also the top decking that I wanted to have a more modern feel. And then we sealed it.” You now may be thinking, “but how does it stay clean?” Well, they put in a pump system and use chlorine tablets. The pump is hidden underneath the deck and is hooked up to the nearest outdoor electrical outlet.
Wanna know the craziest part? It only cost roughly $650 all up. To be able to have a very chic pool for just over $500 is mindboggling to me. They did such an incredible job and I now really wish I had a backyard.
Now the next year Bri added to her already awesome yard with DIY BBQ Station.
A Modern BBQ Station
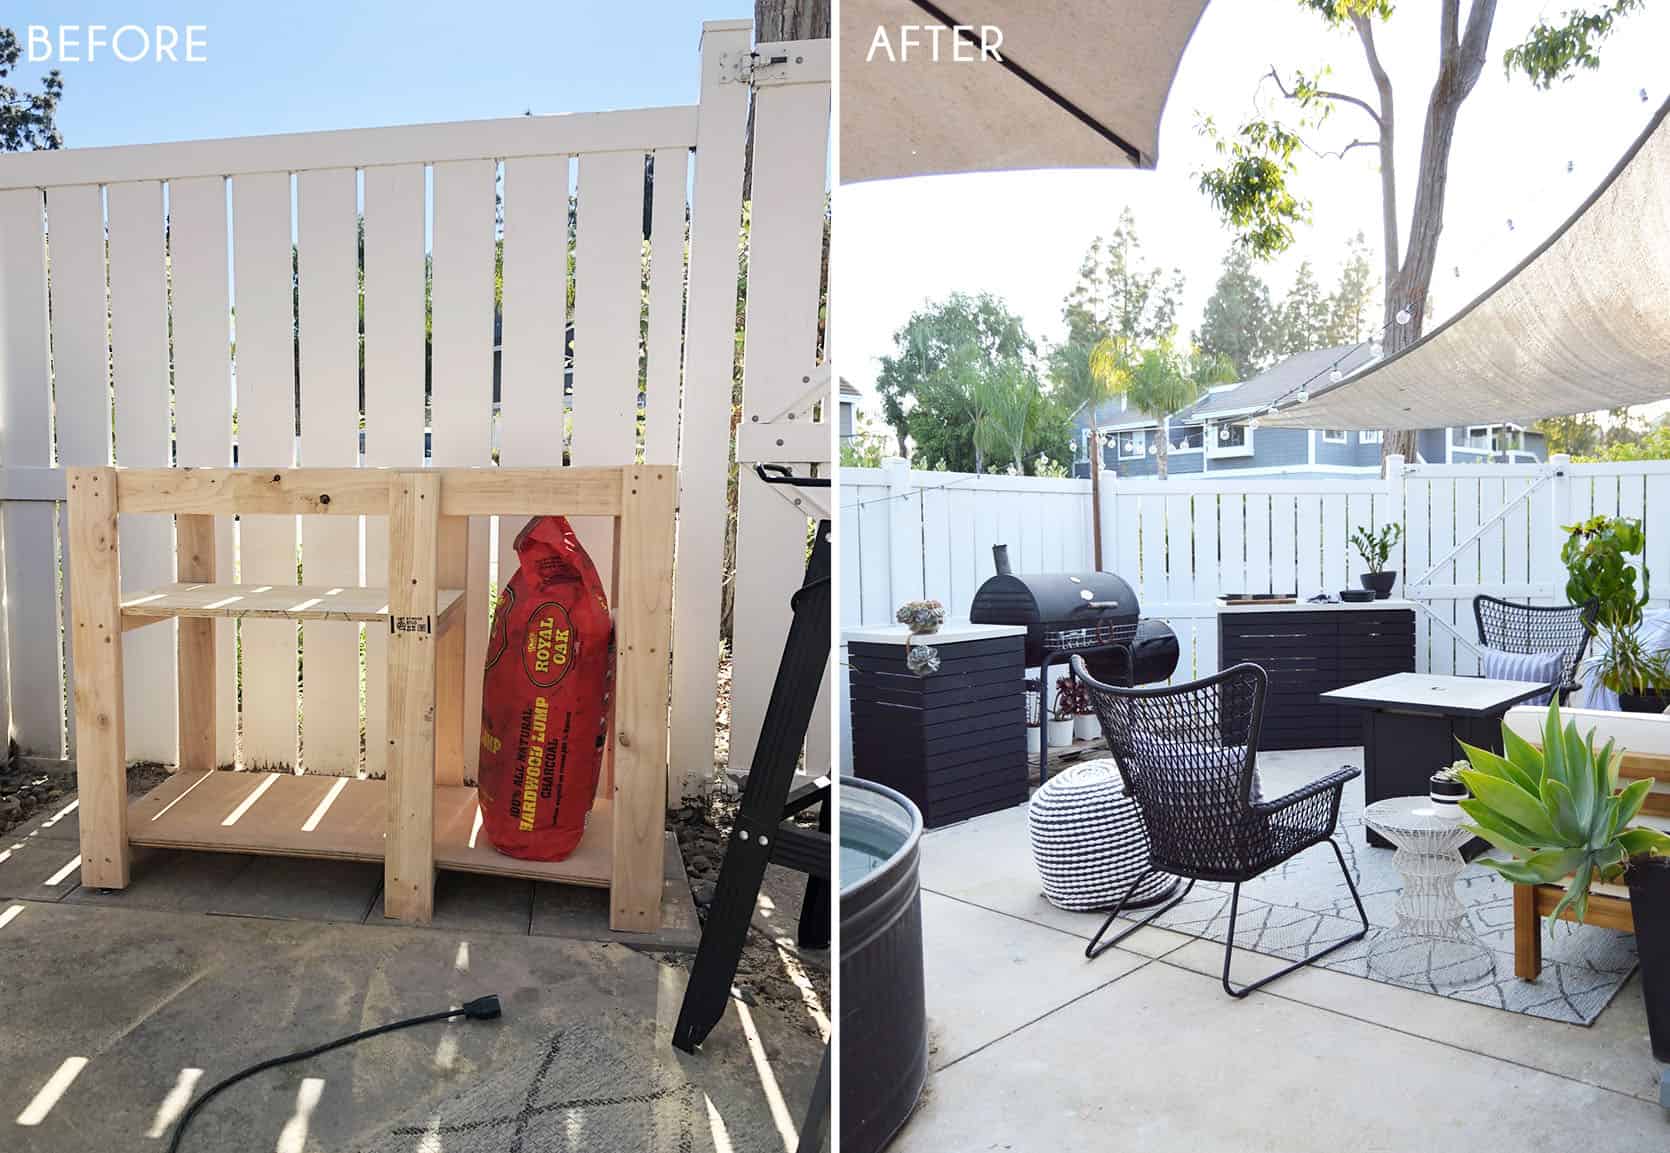
It looks so great and solved their grilling storage problems. Plus for a total of only about $300, Bri was able to customize it to exactly what she wanted. She even made the concrete toppers herself! She has a whole blog post of how she did it so if you too are a grill master head over asap.
The Dreamiest Stucco Sofa
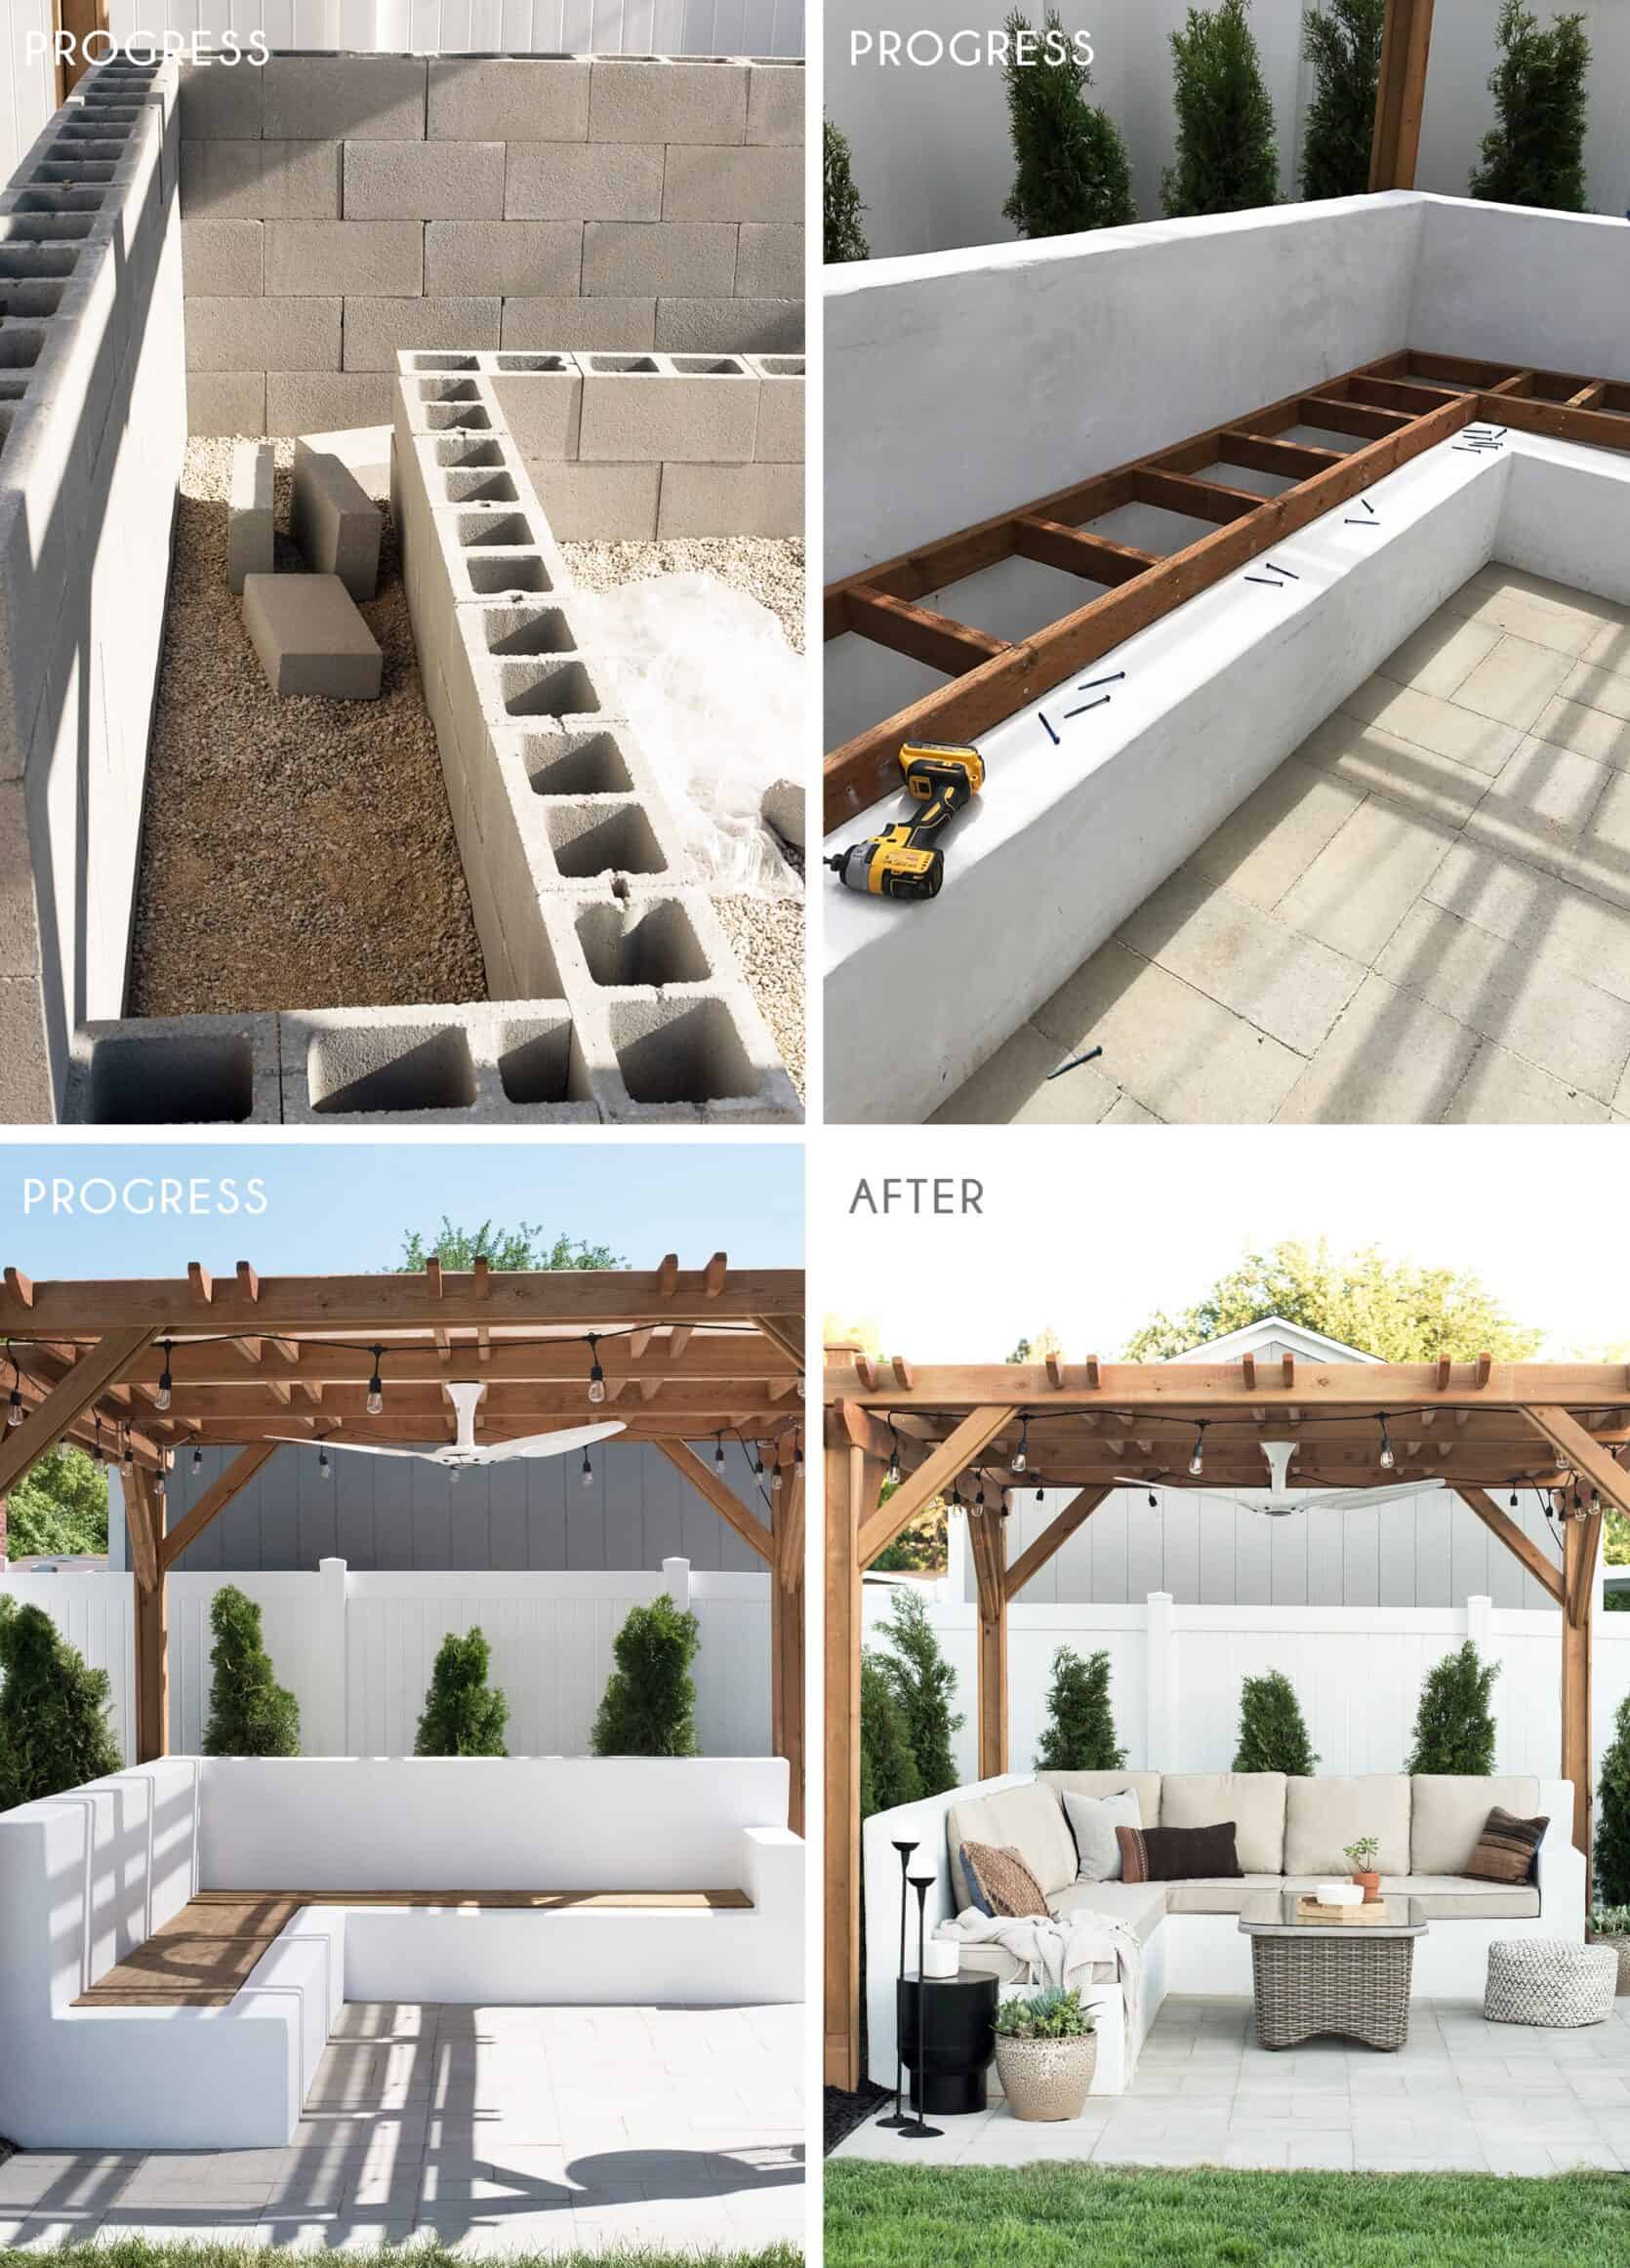
For the last #ShowEmYourDIY post, we shared two of Sarah’s incredible DIY bathroom transformations and today she is back with a total genius and chic outdoor DIY…the stucco sofa. Again with her handy husband Emmett, they were able to build this custom stunner in three days for about $1,000. By using cinderblocks, cement, and a few other materials they made such a special accent to their already beautiful yard. She has a whole blog post on the exact how-tos of the project. While I love my little place, seeing this sofa makes me SO sad I don’t have a yard that I could replicate it in. Someday, right?
You Bet We’ve Got One More Stenciled Patio Dream
When it’s this good we have to show you!
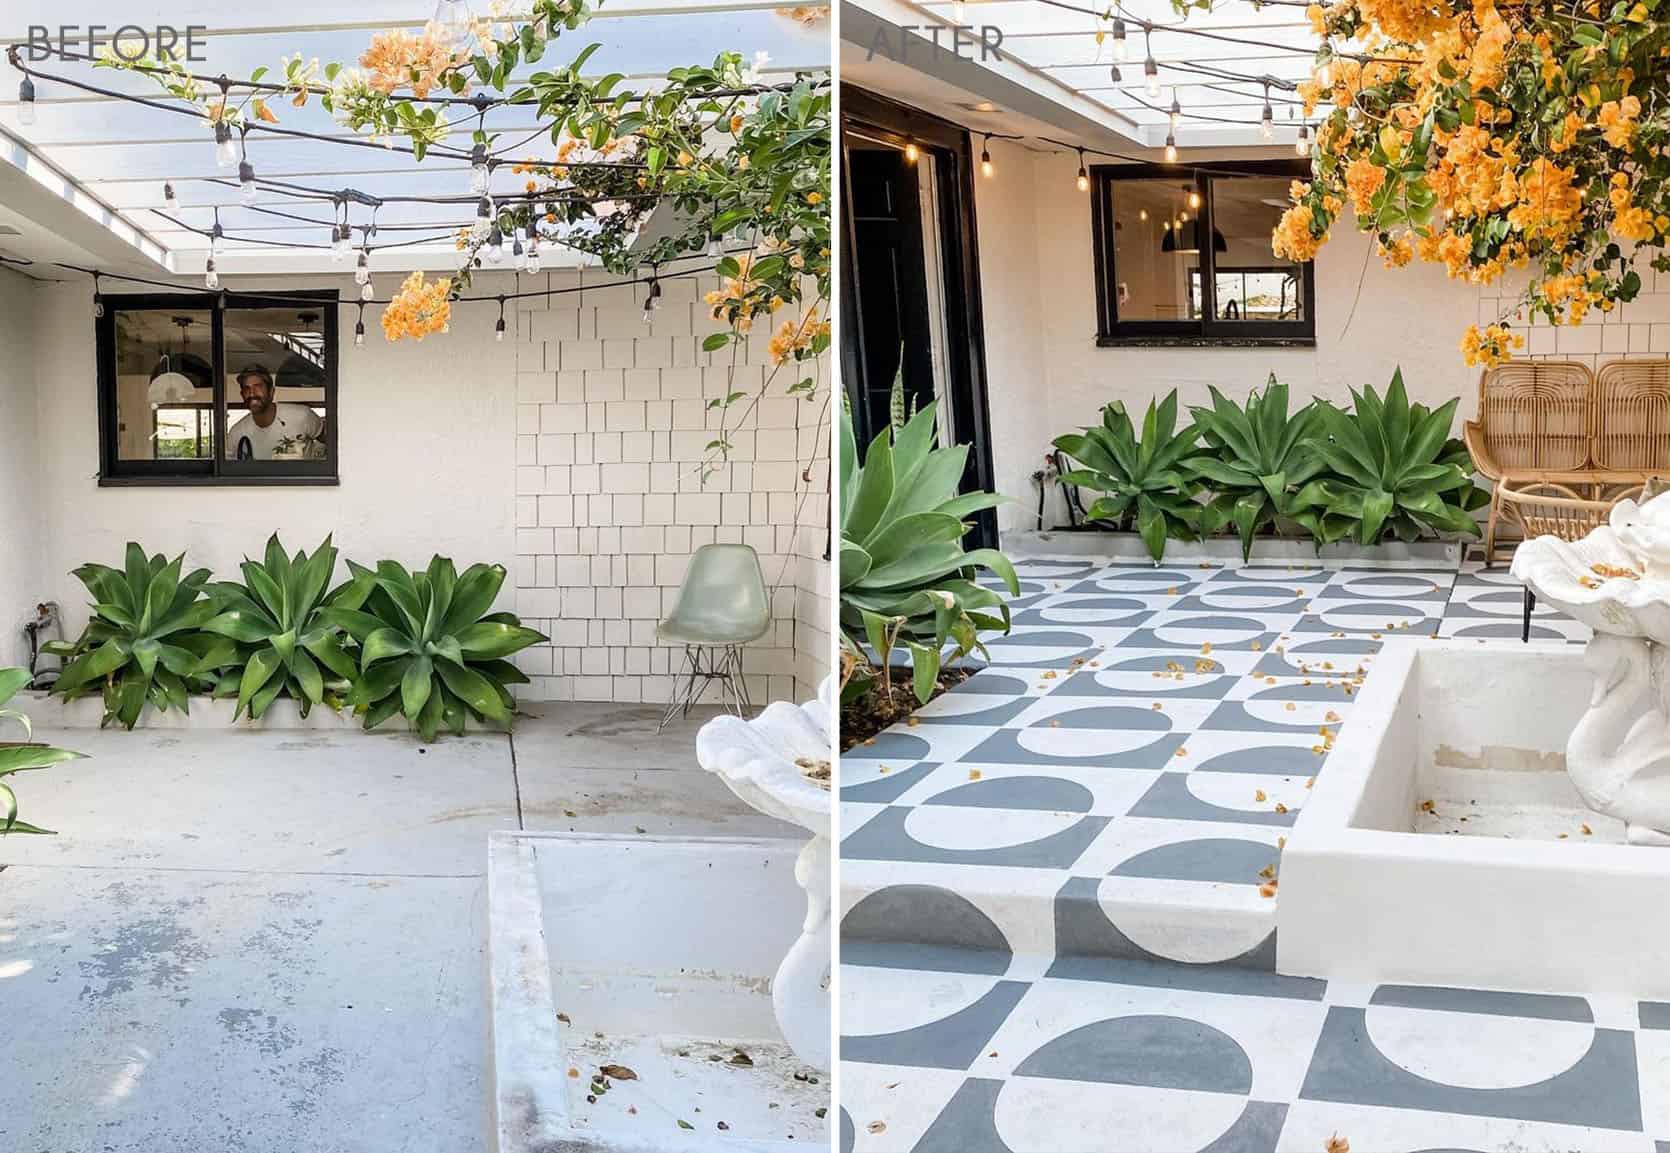
This was actually a DIY that Em sent me by Jesi Haack and told me we should include. Clearly, I agreed because look at it! For this DIY, Jesi first used this cement cleaner to prep, then washed it away with a hose, and then primed it with this KILZ primer (an EHD favorite:)). If you love that pattern as much as we do then you are in luck because it’s a stencil from Etsy! For the gray, she used this KILZ concrete coating in Slate Gray. She also has a highlight on her Instagram with an awesome timelapse for you to get more info and enjoy.
Is it dinner time? Well, it is on Erin’s patio.
Build Your Own Dining Table
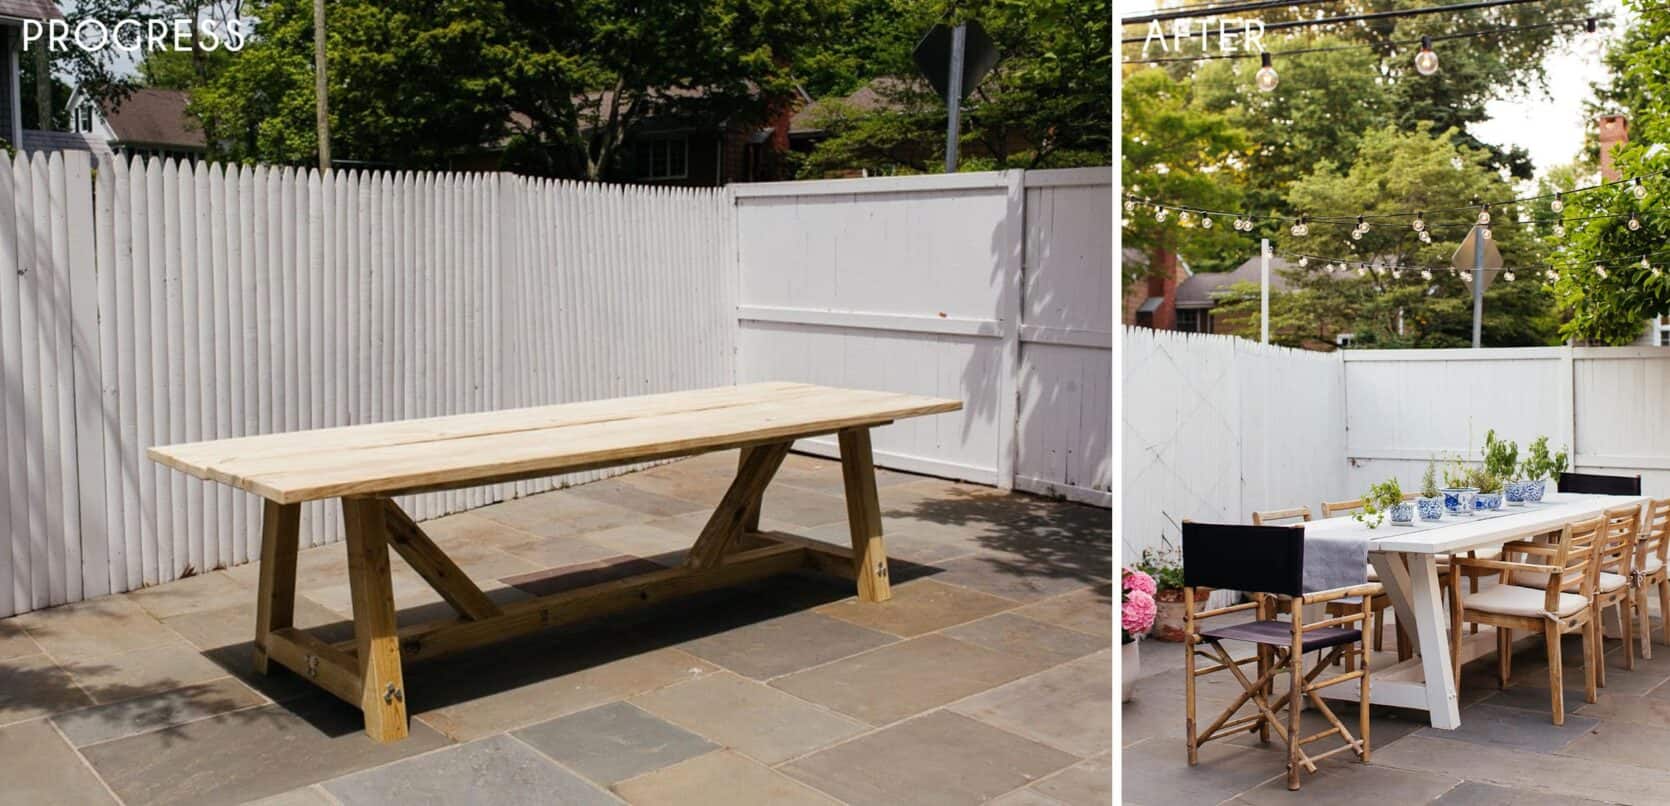
Erin and her husband built this awesome large table for about $200 (instead of the $1,000 it would have cost to buy brand new). They used this tutorial as their guide and once it was all built and beautiful, they finished it off with Superpaint (an exterior grade primer + paint) from Sherwin-Williams in Extra White. PSA: If you can eat outside then you should absolutely eat outside. Head here for more info on her process.
Let’s now talk pergola AND firepit…that is next to a waterfall?! (dreams)
Pergola + Firepit = Summer Heaven
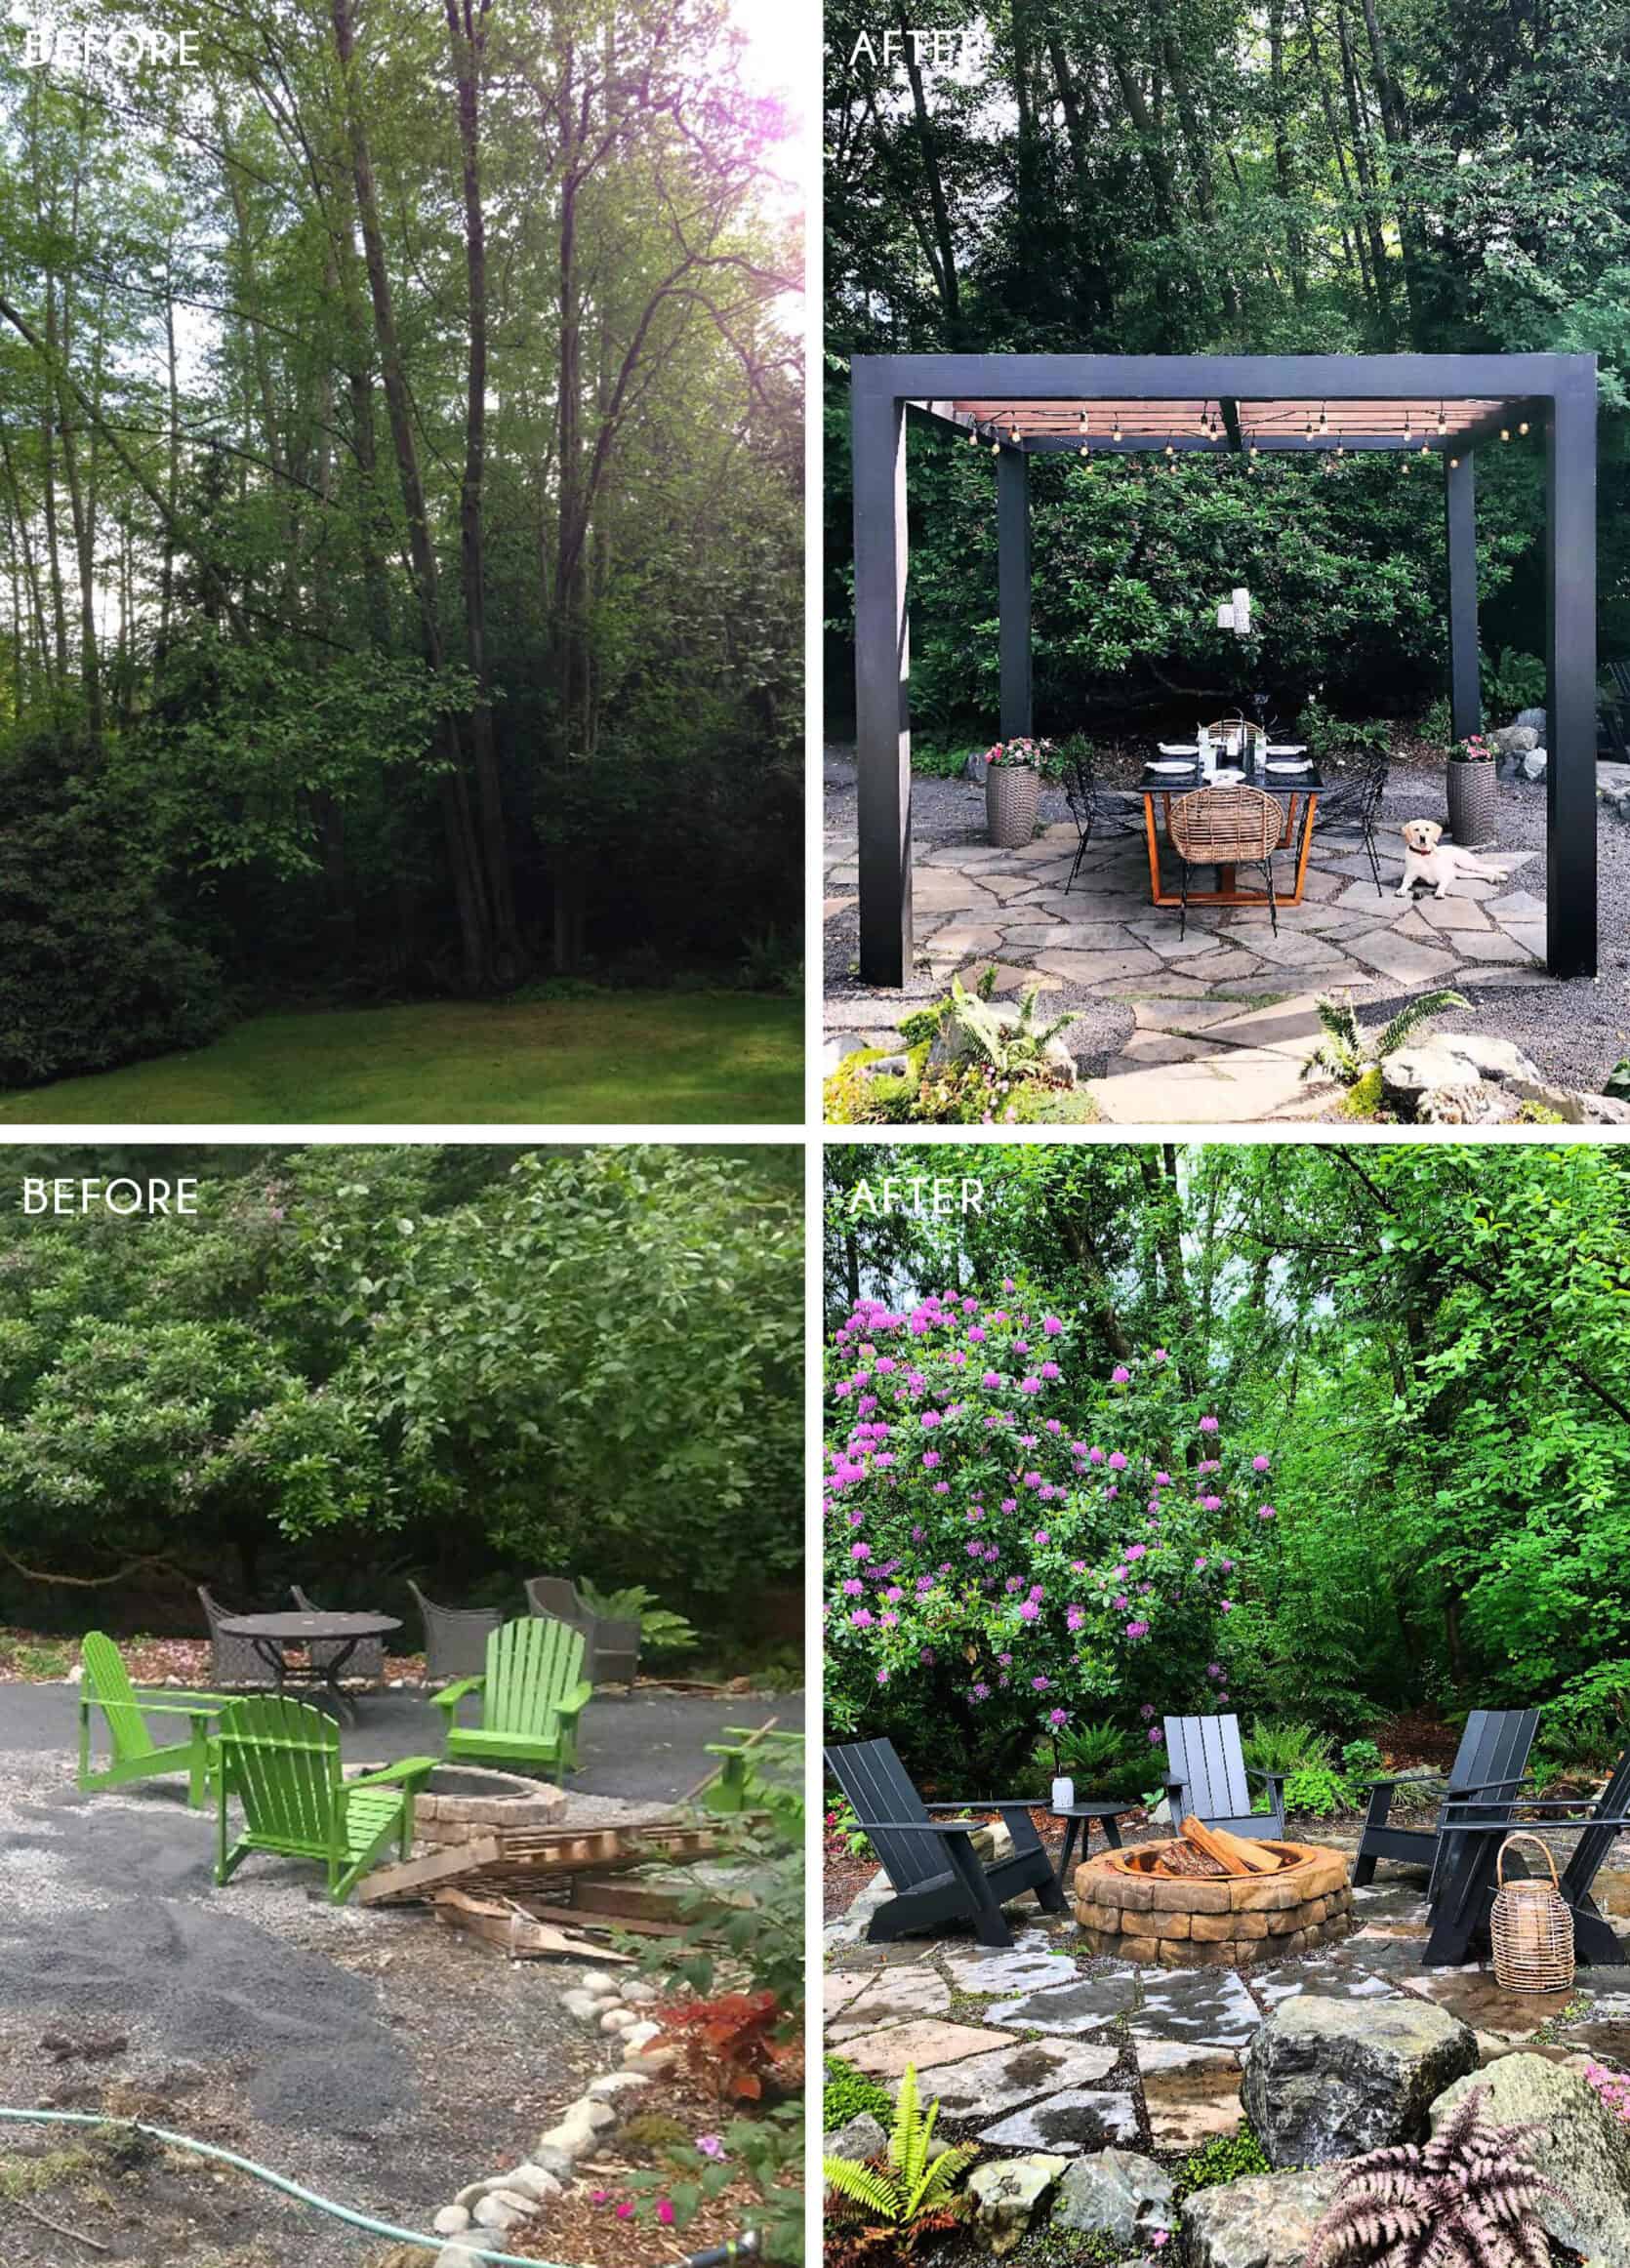
Audrey, her husband, and two boys tackled these two awesome DIYs. They started by ripping out the grass (which was mostly moss). Even though it was very pretty, they wanted to make the space more drought-friendly, sustainable and drain better during their Seattle winters. So they hauled in 24 yards of pea gravel to cover the area.
For the firepit, they stacked paver stones around an iron ring, laid iron mountain flagstone on the ground and set granite boulders to help create a fire pit zone. To make the area soft and inviting, they landscaped with ferns, hosta, moss, and flowering groundcover. Now for the pergola, they wanted it to be the main statement in their backyard so they chose to use 8×8 posts. For how they installed the posts, she said her husband “raised the posts by himself and I would steady the posts while he mounted them to hidden brackets attached to cement pillar bases he had dug three feet down into the ground.” Easy right? Ha. Once they finished putting up the rest of the structure, the whole family painted the posts Sherwin-Williams Caviar but kept the cedar slats a natural tone. To keep everything looking consistent they also used the iron mountain flagstone underneath the pergola. In total, the two projects took them three months and they spent about $6,500 for materials. A last-minute project Audrey emailed about was the outdoor dining table. Kevin used 4×6 cedar pieces for the base with leftover stain from the pergola. They then spray painted an old tabletop and chairs to give it a fresh look. It looks brand new! All that hard laborious obviously paid off. 🙂
The Wood Plank Coffee Table Firepit
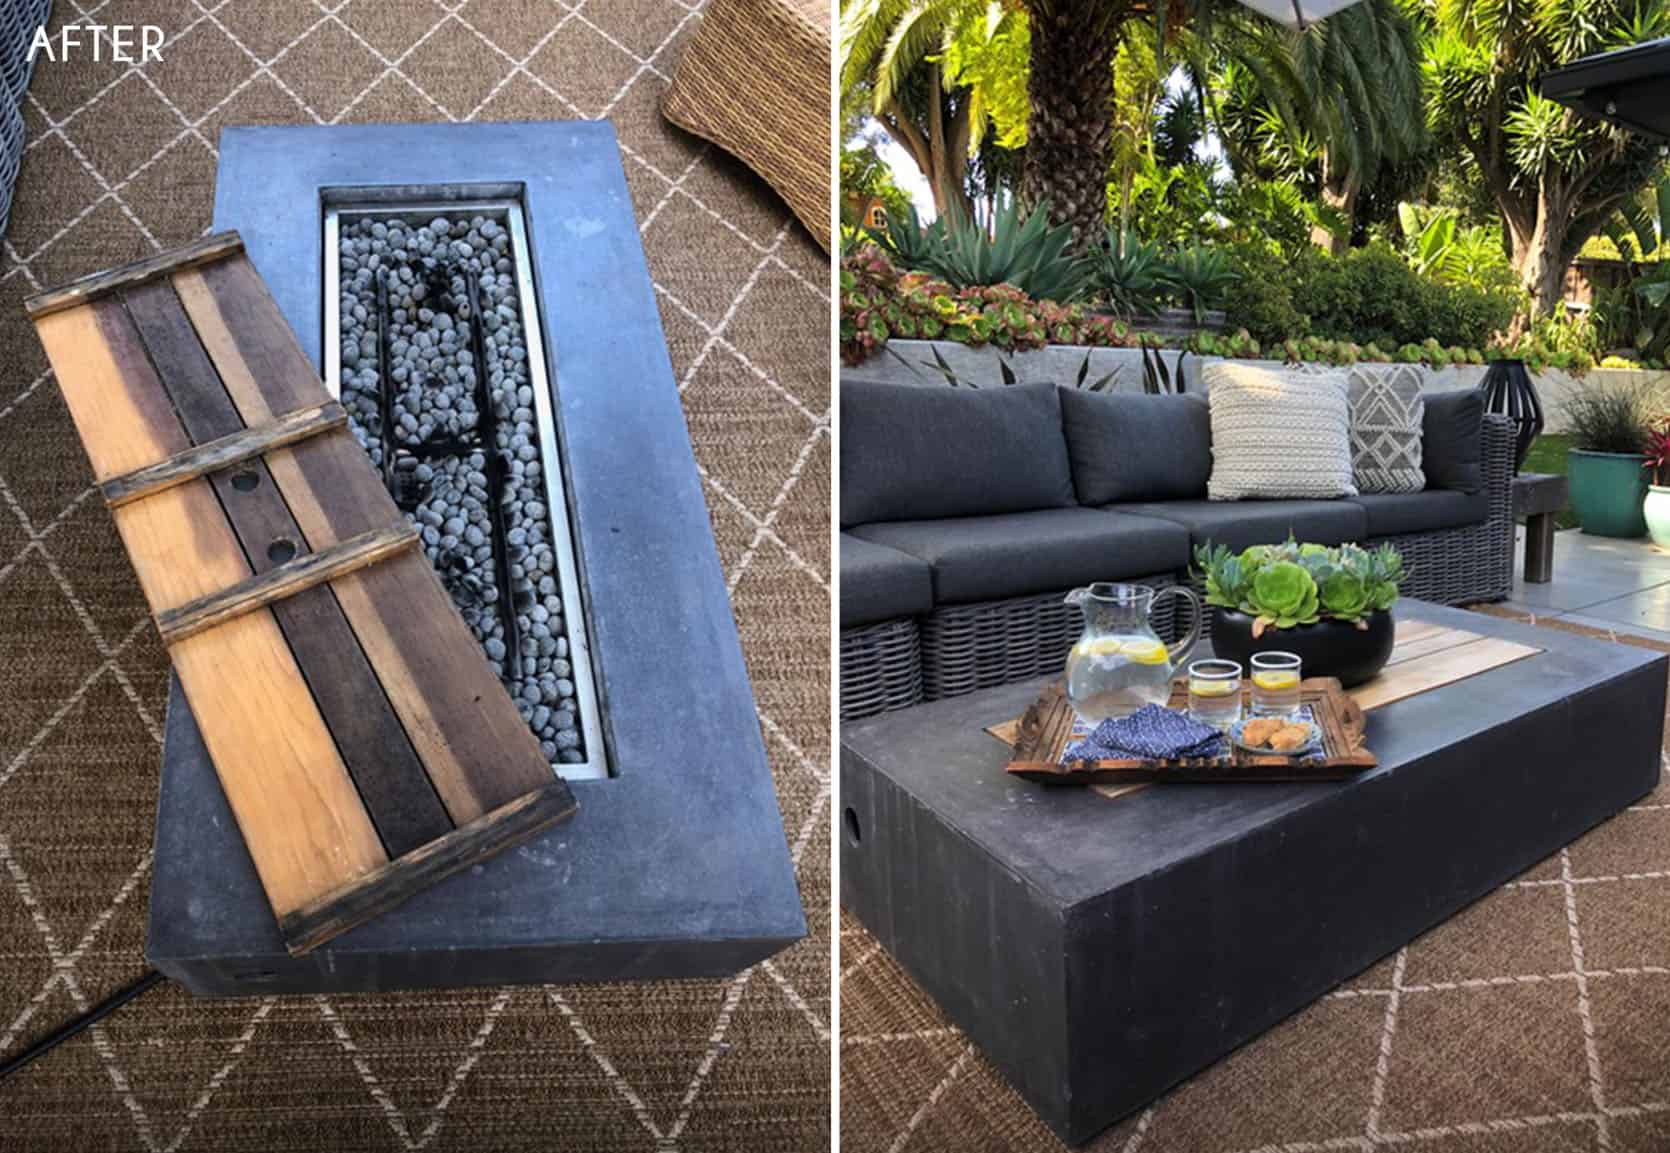
This is such a chic and easy way to make the most functional firepit ever. Designer Kisha Gianni made this awesome yet simple wood plank insert for her firepit. This way when those flames are taking a break, she can use it as a normal coffee table. Note the two holes on top to make it easy to take on and off. The only tricky measurement you really want to get right is the depth of the pit. You want to make sure that the braces are the right height so when it sits in the hole, the piece is flush with the rest of the coffee table. So if you have a measuring tape, a power drill, and some screws (maybe an electric saw if you can’t get the pieces pre-cut) you are good to go! Also if you are in the market for a firepit head here🙂
Turf Oasis
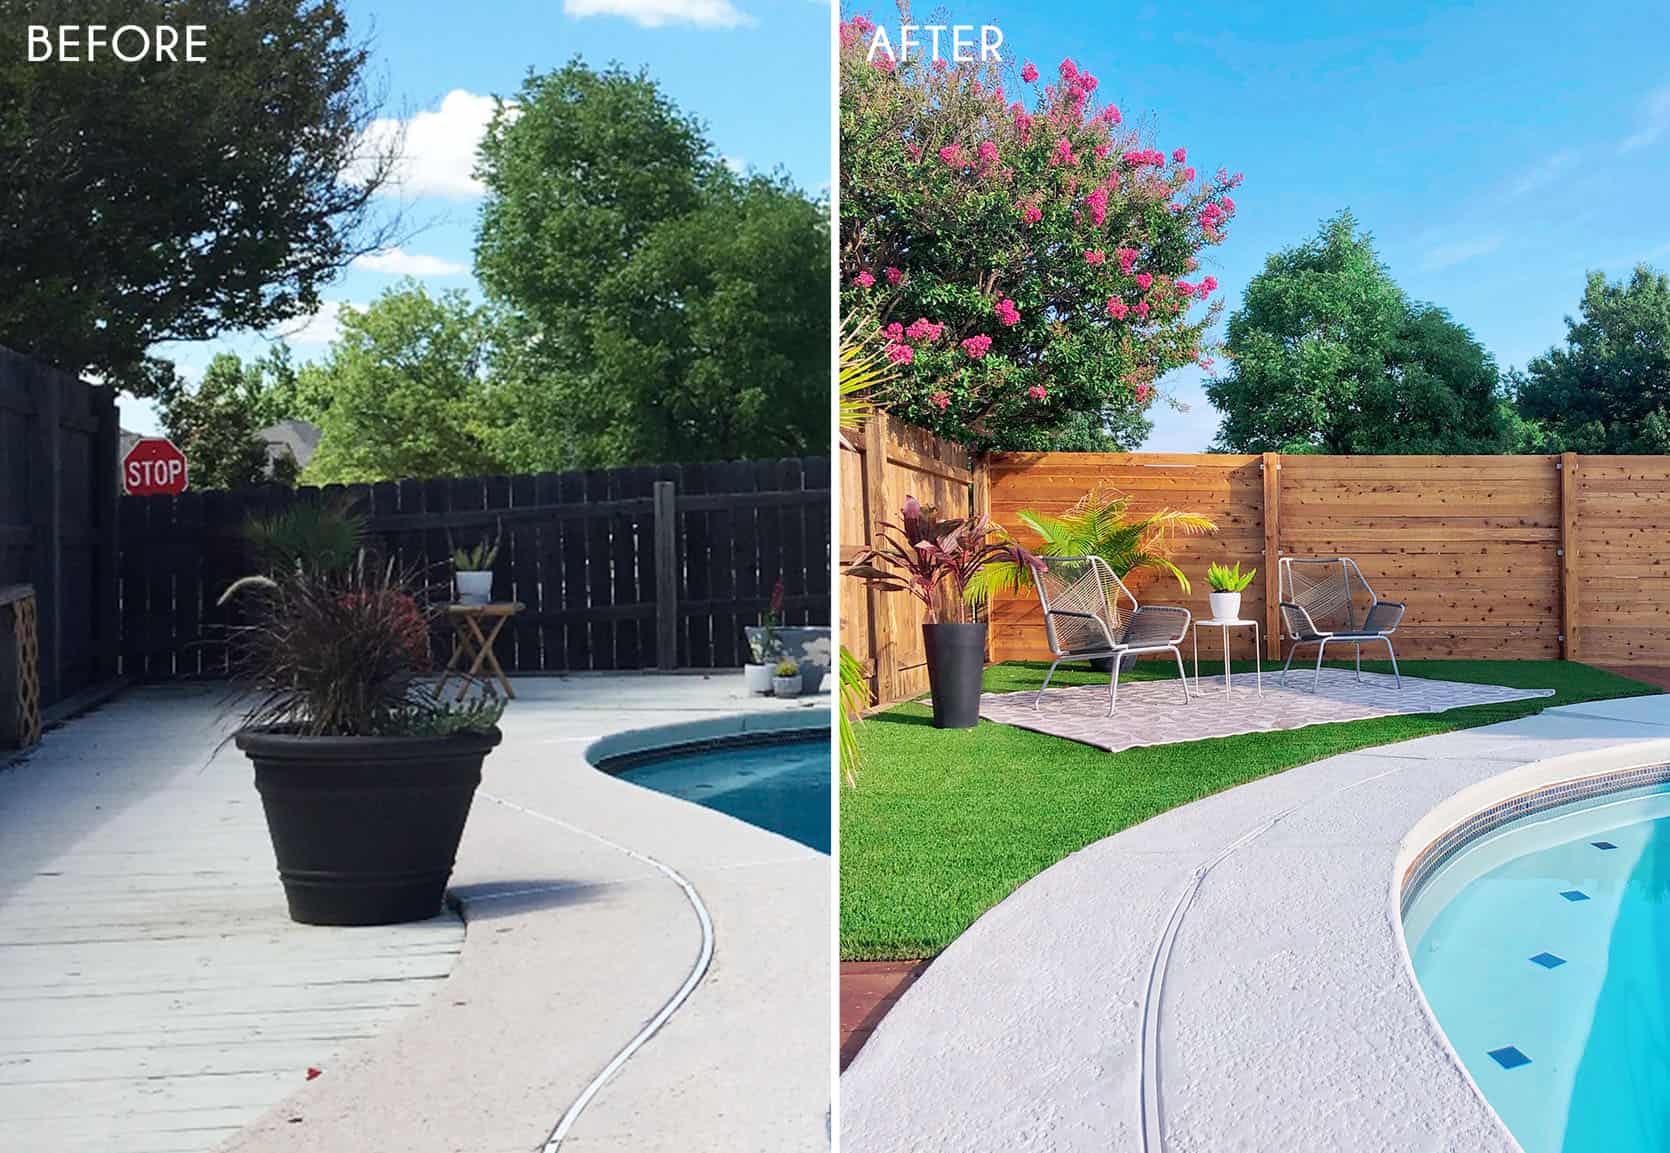
I have questioned the use of turf before. I mean I know it’s low maintenance and saves on water but does it look better? Well if there was ever a case in favor it’s designer Lauren’s poolside oasis.
“When we bought our house a little over 5 years ago, the wood deck around the pool had been painted white. The concrete around the pool was a beige/almost peachy color with lots of cracks. I tried several methods for sanding the deck, but the most effective option was an angle grinder with a DimaBrush attachment. I then used a multi-tool with a detail sander attachment to sand in between the cracks of the deck. To say it was tedious is a massive understatement! After everything was sanded, I filled all of the cracks in the concrete and used H&C Cool Feel acrylic deck & walkway coating from Sherwin Williams to paint it. For the most part, I rolled it on, but I had to brush it on along the inside edge of the pool and in between the plastic expansion joints. Next, I replaced the broken and warped deck boards and stained the whole deck with Cabot Australian Timber Oil in Jarrah Brown. The angled part of the fence that really bothered me broke during a storm this spring (how convenient!), so we hired out that job and got that replaced. In order to help the old & new fences blend in a little better, I pressure washed the existing fence and stained everything with Wood Defender stain in Harvest Brown. While you can clearly tell that part of the fence is newer (the color isn’t exactly the same and it is horizontal as opposed to vertical), it is much better than if I had left the old part untouched. Eventually, we’ll replace the other two sides, but that just wasn’t in the budget for the time being.
I ordered turf from a local company to create a small grassy area and break up all of the wood. The company delivered the turf in a large roll and helped me set it in place. Then I cut the shape using a box knife. Since it was going directly on top of a wood deck, I just used a staple gun to keep it in place. The turf is definitely one of my favorite parts of the whole makeover! It does get very hot in the heat of the day, but it is soft and very realistic looking.”
This was clearly a big project but man what an incredible reward. Here’s the budget breakdown:
Fence- $2227.12
Turf- $1124.27
Stains, tools, etc.- $719.25
Total: $4070.64
Again a very big project with a lot of DIY labor but for something that will last them years and hours of enjoyment, it was a great investment.
In need of garden/patio inspiration on a budget? Well, Cathy is here to fix that.
The Perfect Paver Patio
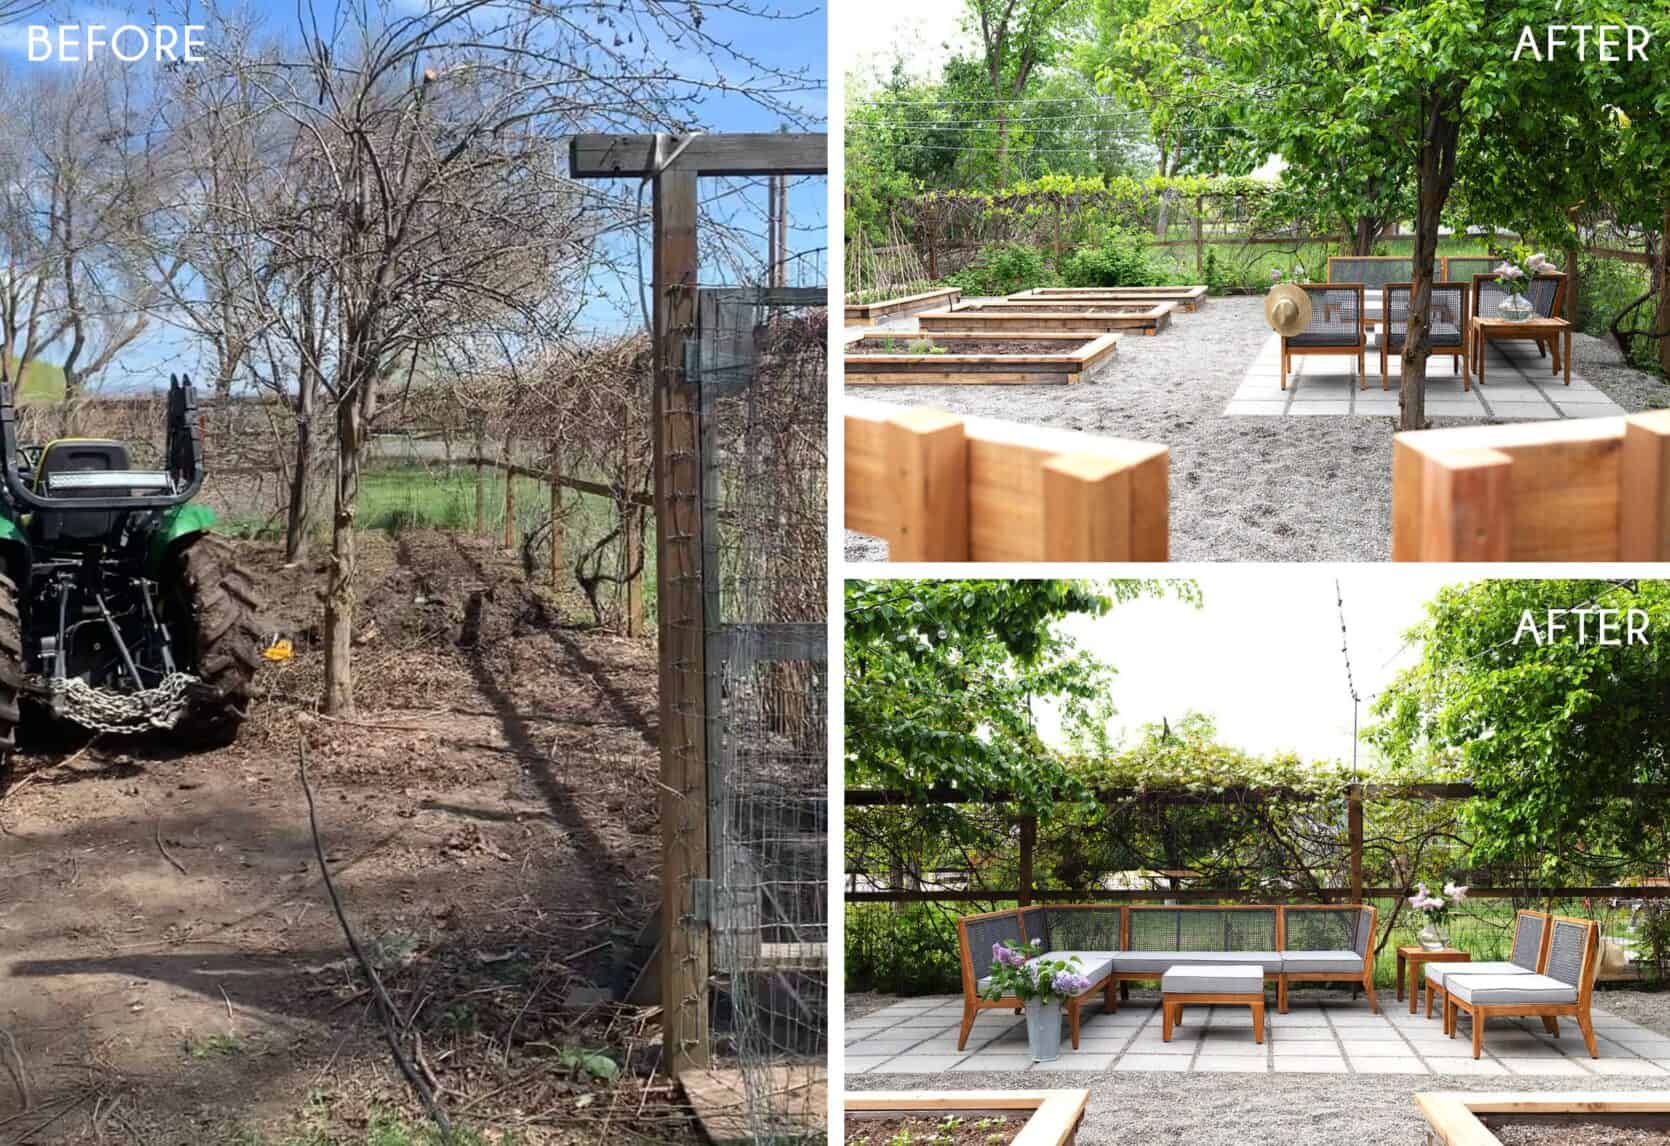
This DIY is seriously impressive, not only for how beautiful it turned out but it only cost $2,000 (not including the furniture). Cathy and her husband kept the deer fence, grapes, and fruit trees but cleared out the debris, added gravel, made garden beds, created the stone patio added a gate and styled the whole thing. Plus, get this…it only took four weeks to complete. This just goes to show that while this yard had beautiful bones, it’s completely possible to fully makeover a space on a reasonable budget and timeline. Head to her blog if you want the total breakdown of the costs and process.
Lastly, we have another familiar face, Leigh.
Poolside Retreat Makeover
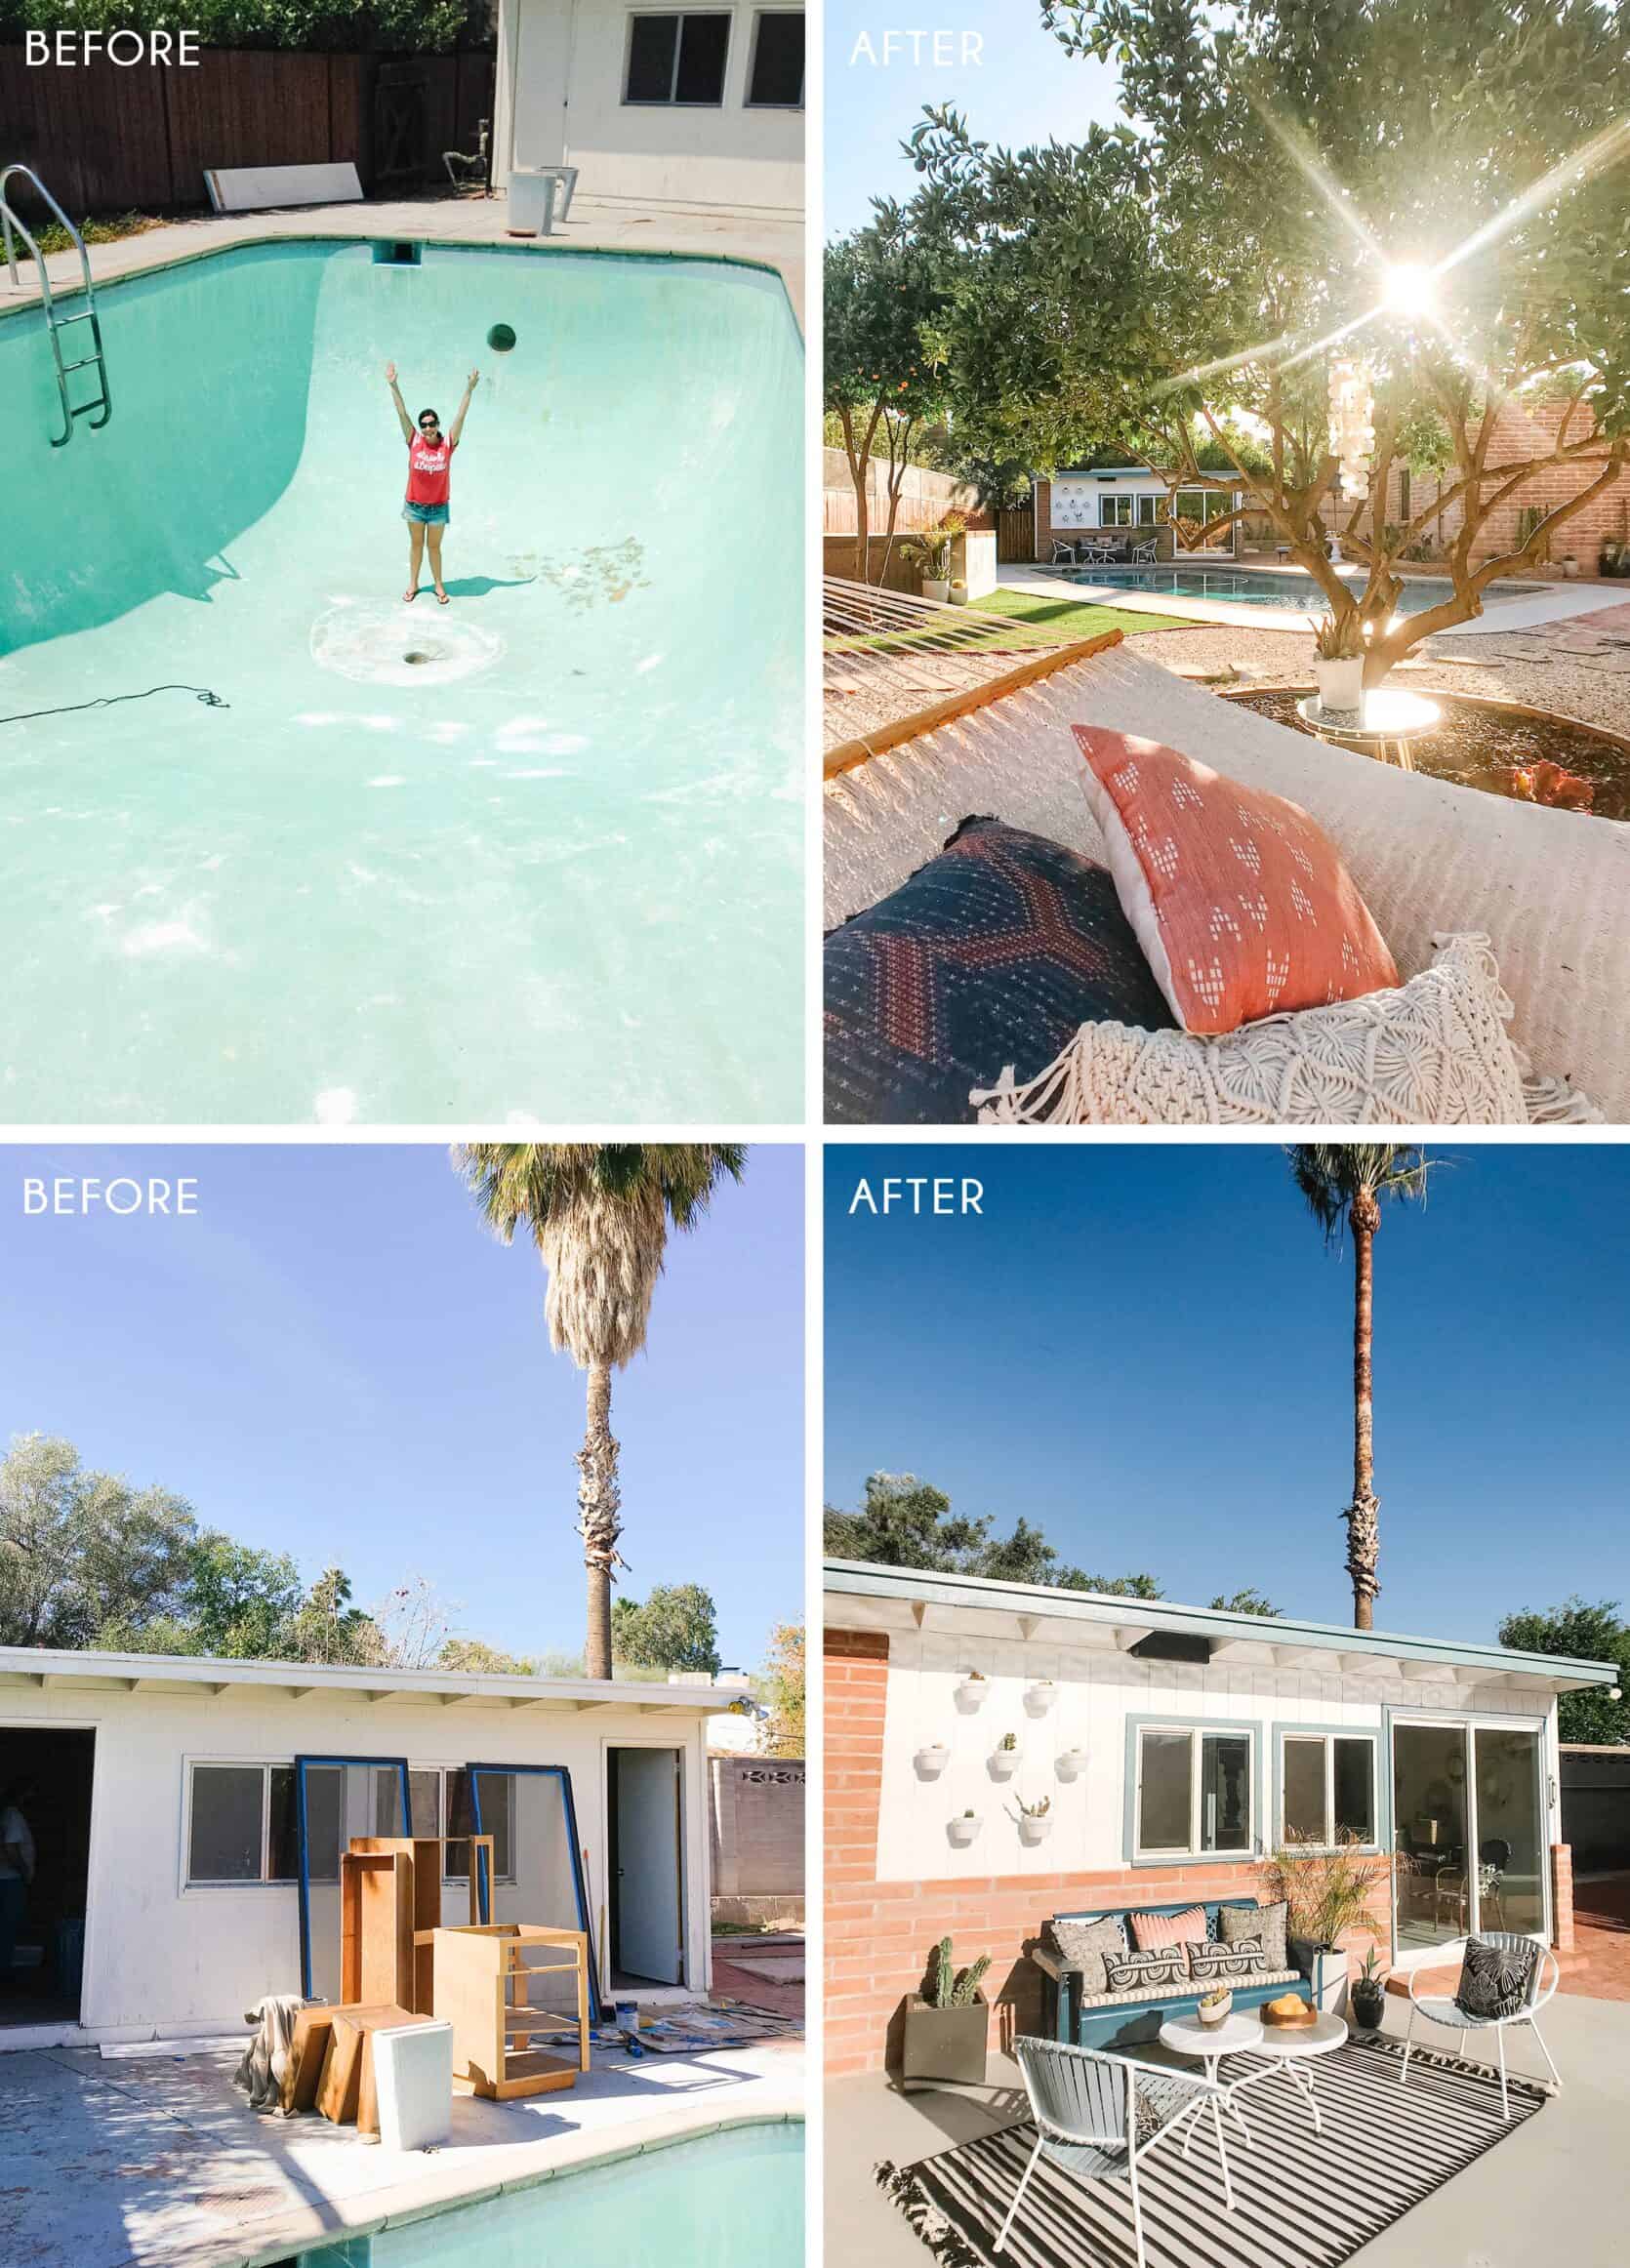
You might remember Leigh from our DIY bathrooms post and her awesome mint green vintage tub. Well, that was just one of MANY projects because she and her husband are renovating their entire home (backyard included). Again, there were a couple of things they hired professional help for like resurfacing the pool and installing an outdoor shower. But the rest was her, her husband and some very kind friends. While her husband resurfaced the pool deck, she DIYed that flower pot wall by painting inexpensive terracotta pots and gave some much-needed love to her vintage patio furniture.
For the furniture, she painted the glider navy blue but wanted to keep the circle chairs lighter for visual contrast. To do that she painted the bases white then replaced the old broken vinyl herself (after watching YouTube videos). “It was actually very fun and easy to do. You measure, subtract about 10%, then boil the vinyl strips and they get stretchy.” Very cool and everything looks great.
I don’t know about you but I want to be outside and preferably in a pool of some kind RIGHT NOW. A frozen drink sounds pretty nice, too. However, in all design seriousness I, as always, hope you feel inspired to DIY your outdoor space if it needs a little makeover. Also, let us know what you want to see next in the DIY world and we will do our best to deliver. 🙂 Lastly, thank you, thank you to everyone that submitted…again!
Love you, mean it.
REMINDER! If you are looking for more even renovation and budget-friendly goodness including posts and shopping options head to the All Things Renovation and Budget Ideas sections of the site.
Opening Photo Credit: Design by Bri Moysa
THIS POST WAS ORIGINALLY PUBLISHED HERE.
