Well, well, well…Here I am, after much teasing, I am finally on my way to a kitchen reveal. I think this space was the hardest for me to finish because it’s been completely liveable for a long time. After living in apartments for years with cabinets that had been painted so many times that only half of them closed, tile countertops, no garbage disposal, no dishwasher, and subpar appliances – this kitchen felt so much nicer so I just wasn’t inspired to make it any better.
That, and when we made the decision to renovate the kitchen, it was under much financial duress so the finishes weren’t anything to write home about and I knew I couldn’t justify changing them. Before we get too far into that though, let’s talk about where we started:
PHASE 1: THE BEFORE
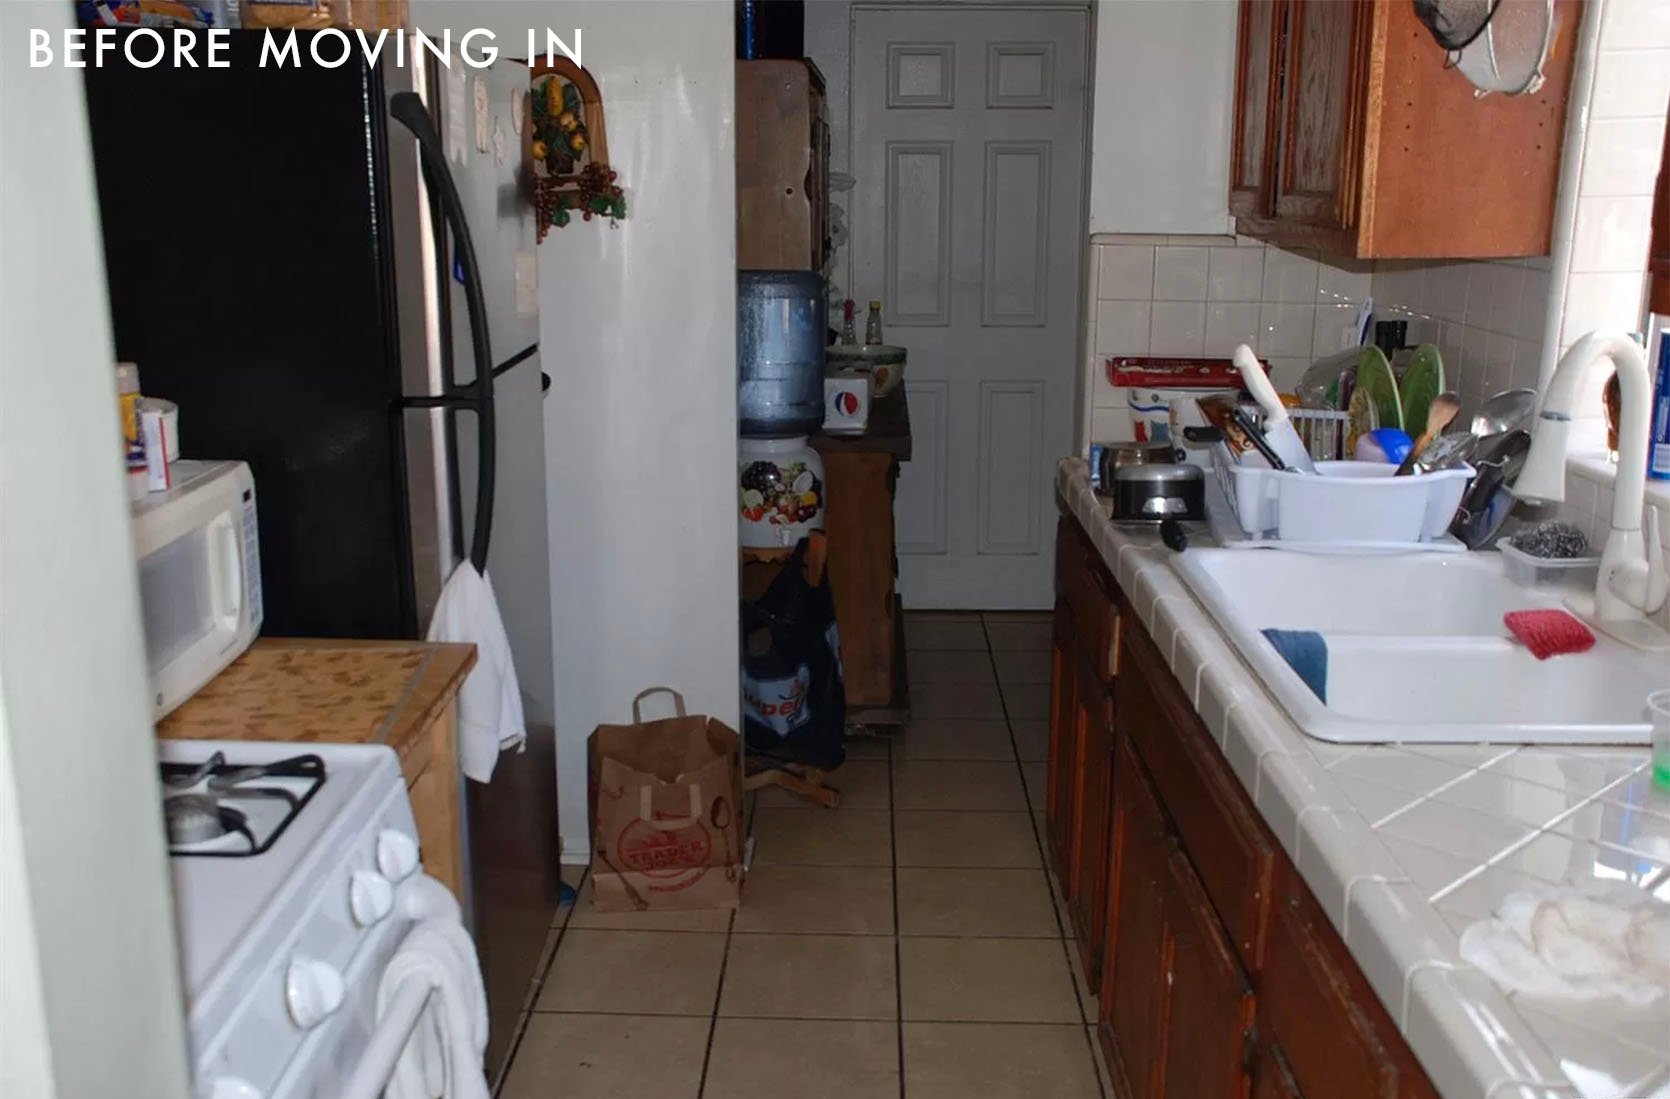
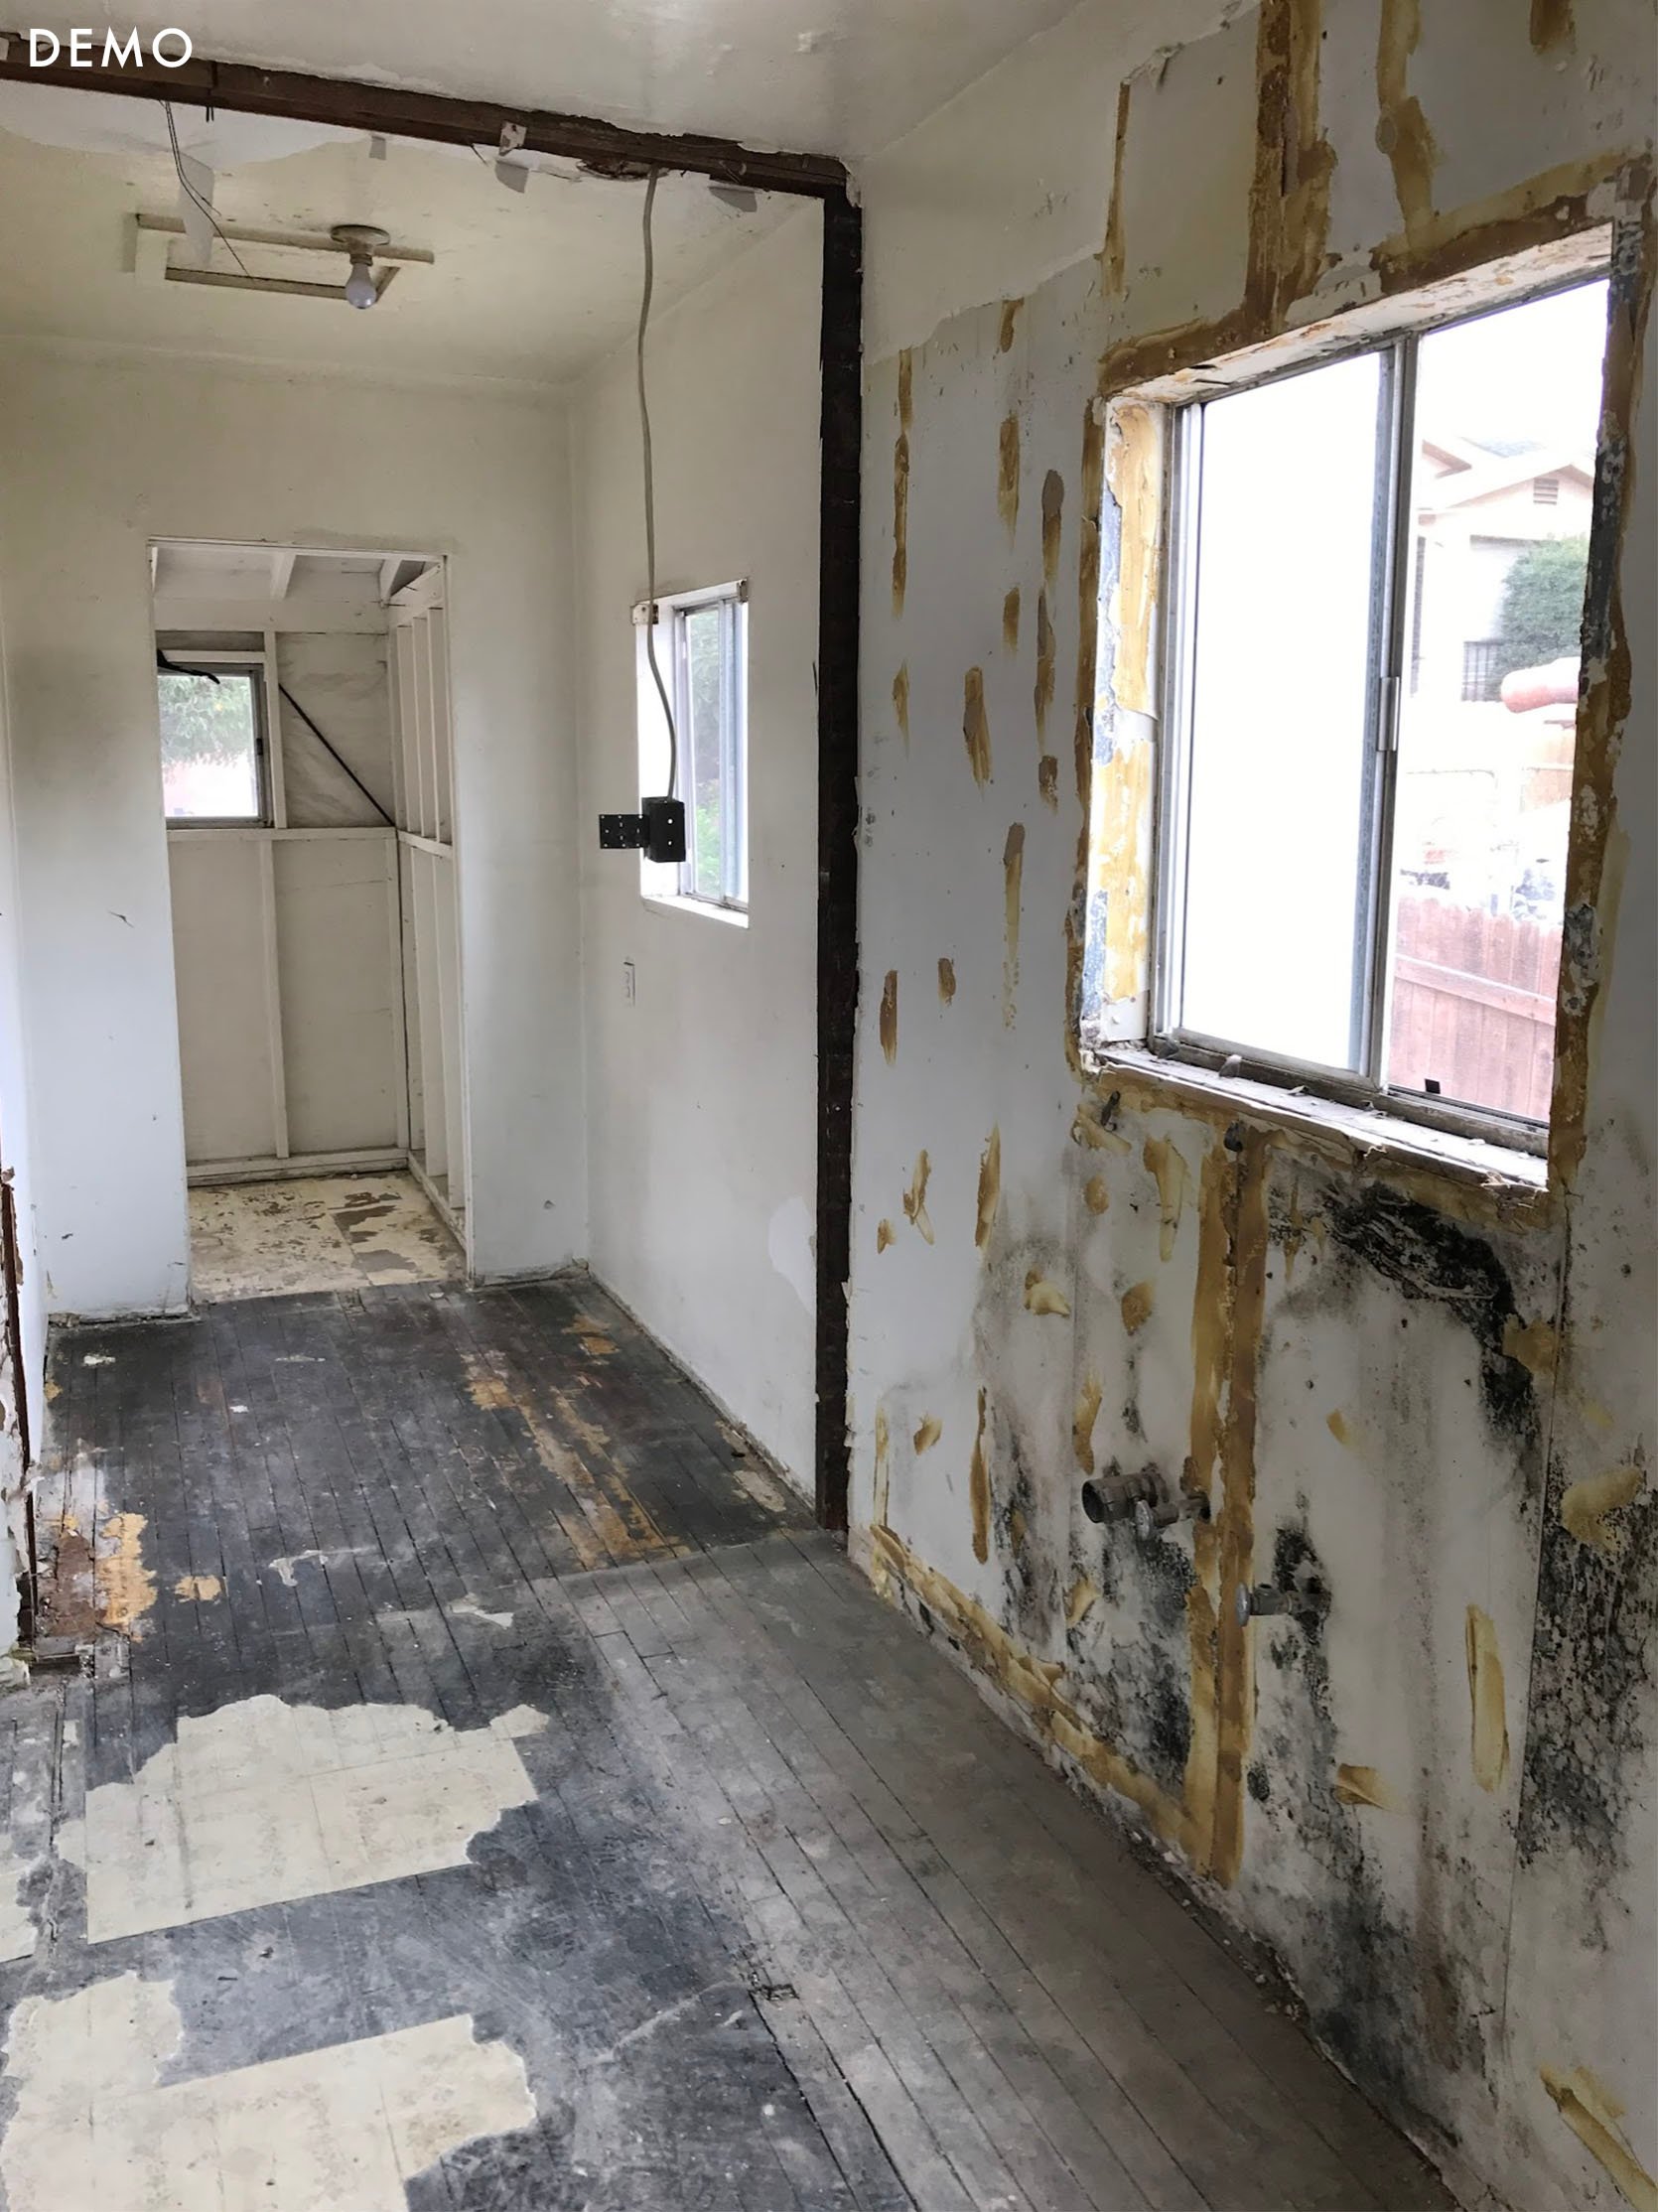
File this under: “one of a million examples of LA real estate not even trying to sell clearly overpriced homes”. This is what the kitchen looked like when I walked through the house, completely despondent, and ready to give up house hunting for good. For more about my psyche when we were searching for a home in 2016 you can read about it here.
It is a small, galley kitchen, with a strange walk-through…closet? I don’t know how to explain it. The door you see in the back there used to be the back door to a small covered patio that is now a laundry room. Truthfully it wasn’t much worse than any other kitchen I had rented. My last apartment had Pepto Bismol pink tile countertops and the one before that had banana yellow. Both were over 100 years old and there’s just no way to make them ever look clean. Shoutout to basically every renter in LA. FYI: I hear these are coming back?? I mean, they can be cute in photos but clearly whoever decided on that trend never lived with them. The GROUT! Blech. At least these were new-ish counters and kinda looked clean. When we made the decision to buy the place I was like, “I’ll just paint the cabinets myself and live with it until we save up money.” We needed to get the back house not just to a livable condition, but as nice as we could afford so we could rent it out for a premium to help pay for our mortgage. The plan for the front house was to do what we had always done: make the most of what we were given, as we did with our rentals, and slowly do the renovations over time.
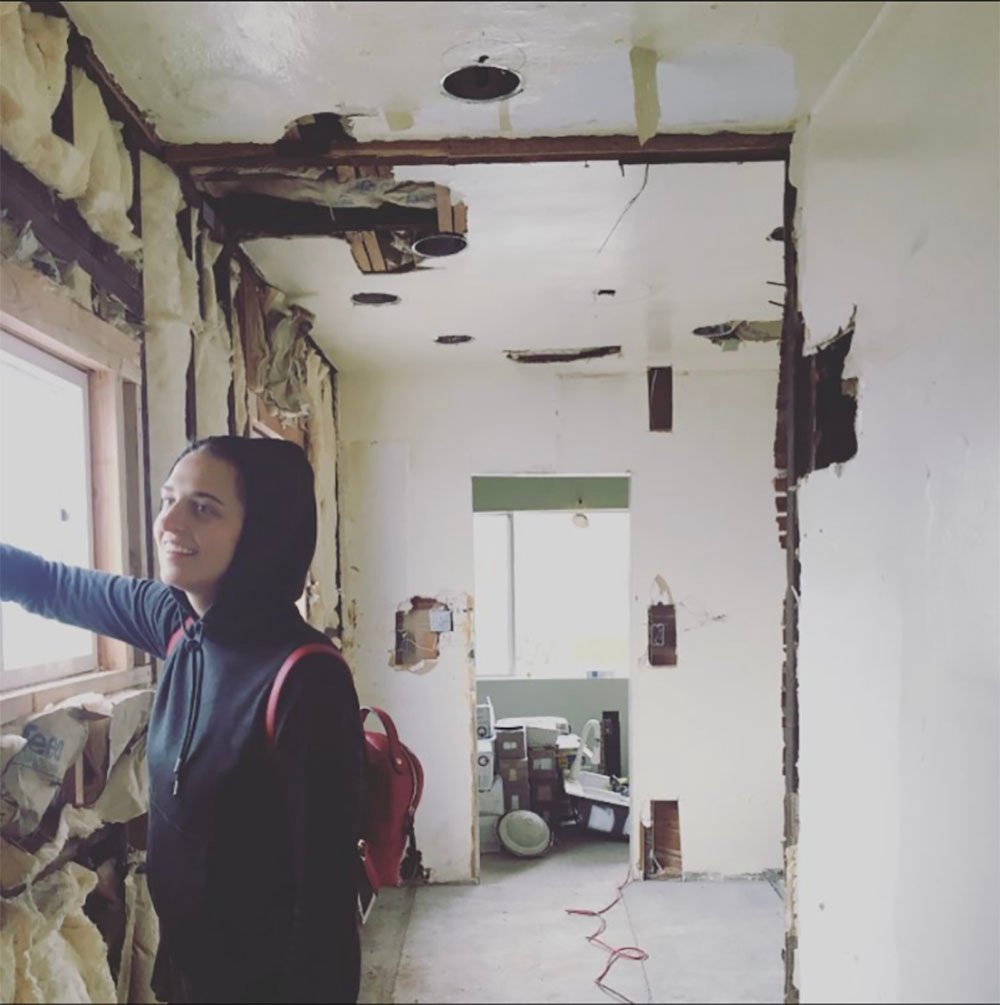
Of course, things did NOT go to plan, and slowly renovating didn’t happen. I really really wish I could have lived with the kitchen that was there and had the time and money to renovate it right the first time. I am a big advocate of living in a space for a year and seeing how you utilize or *want* to utilize the space before you make any big changes. Unfortunately, they found mold in the kitchen. I forget why they were looking for it at all, maybe a leak in the sink? Of course, I am happy that I didn’t live with black mold, but having to make quick and as-cheap-possible decisions did bite me in the butt a little bit. This is going to be a story about how I made my “meh” kitchen into a fully functional and pretty kitchen without renovating again. Hopefully, this is helpful for people who live in “good enough” kitchens that really don’t need to be ripped out but aren’t very inspiring.

PHASE 2: THE INITIAL, FORCED MAKEOVER
Let’s talk about the kitchen’s first makeover. When purchasing this house I wanted to go with finishes that were timeless and not too particular style-wise because the long game for this property is that both units are rentals. I recognize now that it is a very VERY long game because having the financial ability to keep this property and buy another one would mean something life-changing happened with our careers. However, a girl who has yet to feel the cold slap of adulthood can dream! I wanted the style to be simple, something most people could see themselves living in and making their own, despite my own pull towards the more dramatic. It was the spring of 2016 (didn’t end up signing papers until Oct – long story) so of course, we ended up with black hex floors and subway tile. This was back when you thought of those things as timeless and they hadn’t *completely* overrun all of social media. Subway and hex tile are also very affordable, as were simple white cabinets and the 3 slabs of quartz I found for $300 each. I needed a slab and a half for each kitchen – this is where it became apparent that this was going to be a lot more affordable if I choose the same finishes for both kitchens. My plan was to use IKEA cabinets because I had heard good things. My contractor insisted he could do higher quality for less and honestly, I’m pretty happy with them. They aren’t fancy but they are made with good plywood and didn’t have that extreme off-gassing that cheap cabinets have.
I was in complete financial trauma by the time we were told the kitchen had mold and we needed to renovate both kitchens. I honestly don’t remember much from the process other than trying to pick the best I could for as cheap as possible. There was not a lot of joy in it. I do remember noticing the lack of joy at the time and feeling a bit sorry for myself. I love design and I love making a home but I didn’t love anything about this part of the process because it didn’t feel like I really had options. This was not the romantic idea I had of my first home in my head. The kitchen era of the reno was a dark era for sure.
That said, even though I was completely stressed about how we were going to pay for all this (which at this point was $100,000 OVER what I was bid and would go higher), there were a few things I put my foot down about that I am very pleased with to this day: I wanted the wall between the kitchen and this strange closet/walk-through to be taken down and I wanted a dishwasher.
My contractor was really against me putting in a dishwasher because of how much cabinet space it eats up, and he wasn’t wrong – he just underestimated what I was willing to sacrifice and what I could make happen in such a tiny space in order to have a dishwasher. I. Love. My. Dishwasher. I use it every single day with absolute abandon and literally, NO ONE can make me feel bad about it. After hand washing SINCE LEAVING MY PARENT’S HOUSE, I know FOR A FACT that handwashing uses more water and 100% is the worst. My heart goes out to people without one (I see you 99% of LA renters) and I will not gaslight you as my friends who had dishwashers and washing machines and AC did to me. Your life will get at least 80% better simply with modern conveniences. You can be “flirting with financial disaster” (quote by my friend Lauren to me about this time period) and walk into your new house with a dishwasher, washer/dryer, AC and be like, “I’M RICH!”.
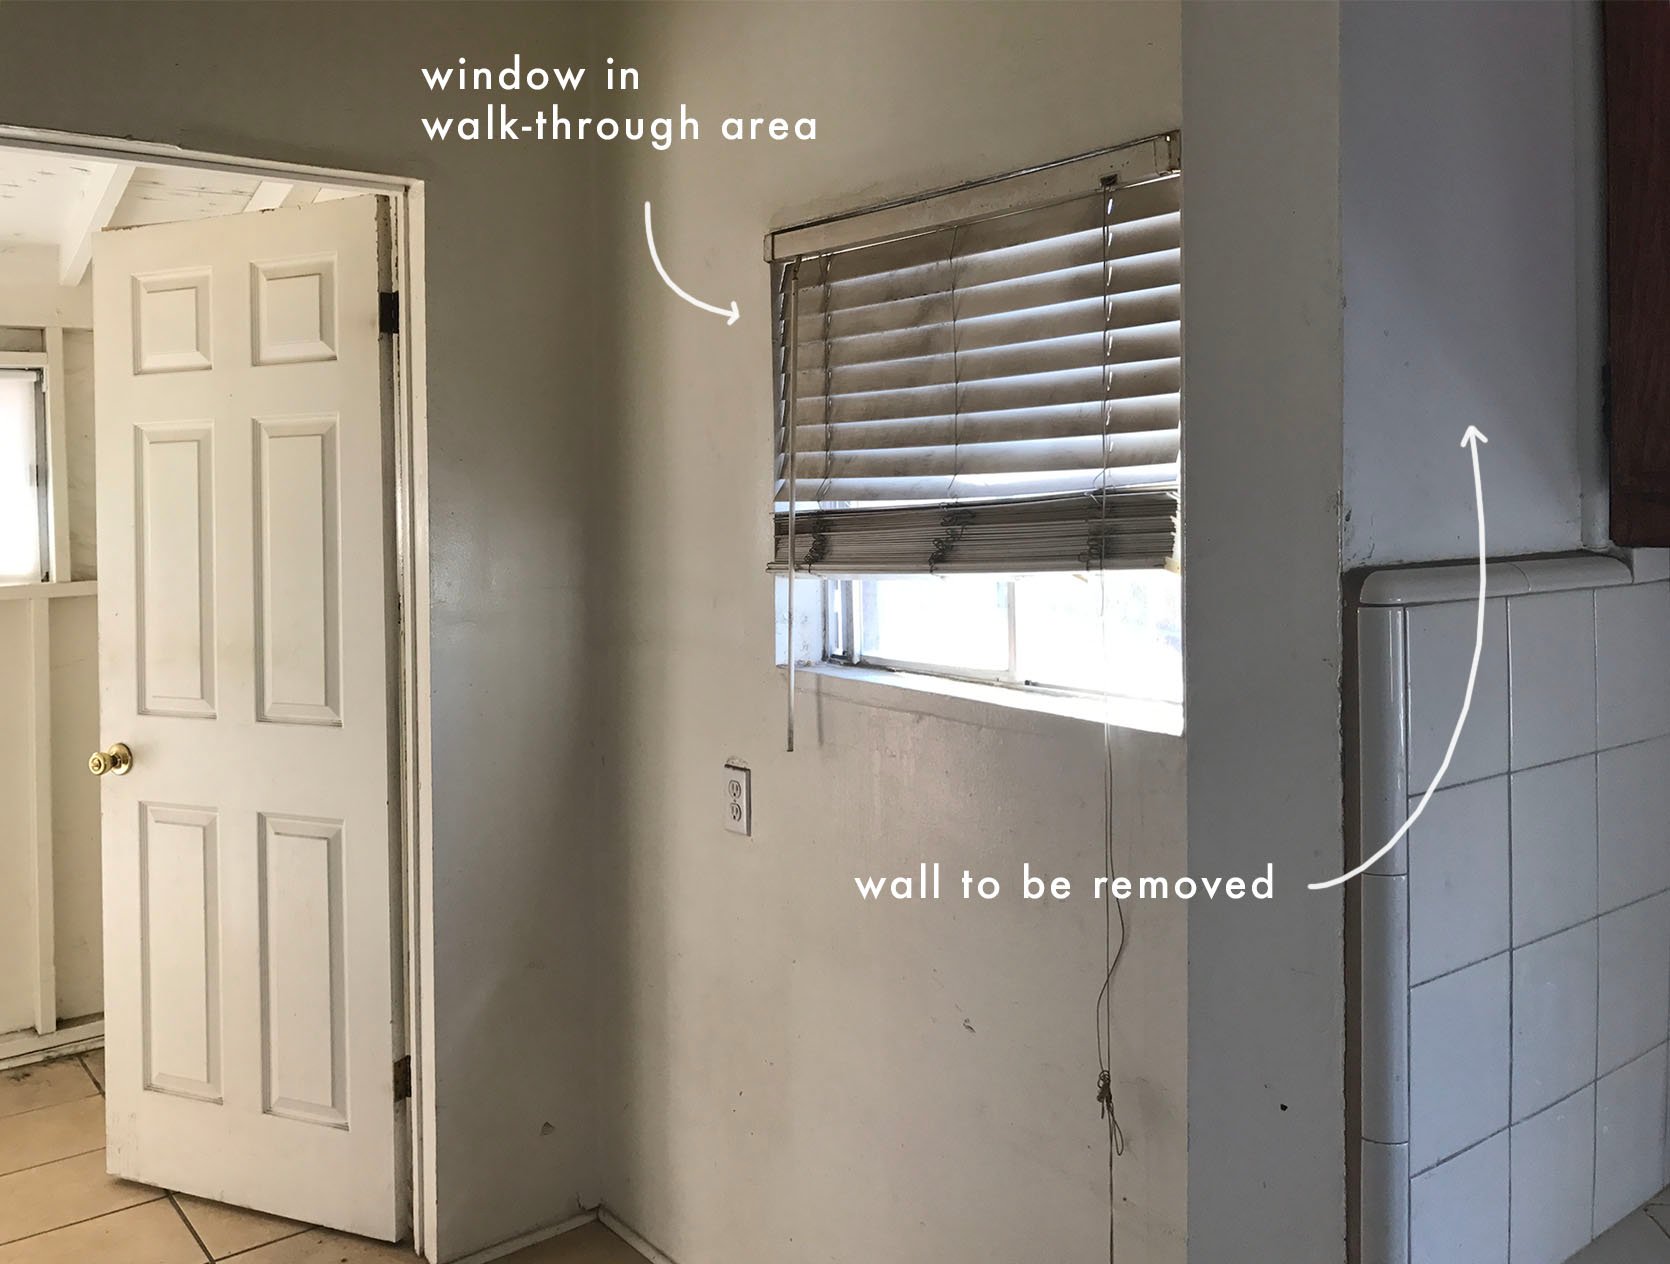
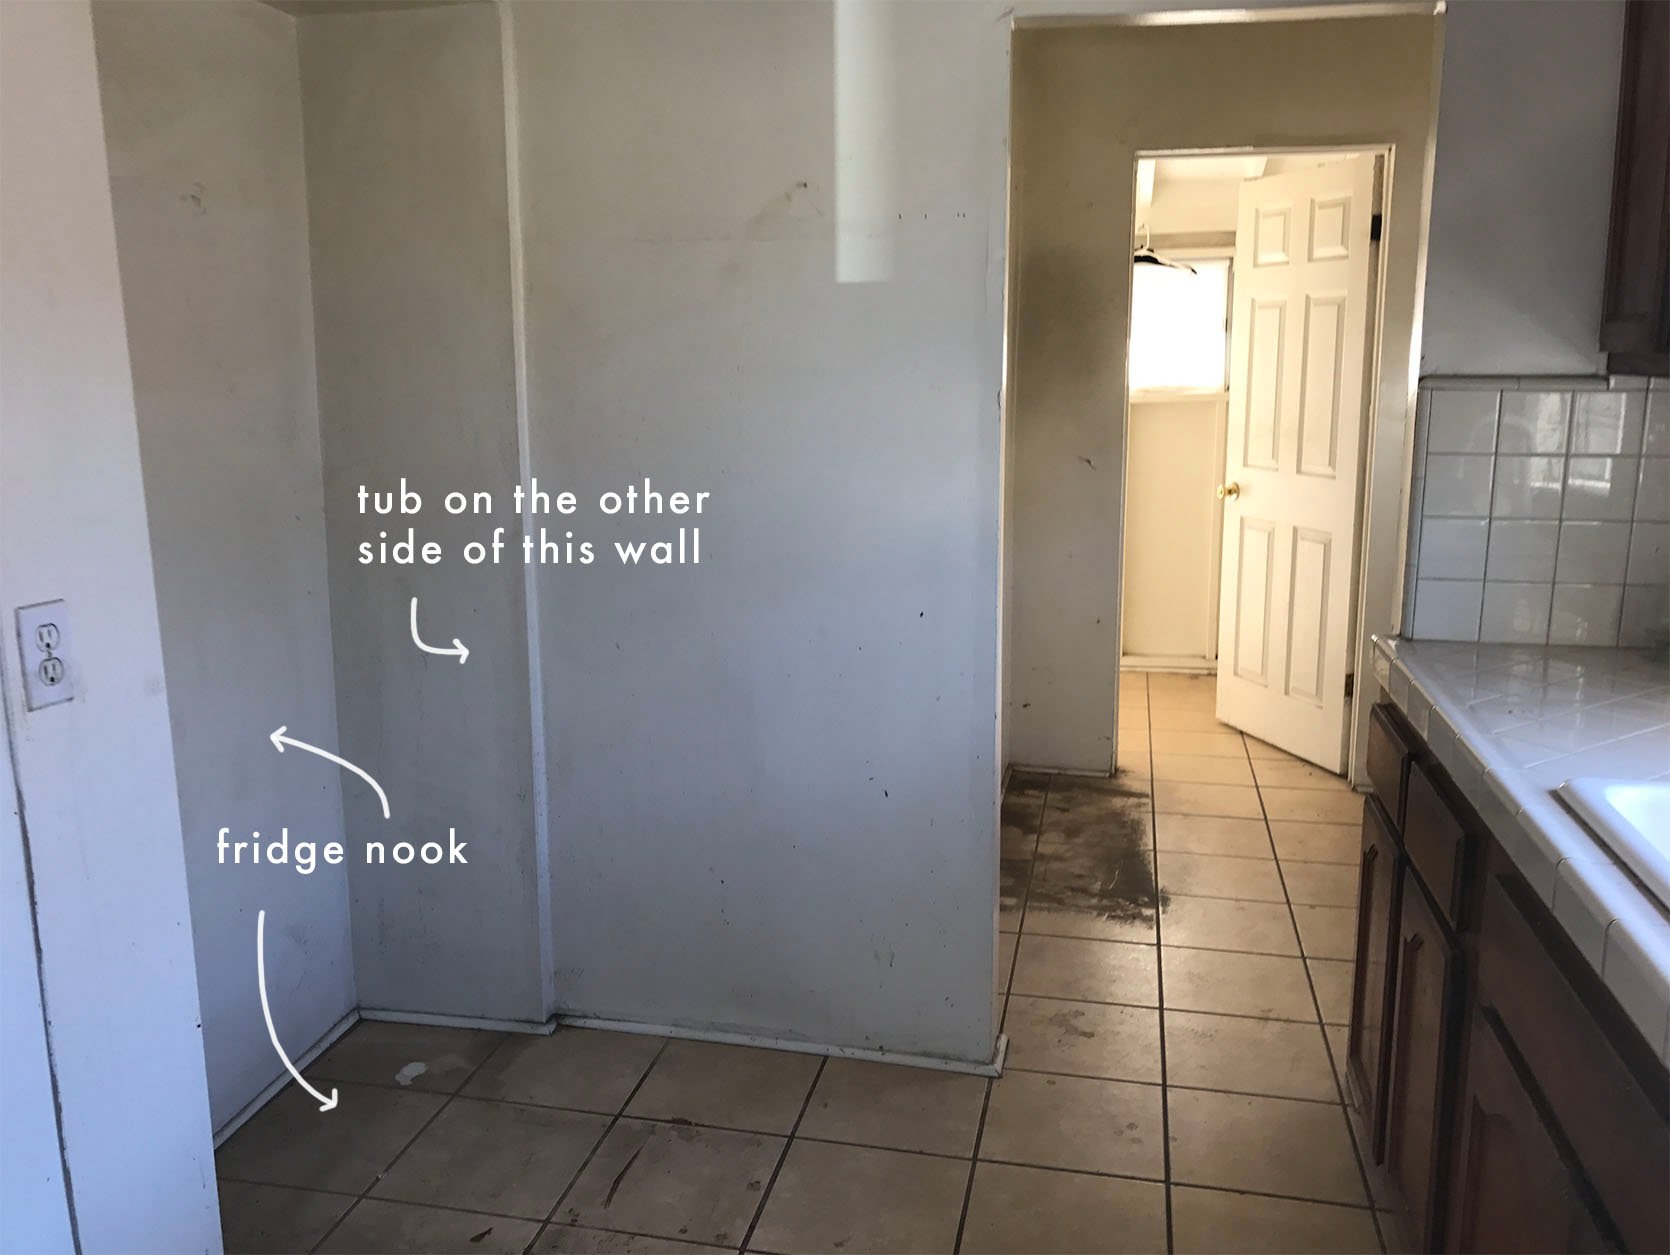
Taking down the weird wall was a must. That closet/walk-through space was practically unusable and made the space feel tinier than it already was. The general layout of the kitchen is the only way to do it, so all appliances stayed where they were. My house is very economical and there’s not one bit of unused real estate, meaning there’s no wall you can break through to make more space. Behind the stove on the left is the hall closet (one of two closets in the whole house), and the bump out after the fridge is our bathroom. We had to keep this odd, narrowing galley, the only thing we didn’t need was the doorway into the closet thingy. For the life of me, I can’t figure out why it was there to begin with. As you can see in the first photo, the previous owner had a piece of furniture in there to give themselves more storage and it’s not on the other side of the space because there’s a window in the middle of that wall.
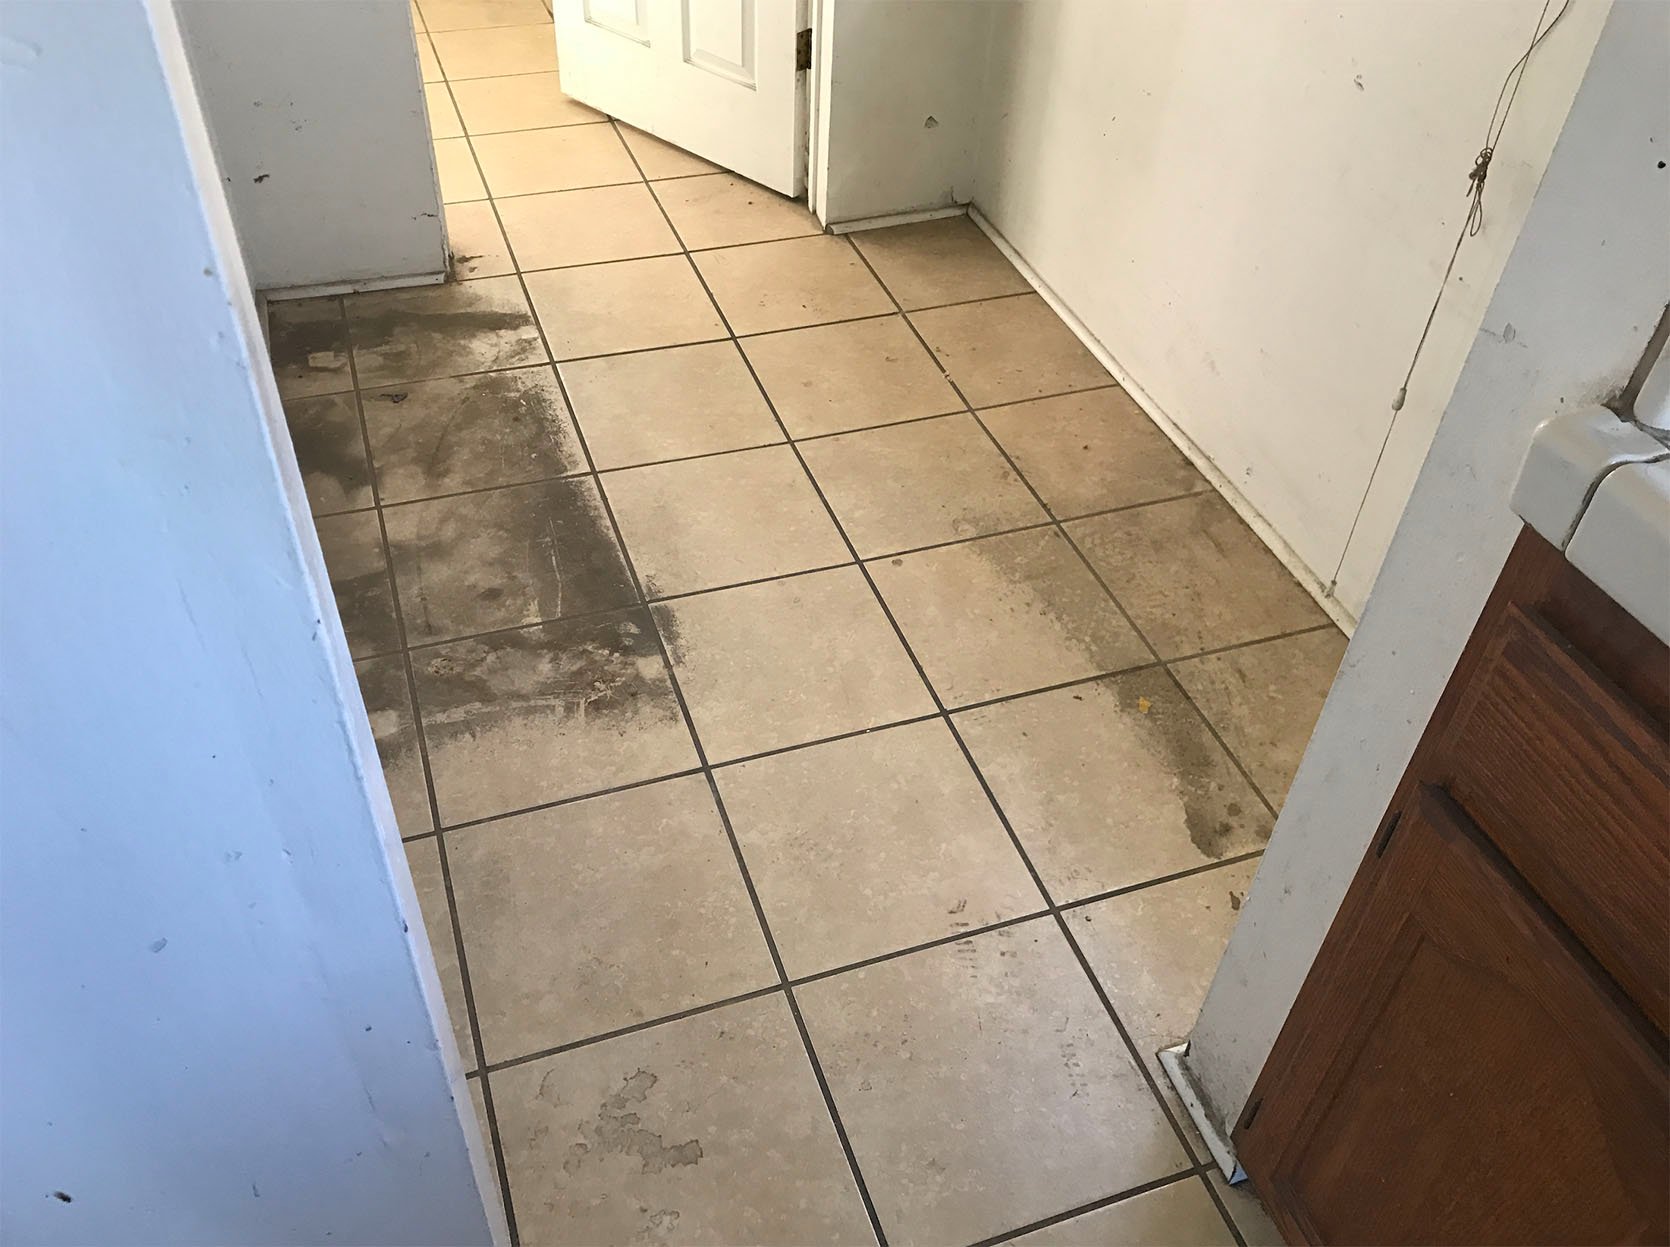
I actually really wanted to use the wood underneath the tile floor but turns out it was literally the subfloor, like between the cracks you could see down under the house. Unfortunately for insulation reasons, we needed to put something on top. If I could turn back time I would have ripped up all the floors and put matching new wood throughout the entire space because I love wood floors in the kitchen. There are original wood floors in the living/dining and one of the bedrooms and to save money I wanted to refinish them and only tile the space that didn’t have original floors but now, of course, the original floors are falling apart and I have to replace them. Le sigh.
I digress, back to the point: the renovation was easy in the sense that it was “put new cabinets exactly where there had already been cabinets, minus the uppers on the sink side because I want open shelving there”. Spoiler alert: I still don’t have open shelving there.
Because the space where the walk-through closet thing was more narrow, we couldn’t continue with normal cabinets and also…I couldn’t afford them. I told myself I would find the perfect vintage piece to put there, perfect being 36” high to match the counters, only 15” deep as to not block the doorway to the laundry room, and 38” long to make the most of the space. Spoiler alert: I did not find the perfect piece. Let’s take a look at how the kitchen has looked for most of the past 6 years:
For funsies do you want to see the matching back unit kitchen?
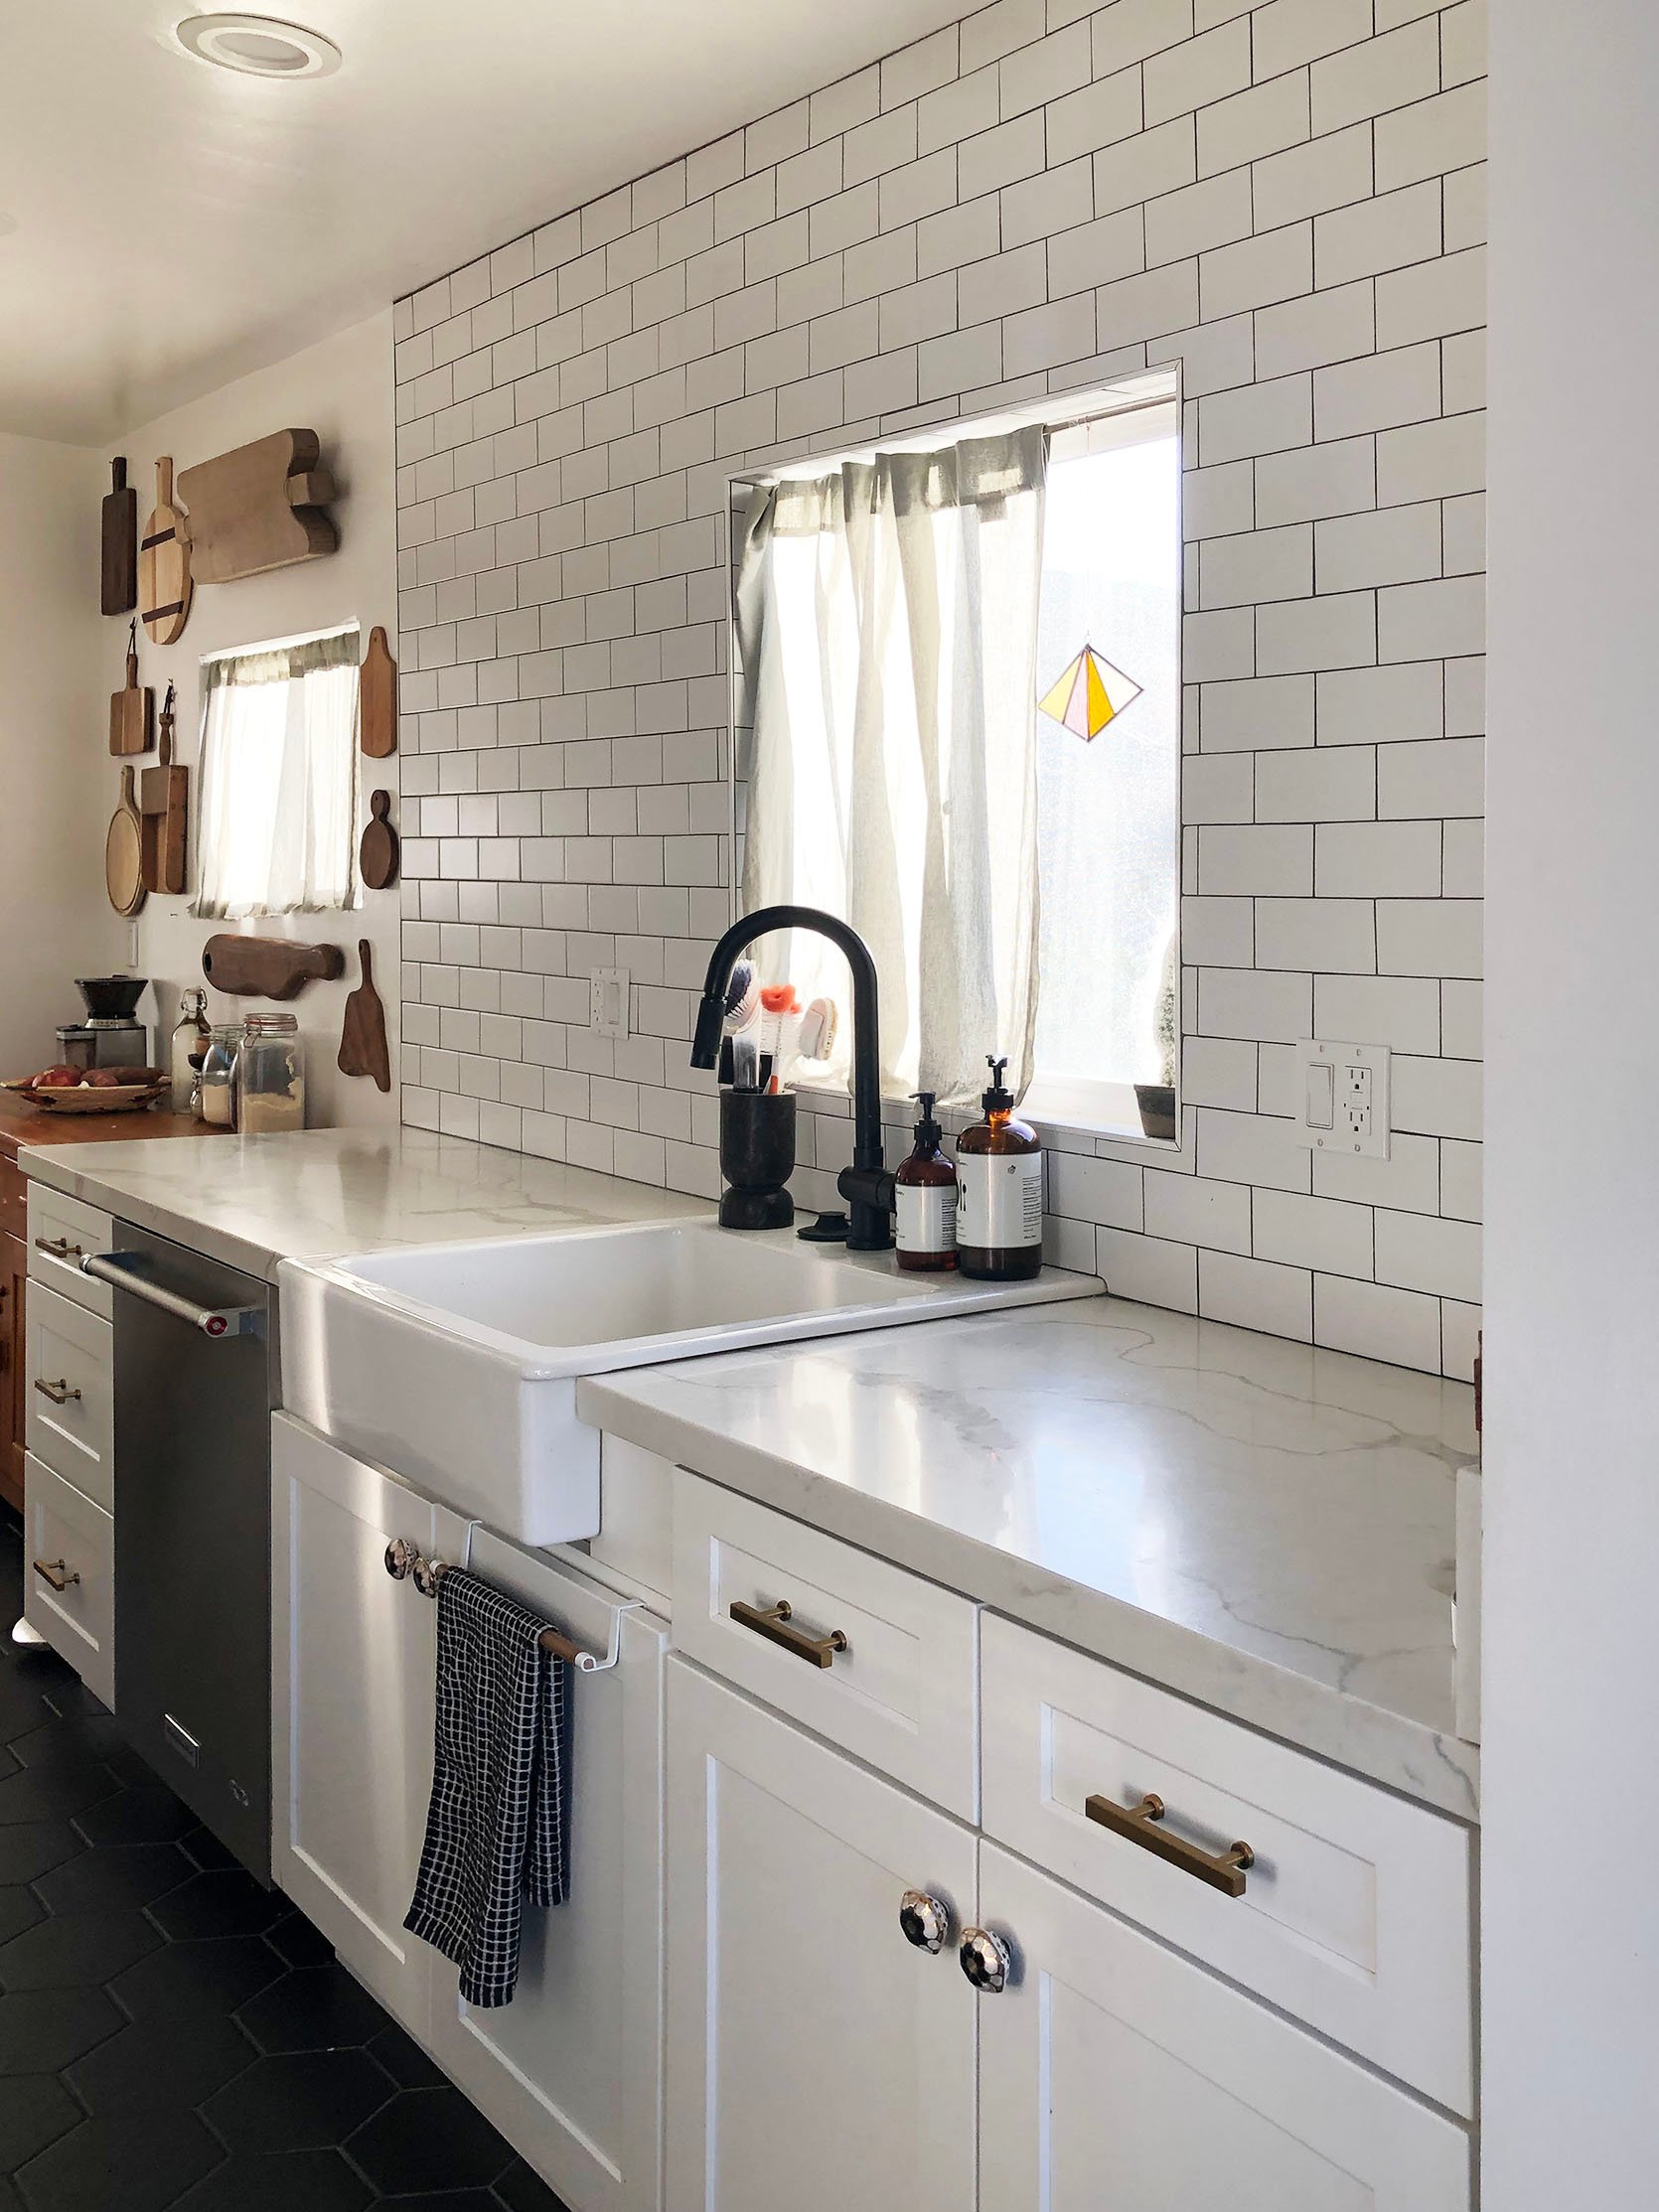
Fine, right? It’s fiiiine. A million times better than the before but, you know, whatever. Things I loved: being able to feel like my kitchen was clean, new appliances, a garbage disposal, and the natural light in here is really, really good. The plan was to put open shelving up but because the tile was put up without thinking about *how* the shelving would be installed – it’s proved to be tricky. Now after living without it for years I’m afraid that it will feel like it’s too visually busy. I get the draw of no uppers, it makes the space feel bigger than it is. That said: Mama could really use a little more storage. Also, I have a lot of pretty things, it kind of comes with the stylist territory and it would be nice to have some of them out.
PHASE 3: SOLVING STORAGE PROBLEMS (OR ATTEMPTING TO)
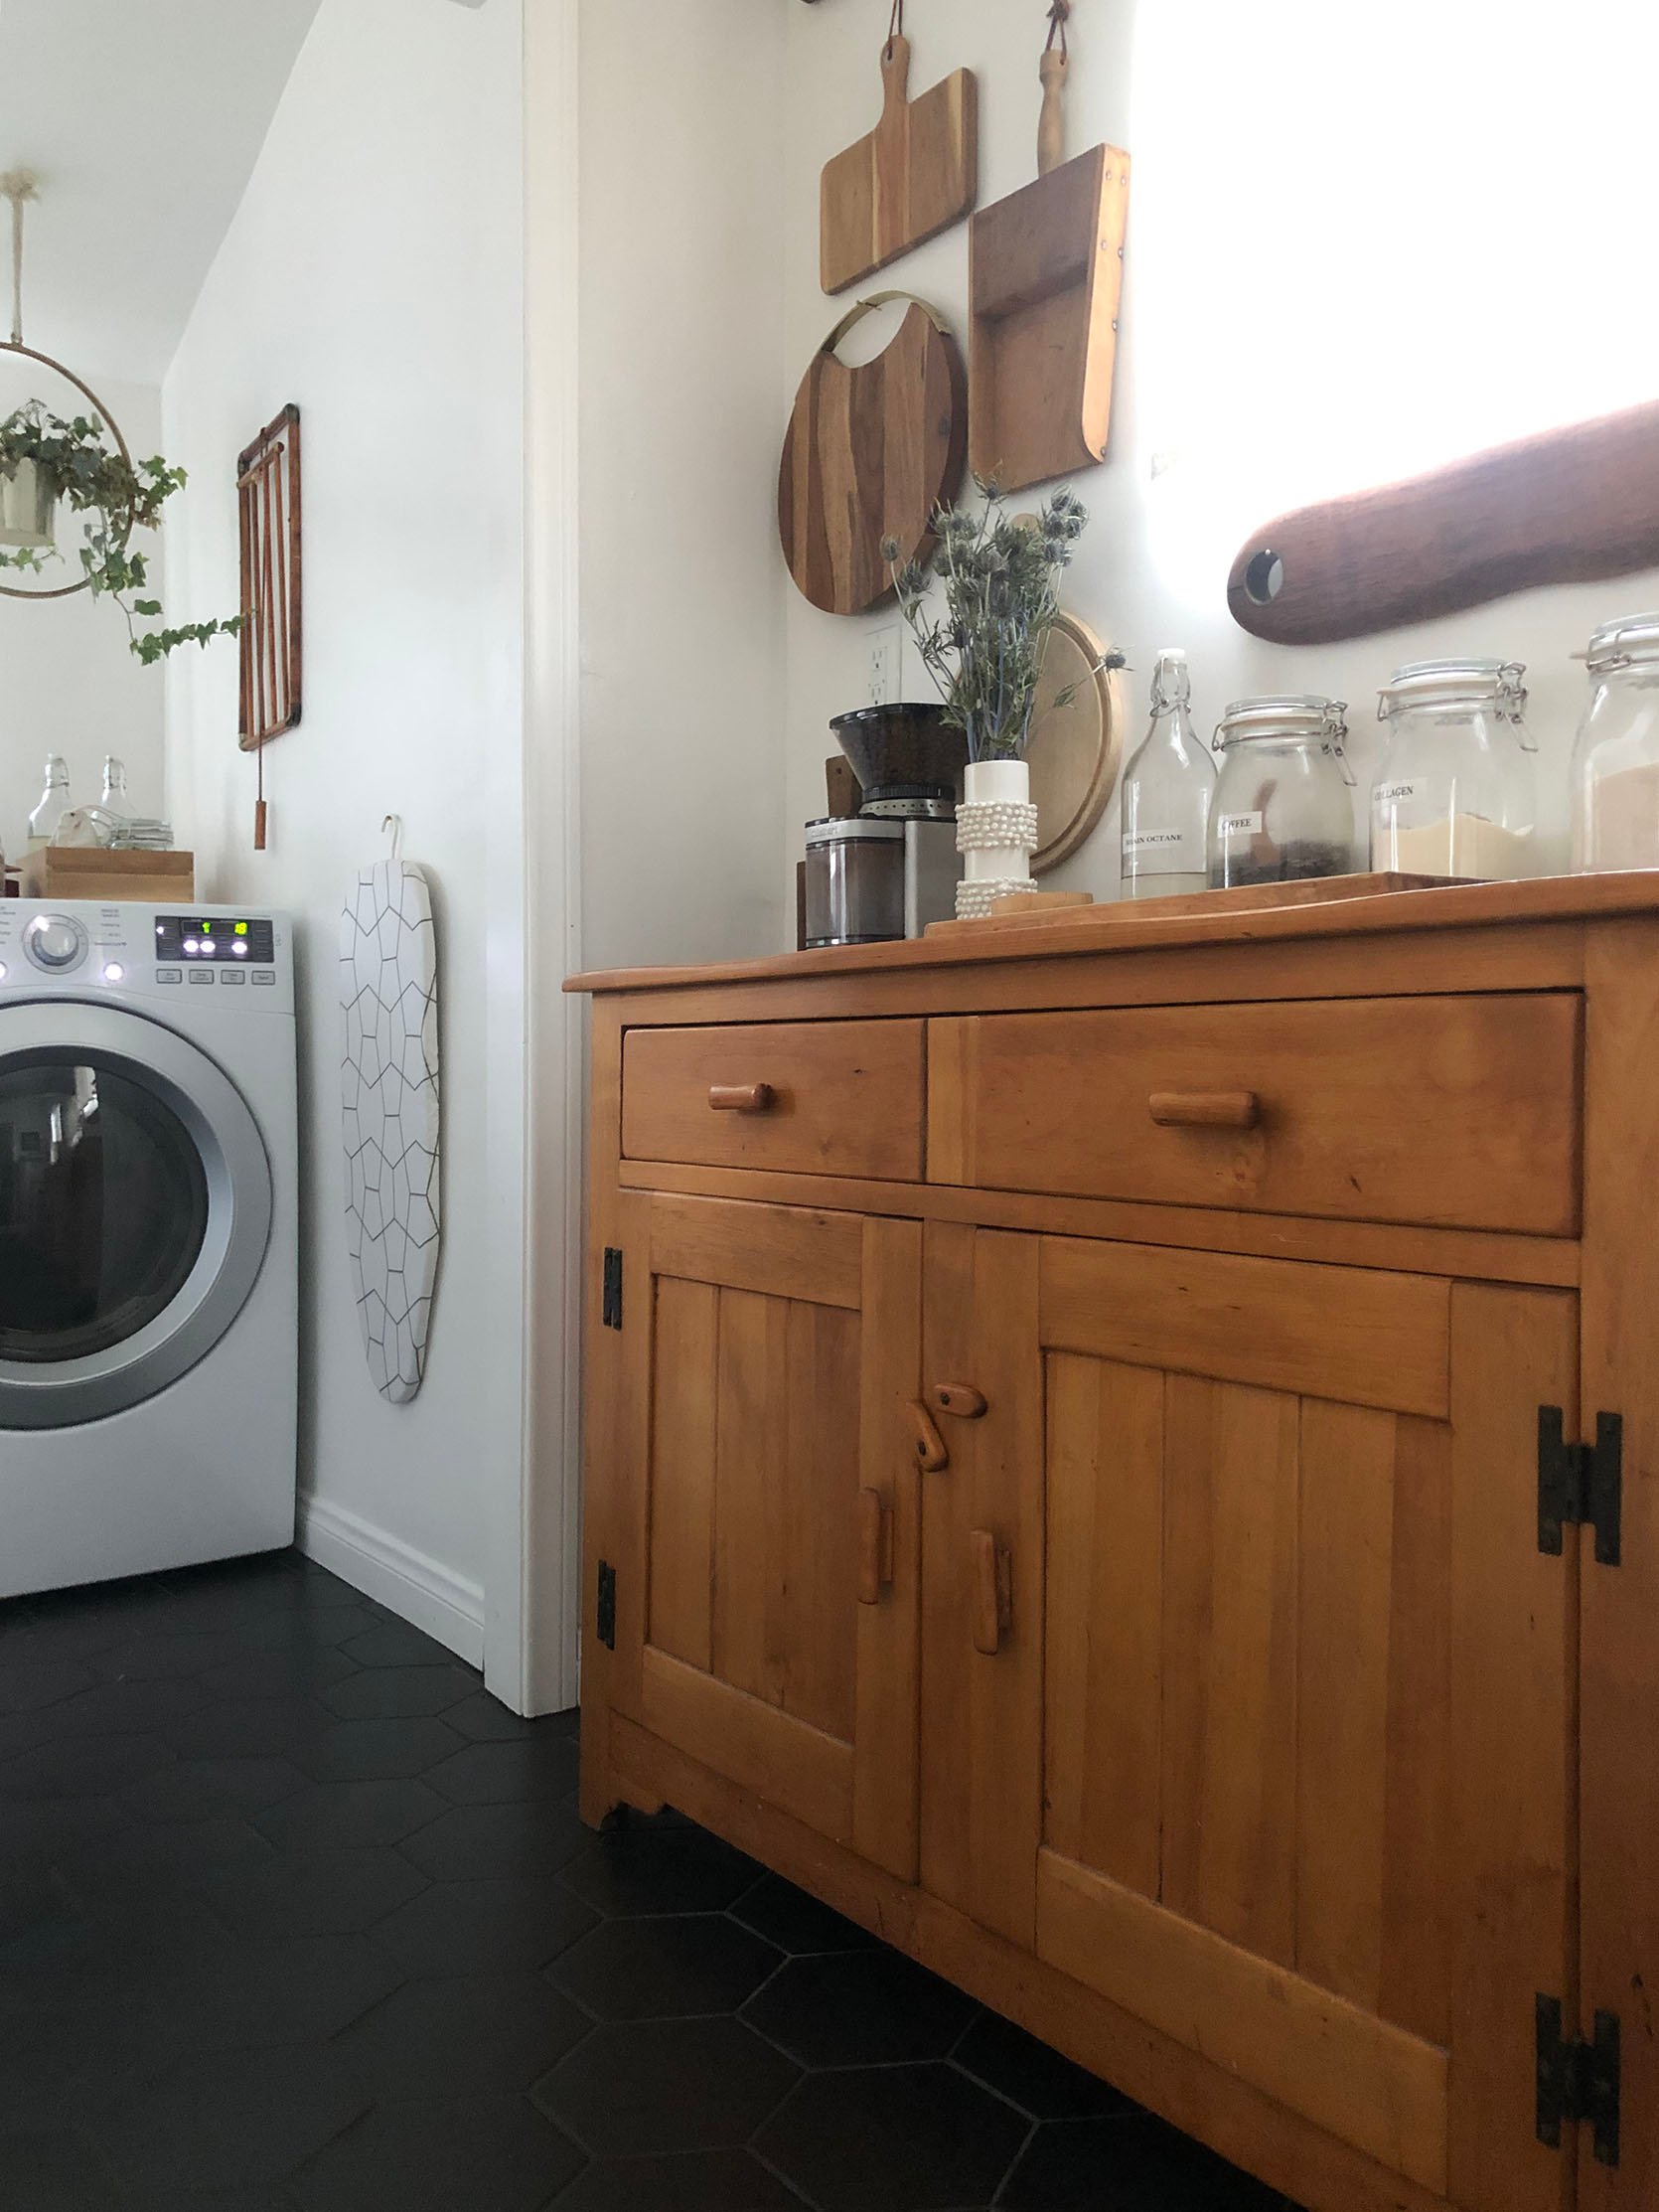
The piece of furniture I found at the flea market was too deep, too short, and too narrow. Doesn’t look too bad here and actually, the inside of it was super helpful for organizing so much so that we kept it until 2020. I really wanted the top to be flush with the countertop so the kitchen would feel more continuous so I did the basic IKEA Ivar cabinet hack. We painted the cabinet with leftover paint from our dining nook (and cut a piece of reclaimed wood from Ross Alan Reclaimed Lumber to be the exact length of the space). Two of the Ivar cabinets were perfect for leaving just a teeny bit of space on either side for our folded-up step ladder on one side and a few extra cutting boards on the other. We attached them directly to studs in the wall so they are technically floating, no feeties, and are completely flush with the rest of the counters, which is what I really wanted.
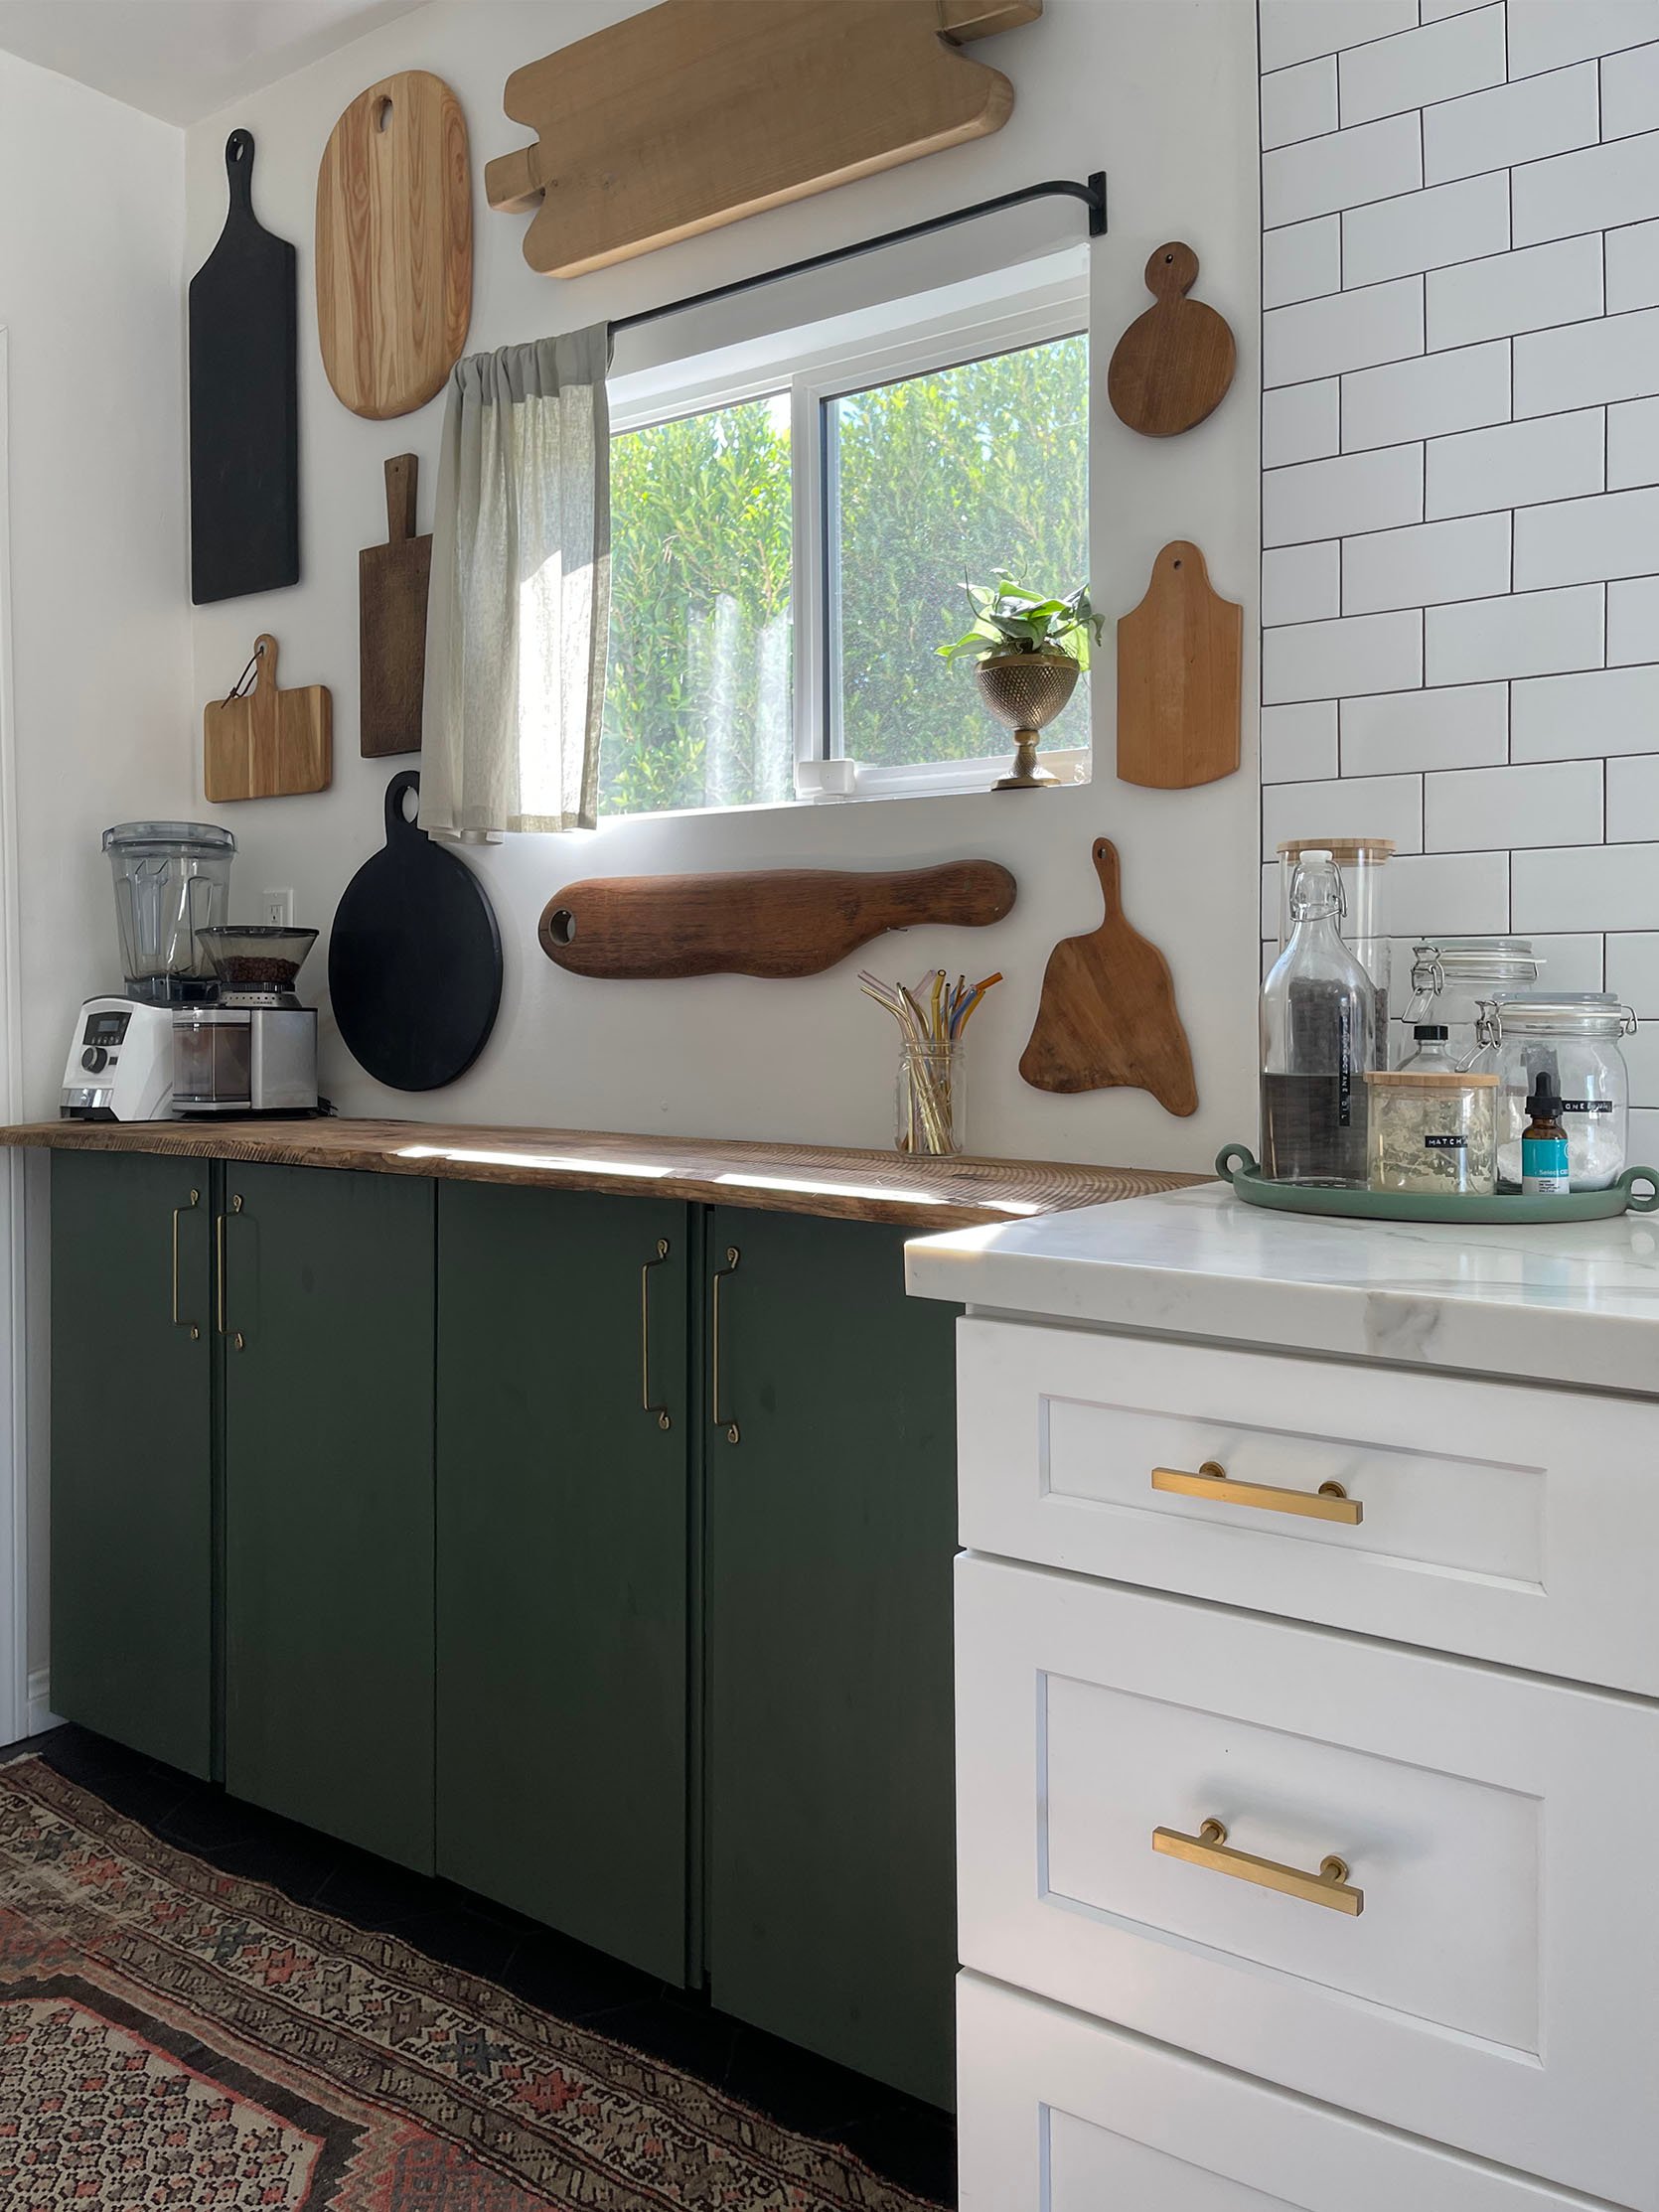
The Ivar storage is basically our pantry. Pretty much all of our food storage is here and about half of it is cookbooks at the moment:) Stay tuned for the final reveal and I’ll show the organization because those shelves are not deep (11.75”) and we make it work. Because I know you will ask: cabinet pulls on the Ivar are Lostine. The beautiful vintage rug is Jean Palmer Home – you’ve seen it in my office reveal because I hadn’t found the perfect vintage rug for my cats to puke on in there yet, but I have now:) Pulls and handles for my original kitchen cabinets are an Etsy find, not sure if they have the exact ones anymore, mine were brass not brushed brass.
We did the cabinet in 2020 and apparently, I could not stop myself from continuing to add boards to every wall. Here’s a very unstyled, lived-in moment from last year:
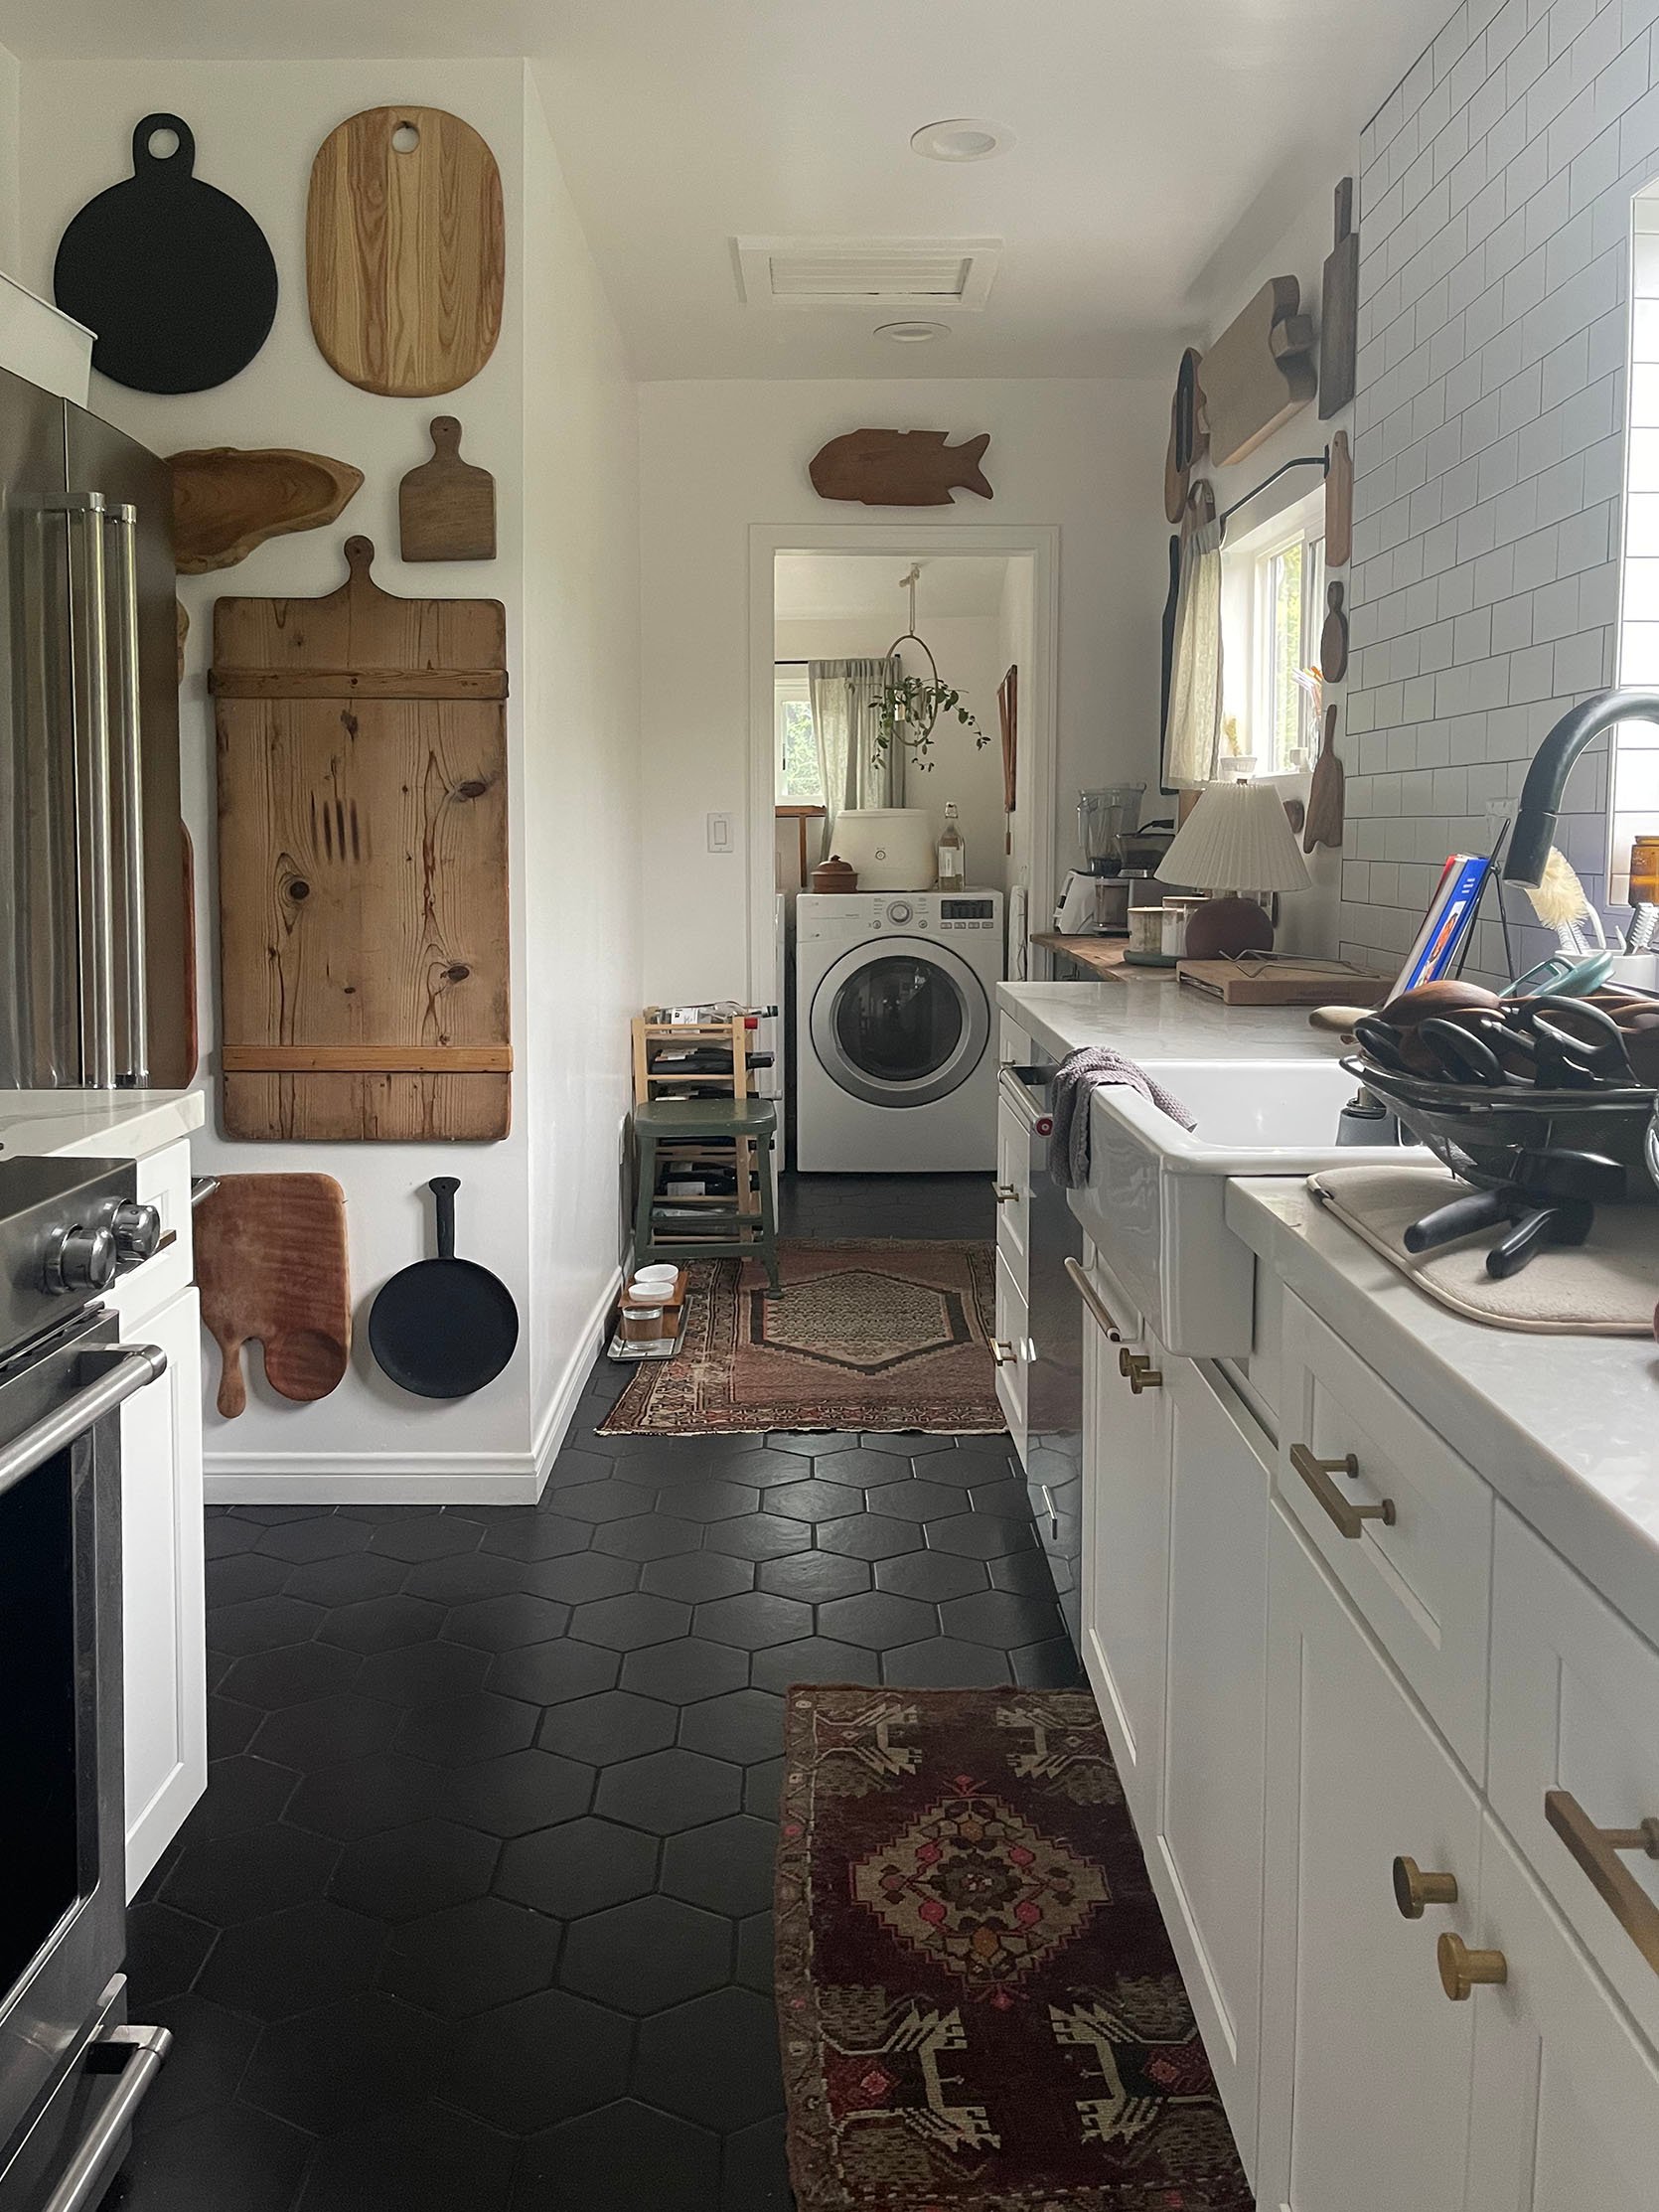
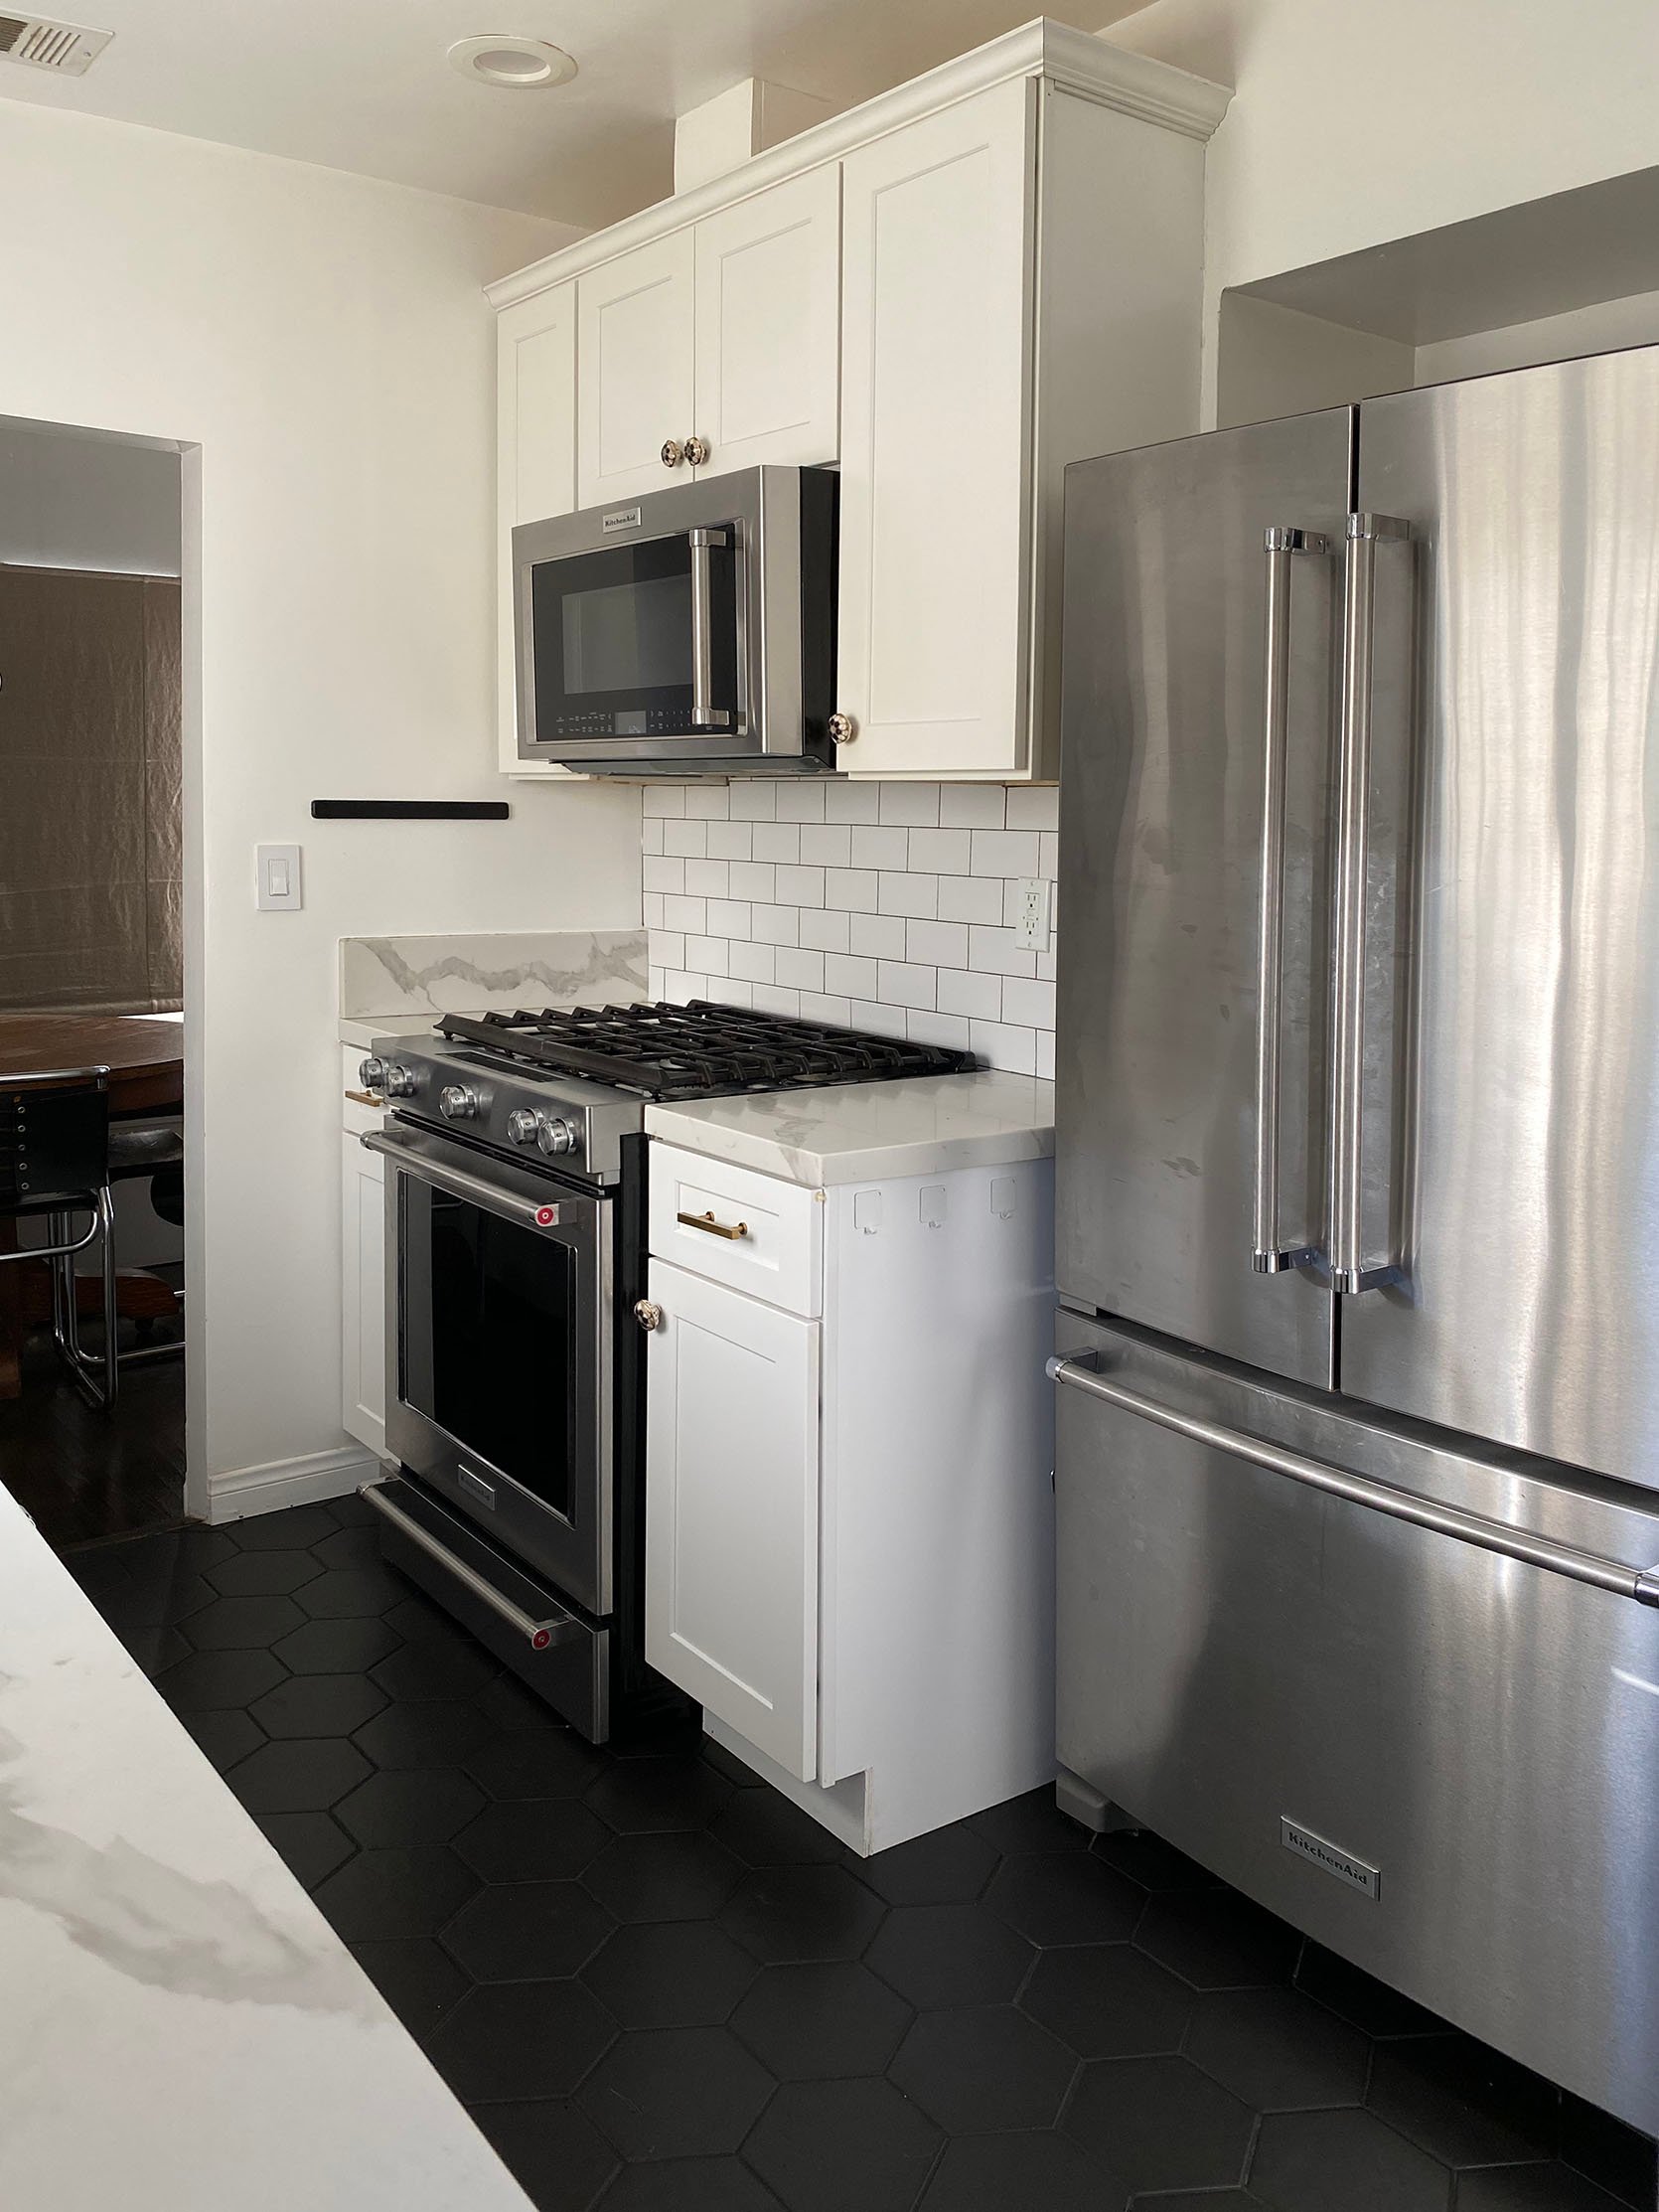
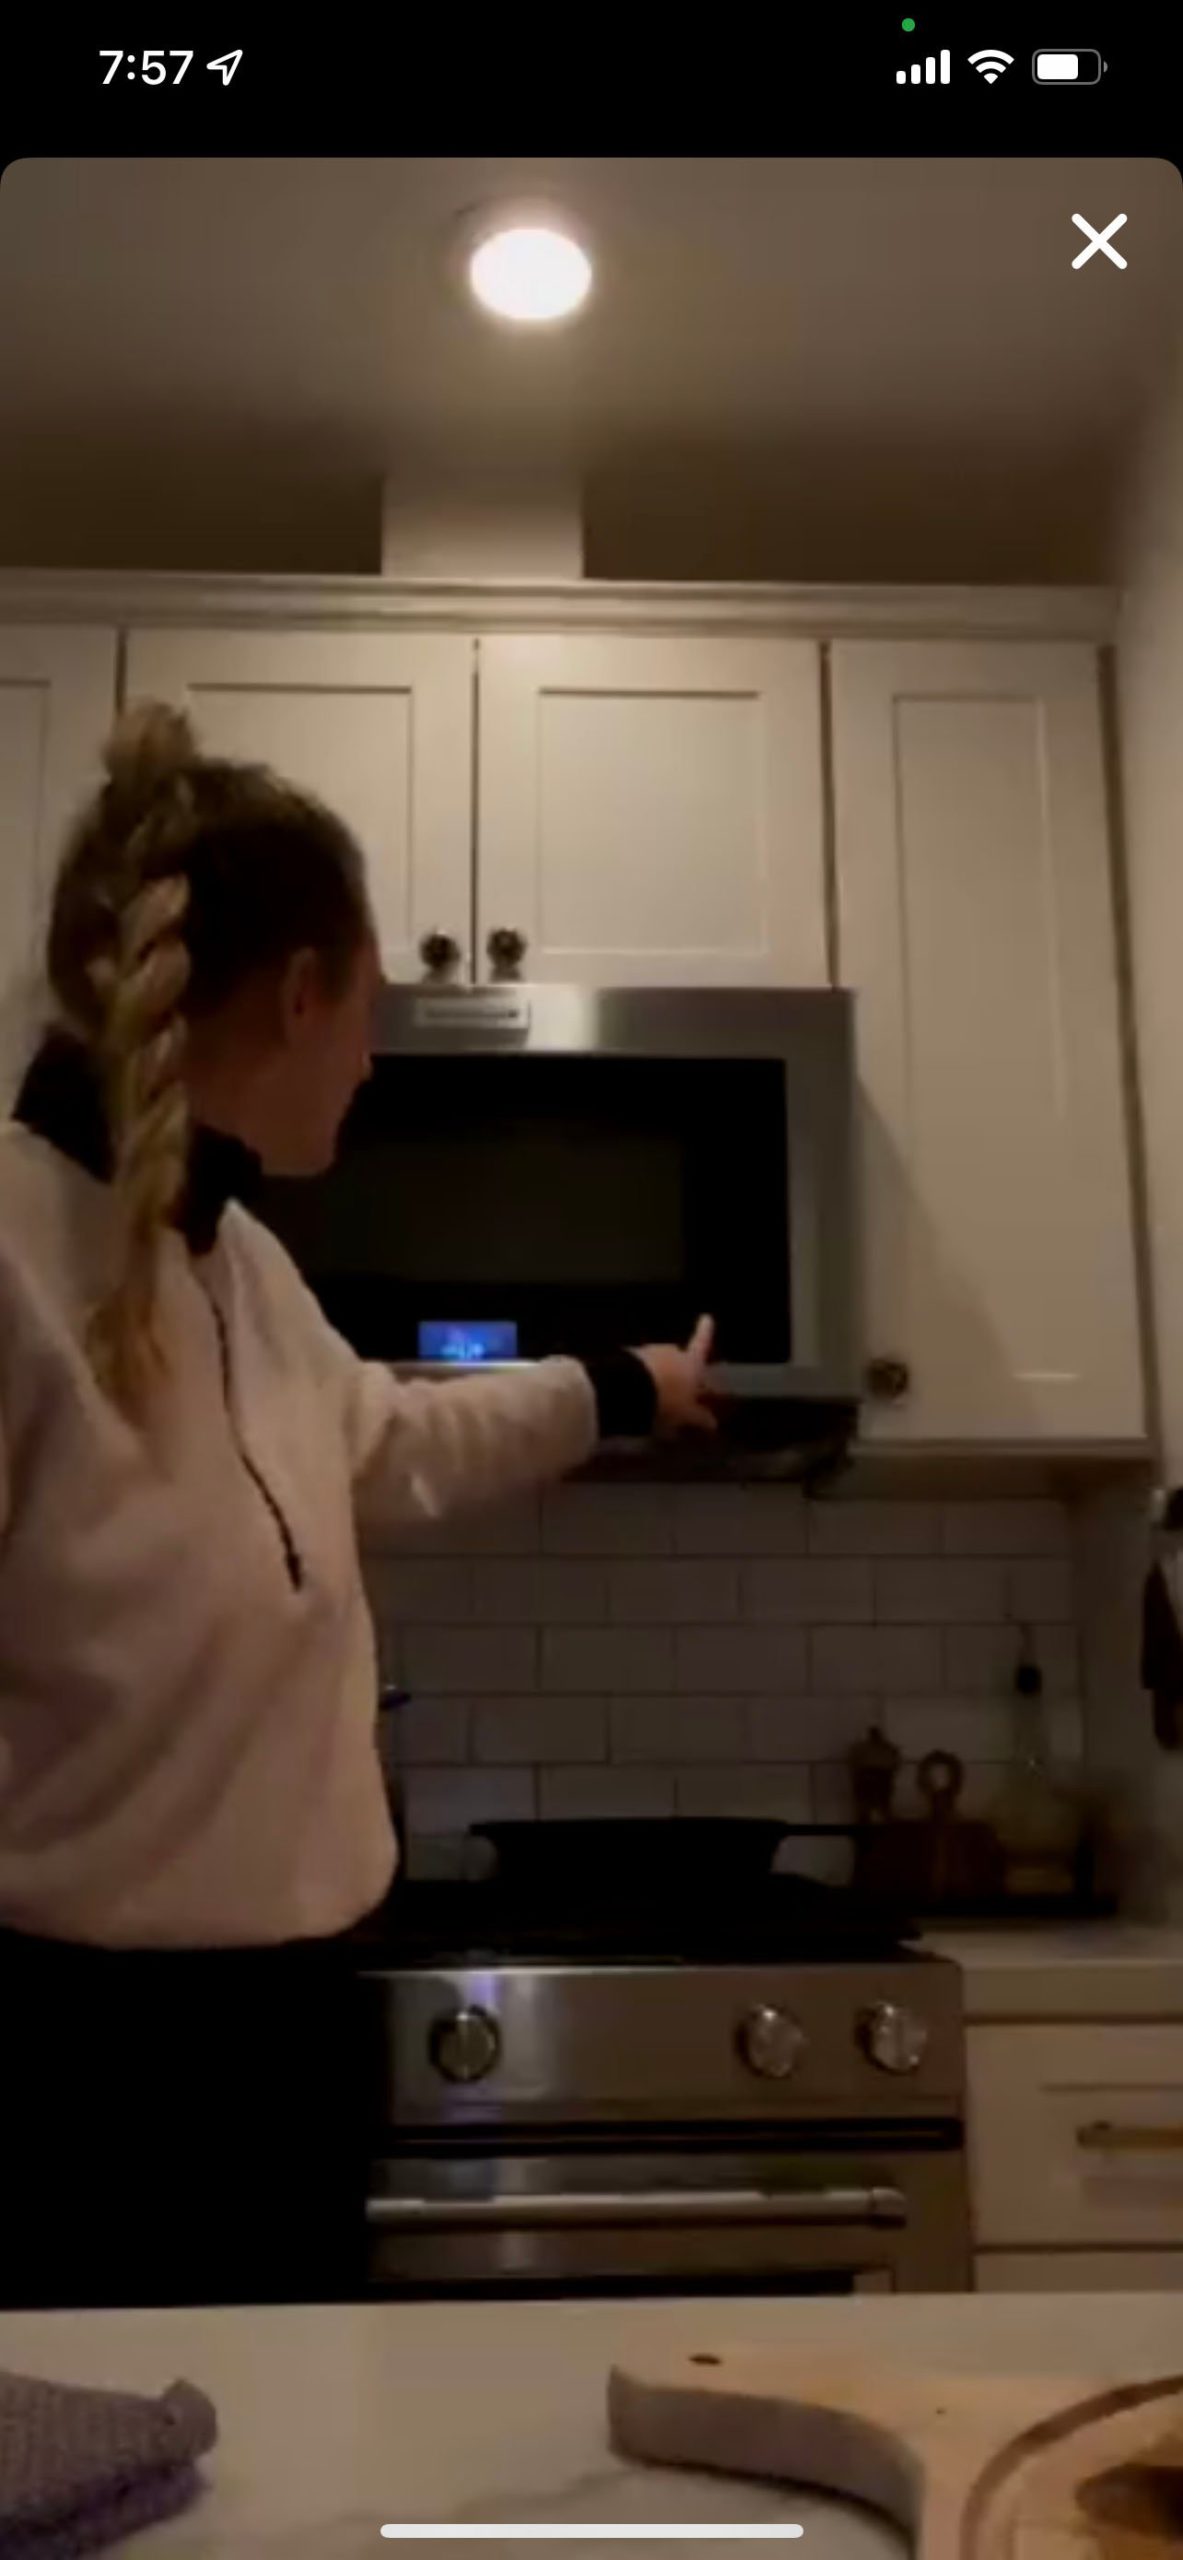
Notice how a wine rack in the corner and Lomi composter on the washing machine were added to the mix. V pandemic of me. The kitchen was absolutely FINE however, it always bothered me ~a lot~ that the cabinets above the stove didn’t go all the way to the ceiling and didn’t incorporate the area above the fridge. Not only were the upper cabinets unsightly, but the lack of them was also a huge waste of space. I still didn’t feel like I was optimizing my space in the area before the laundry room, particularly the wall on the left – that area is tricky because you have to leave space to walk through. Additionally, we had put in a very fancy convection oven/vent/microwave from KitchenAid but we didn’t use it for anything other than reheating leftovers. It was not great at being a vent for the oven and stuck out way too much for how small this space is. The idea was to mount it to keep it off the counters thus more counter space but how bad it was at being a vent was driving me mad. Half of the time we cooked our smoke detector would go off. Another thing that always bothered me visually was the way the kitchen sink sat in the cabinet. I bought that sink because it was cheap and I didn’t think about how it would work with the cabinets – clearly.
Listen, I know these aren’t real problems – that’s why I couldn’t bring myself to do anything about it. I’ve had bigger fish to fry over the past 6 years. There was also just a lot of creative problem-solving that would help, some of which I did, like the Ivar Cabinet hack.
Oh, one nice thing about my fridge nook is that there’s a perfect hiding place for brooms, Chom Chom roller (best thing for pet hair removal!), etc.
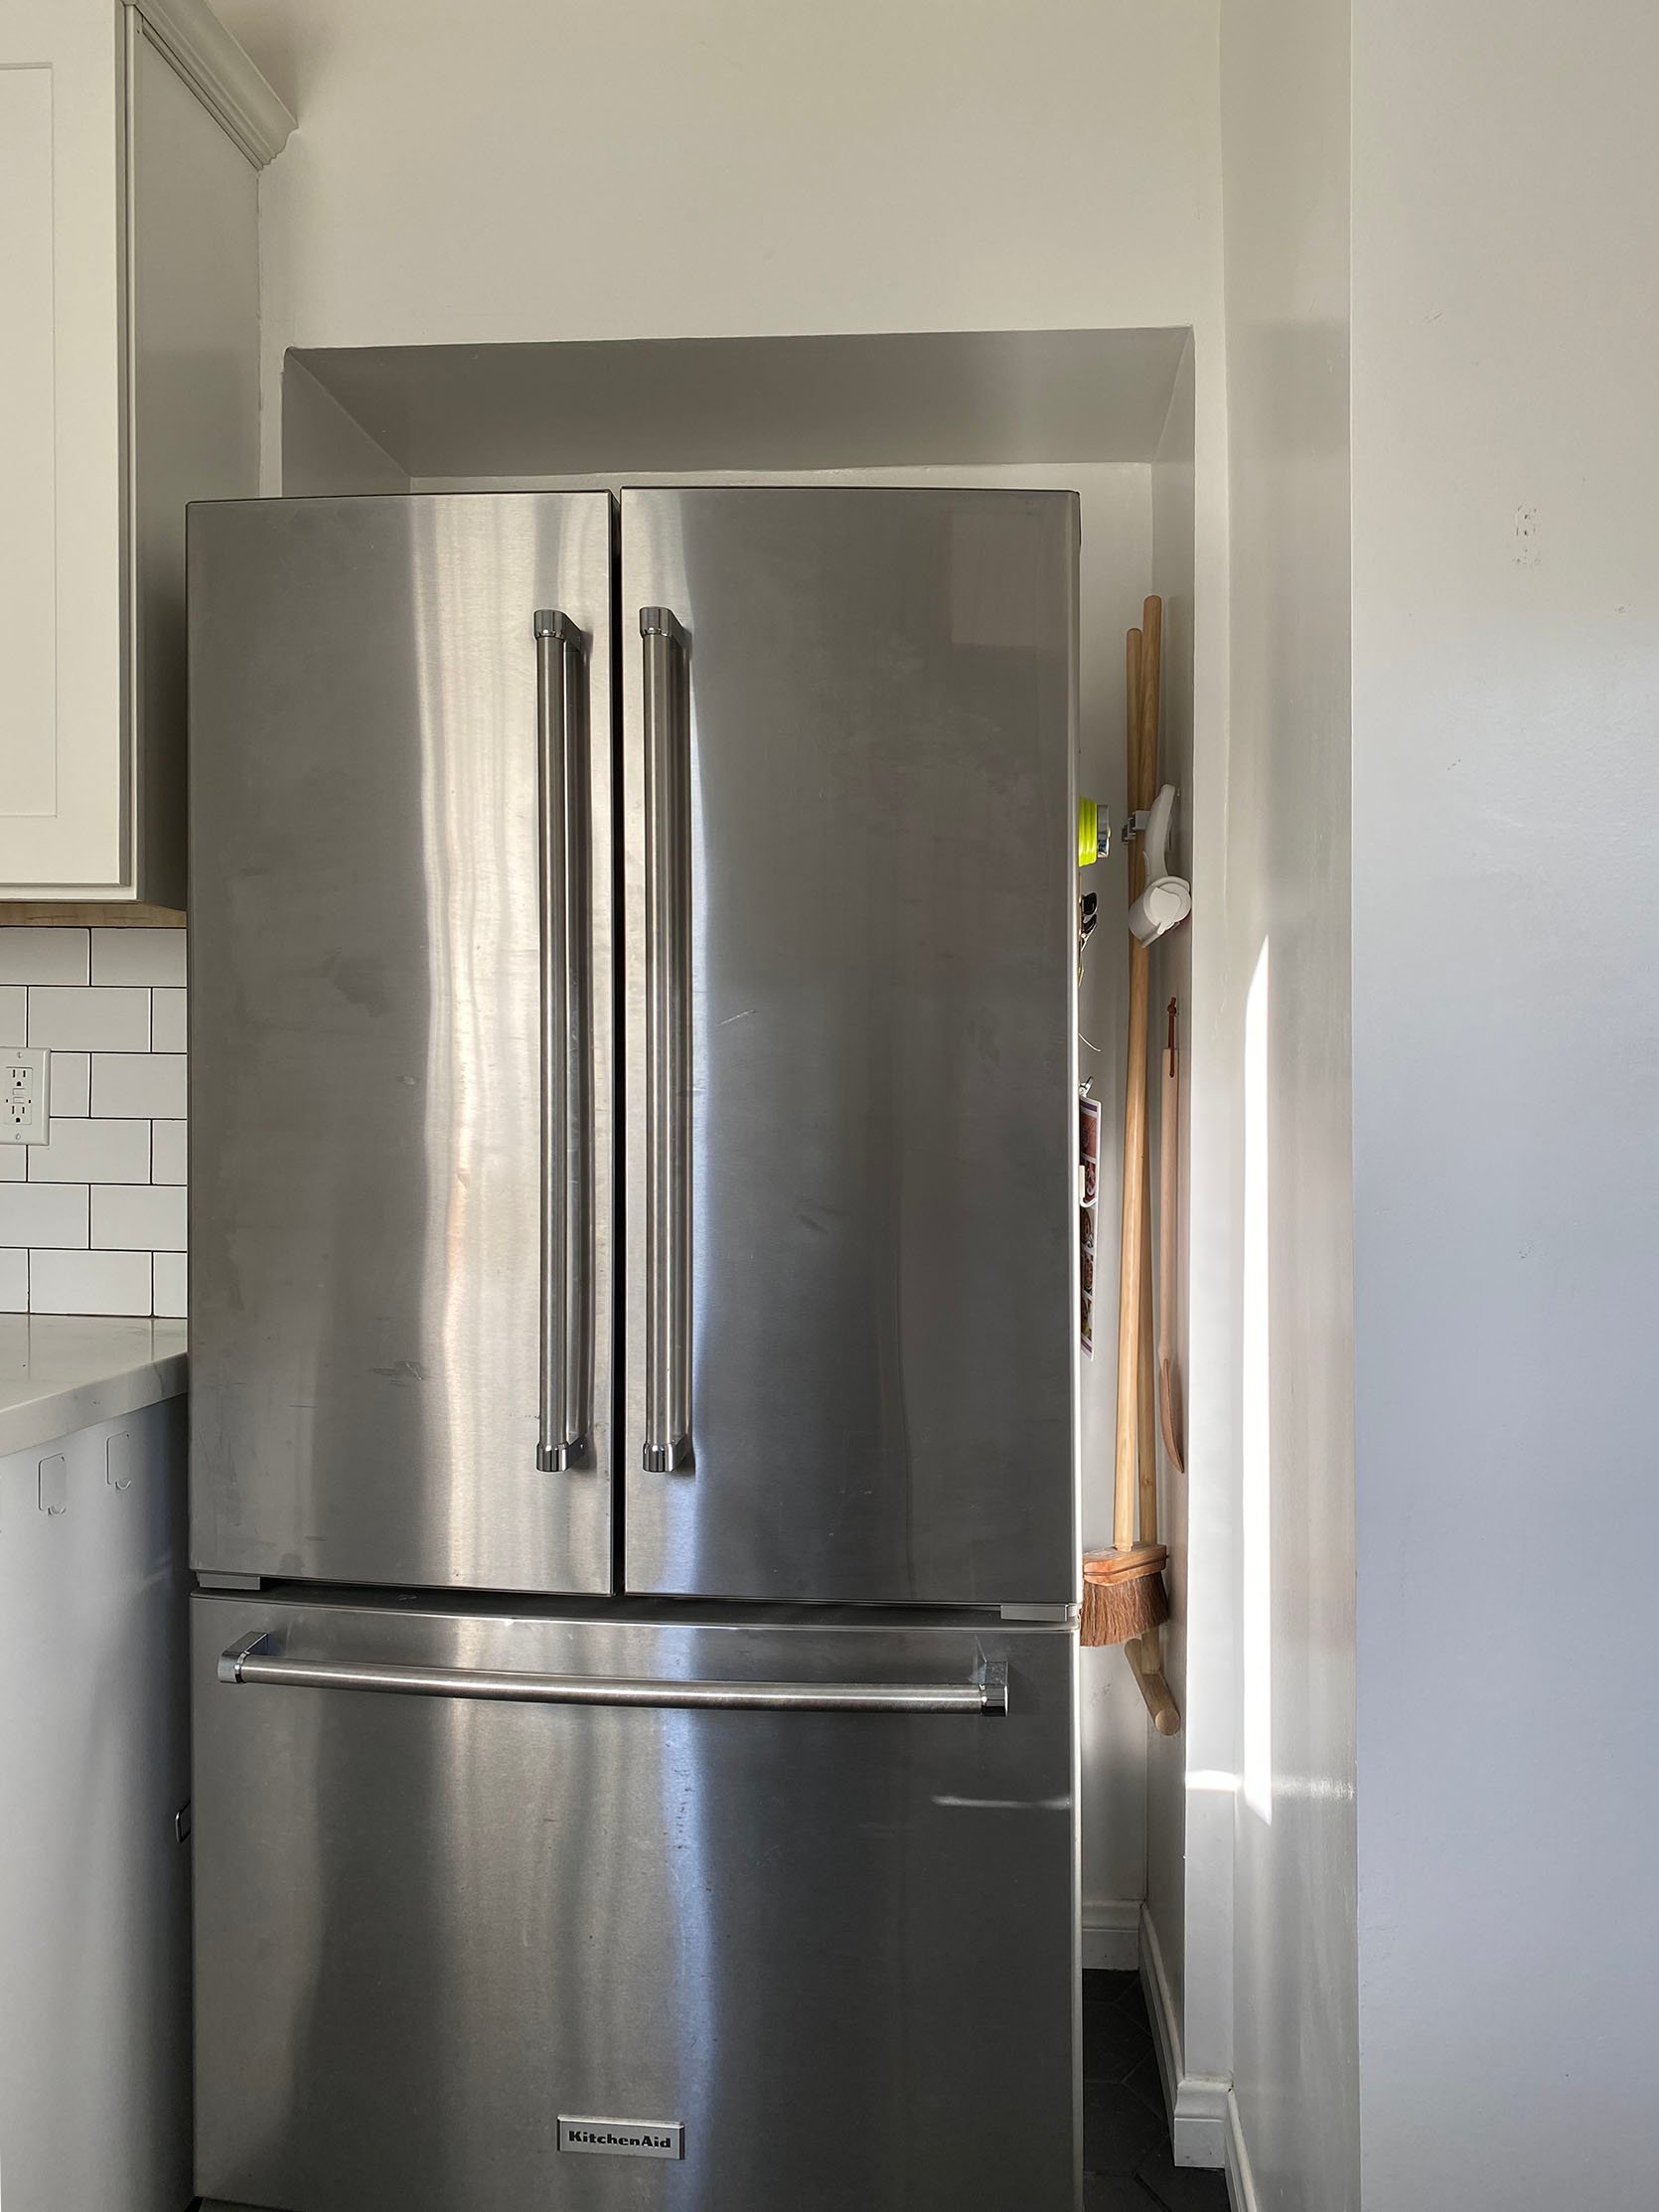
Side note: I bought all the appliances for both units in 2016 on Black Friday. Highly recommend buying appliances only on a big sale. I’ve lived with these KitchenAid (pre-Cafe era) appliances for 6 years and my honest opinion is: they’re good. No real complaints. I had some issues with the dishwasher but after having it serviced a few times I think they’ve figured it out. Currently, the ice maker has stopped working in the freezer and I need to have someone come and look at it but I’m busy so I’ll use an ice tray and I’ll deal with it later:) I assume after 6 years things like this will start to happen. Haven’t had any issues with the stove or oven and the microwave was fine besides the fact that I didn’t feel like it did a good enough job as a vent.
What was I talking about? Oh, how my issues with the kitchen were dumb and not a big enough deal to make me do anything about it until these three things happened:
1. I Marco Polo’d so often during the pandemic with my phone resting in the window facing the stove that the cabinets not hitting the ceiling and wasted space over the fridge became a daily fixation. Example below:


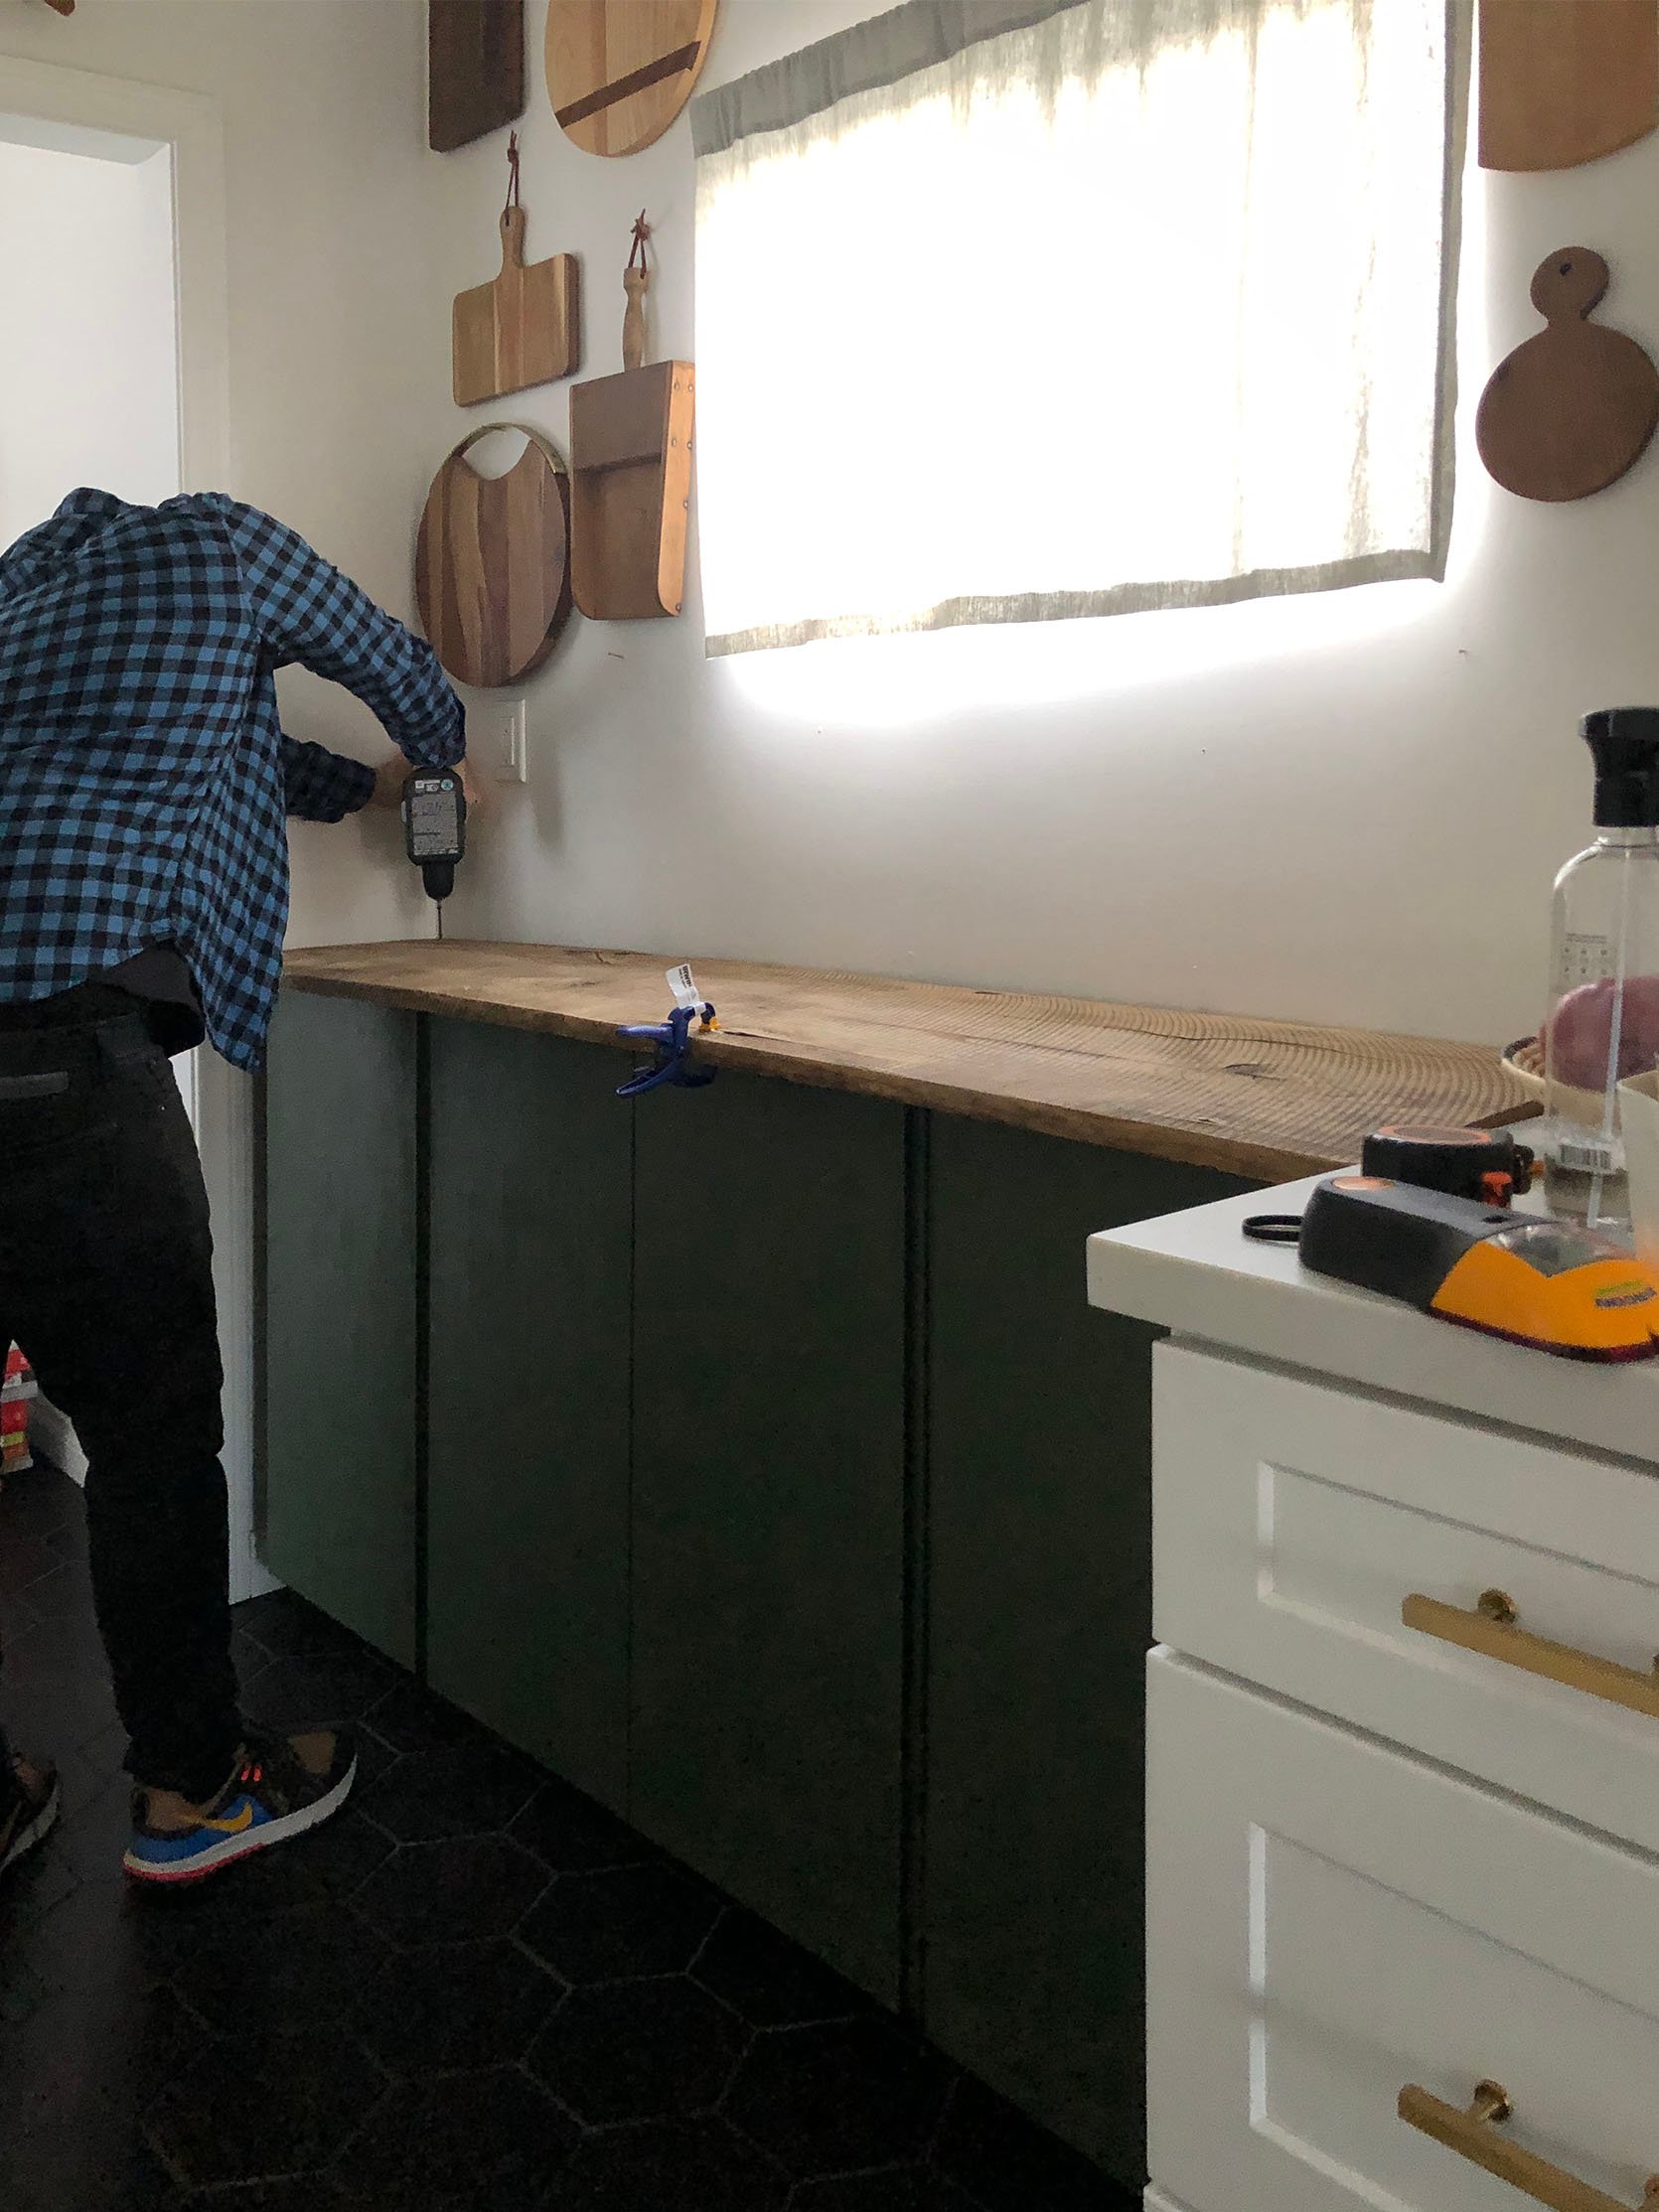
2. I found the PERFECT shelving unit to fit the long blank wall on the left.
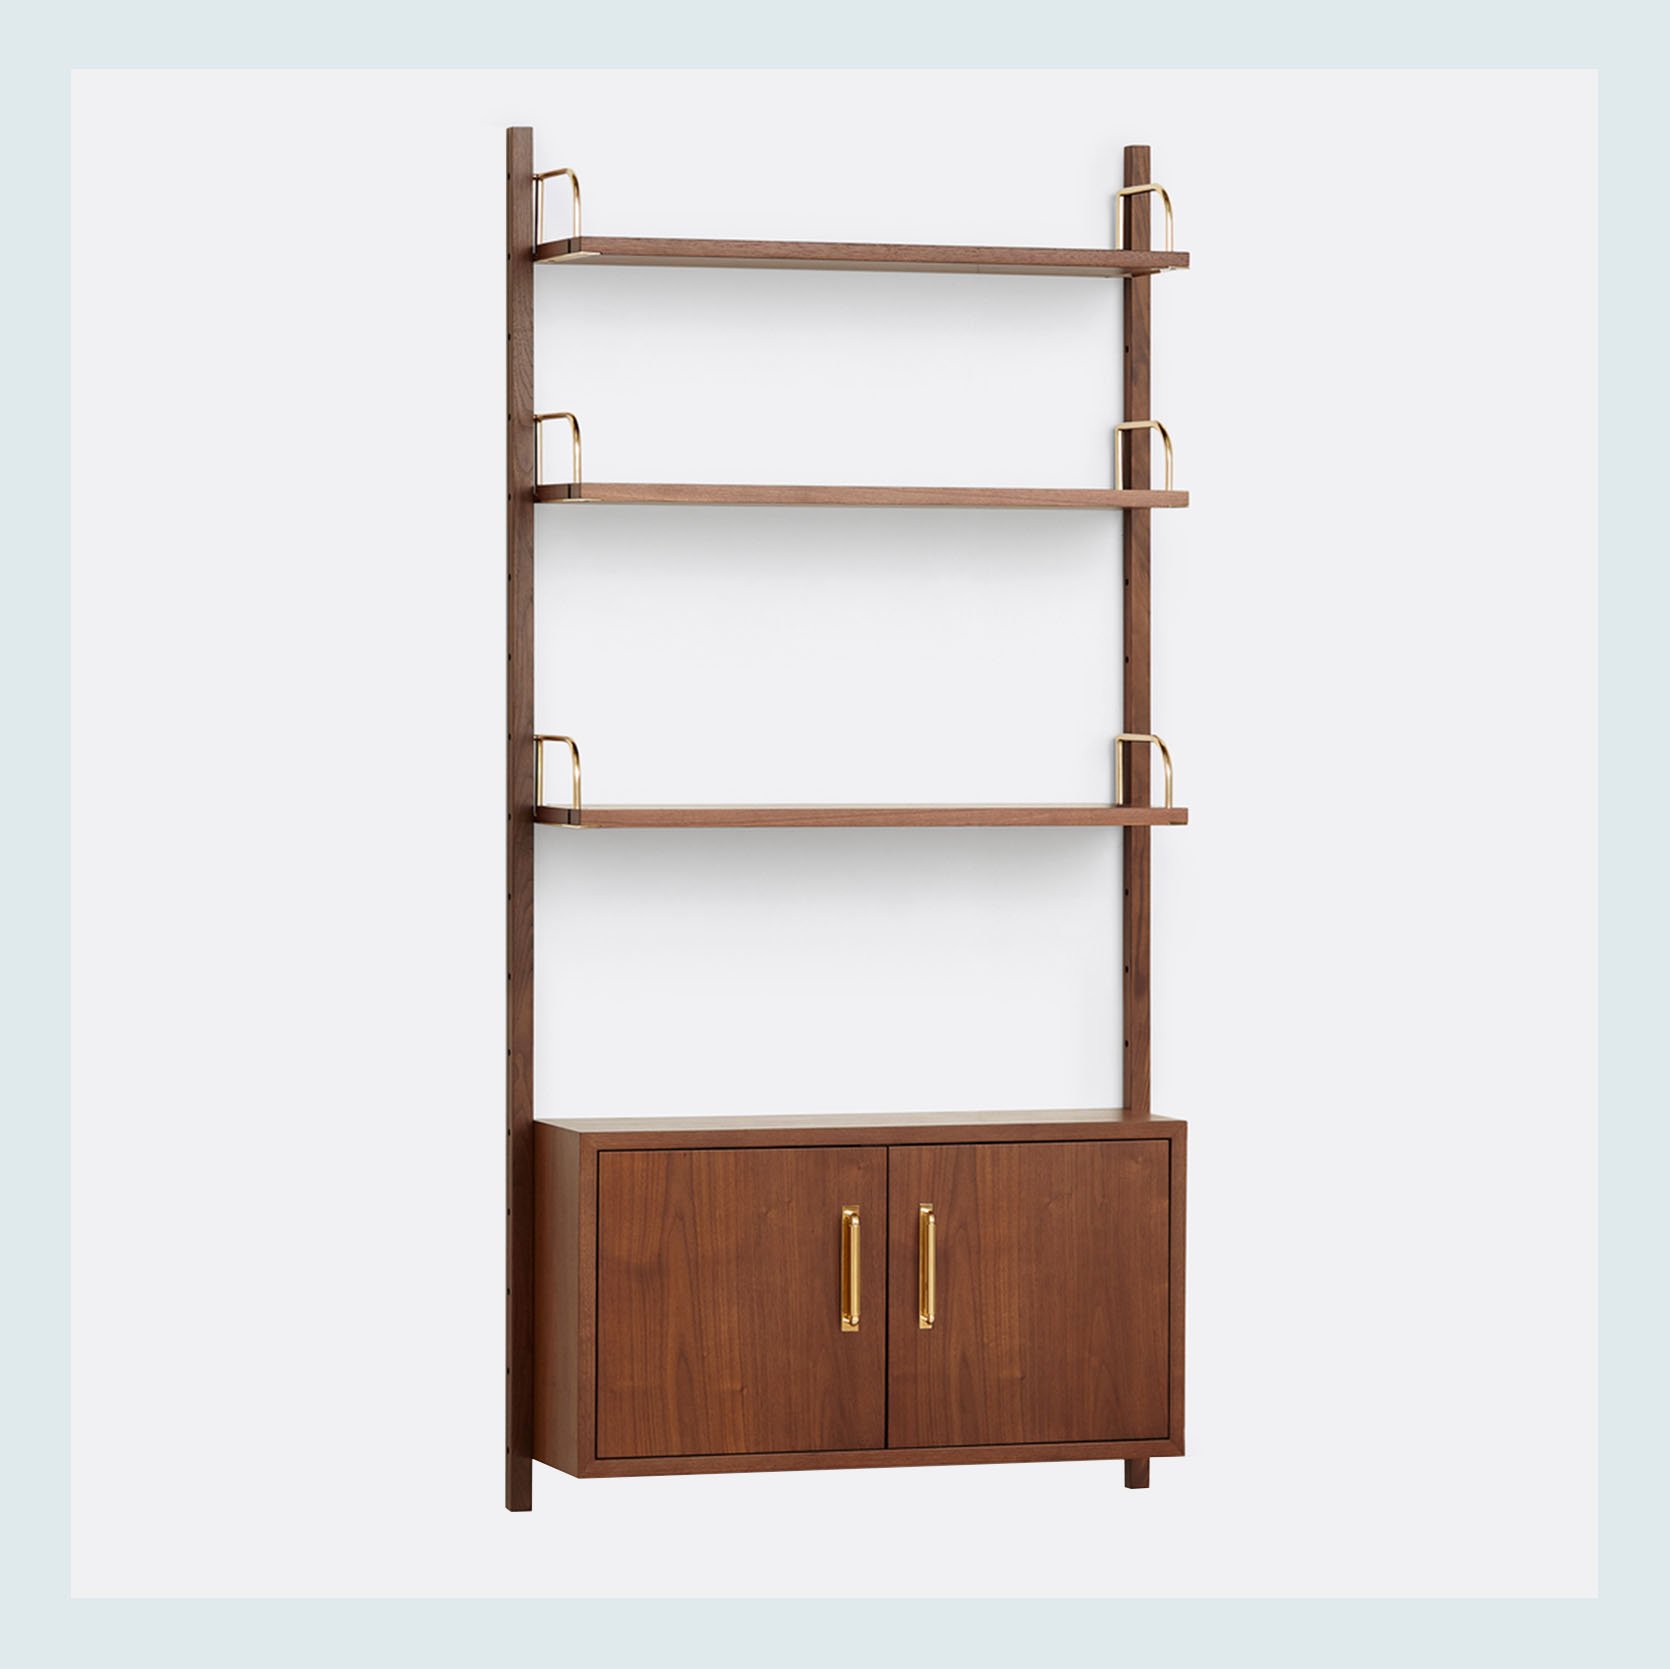
I can’t over-emphasize how perfect this shelving unit is for that space. I had such specific dimensions that it had to fit. The depth is 10.25”, I could *maybe* go to 11” the length is 78” which is just right in order to walk through without feeling crushed. I love that there is some closed storage, a little surface area, and then open shelving for pretty storage. It’s also nice that it’s mounted to the wall, it feels lighter in the space. Let’s take a sneak peek, shall we?
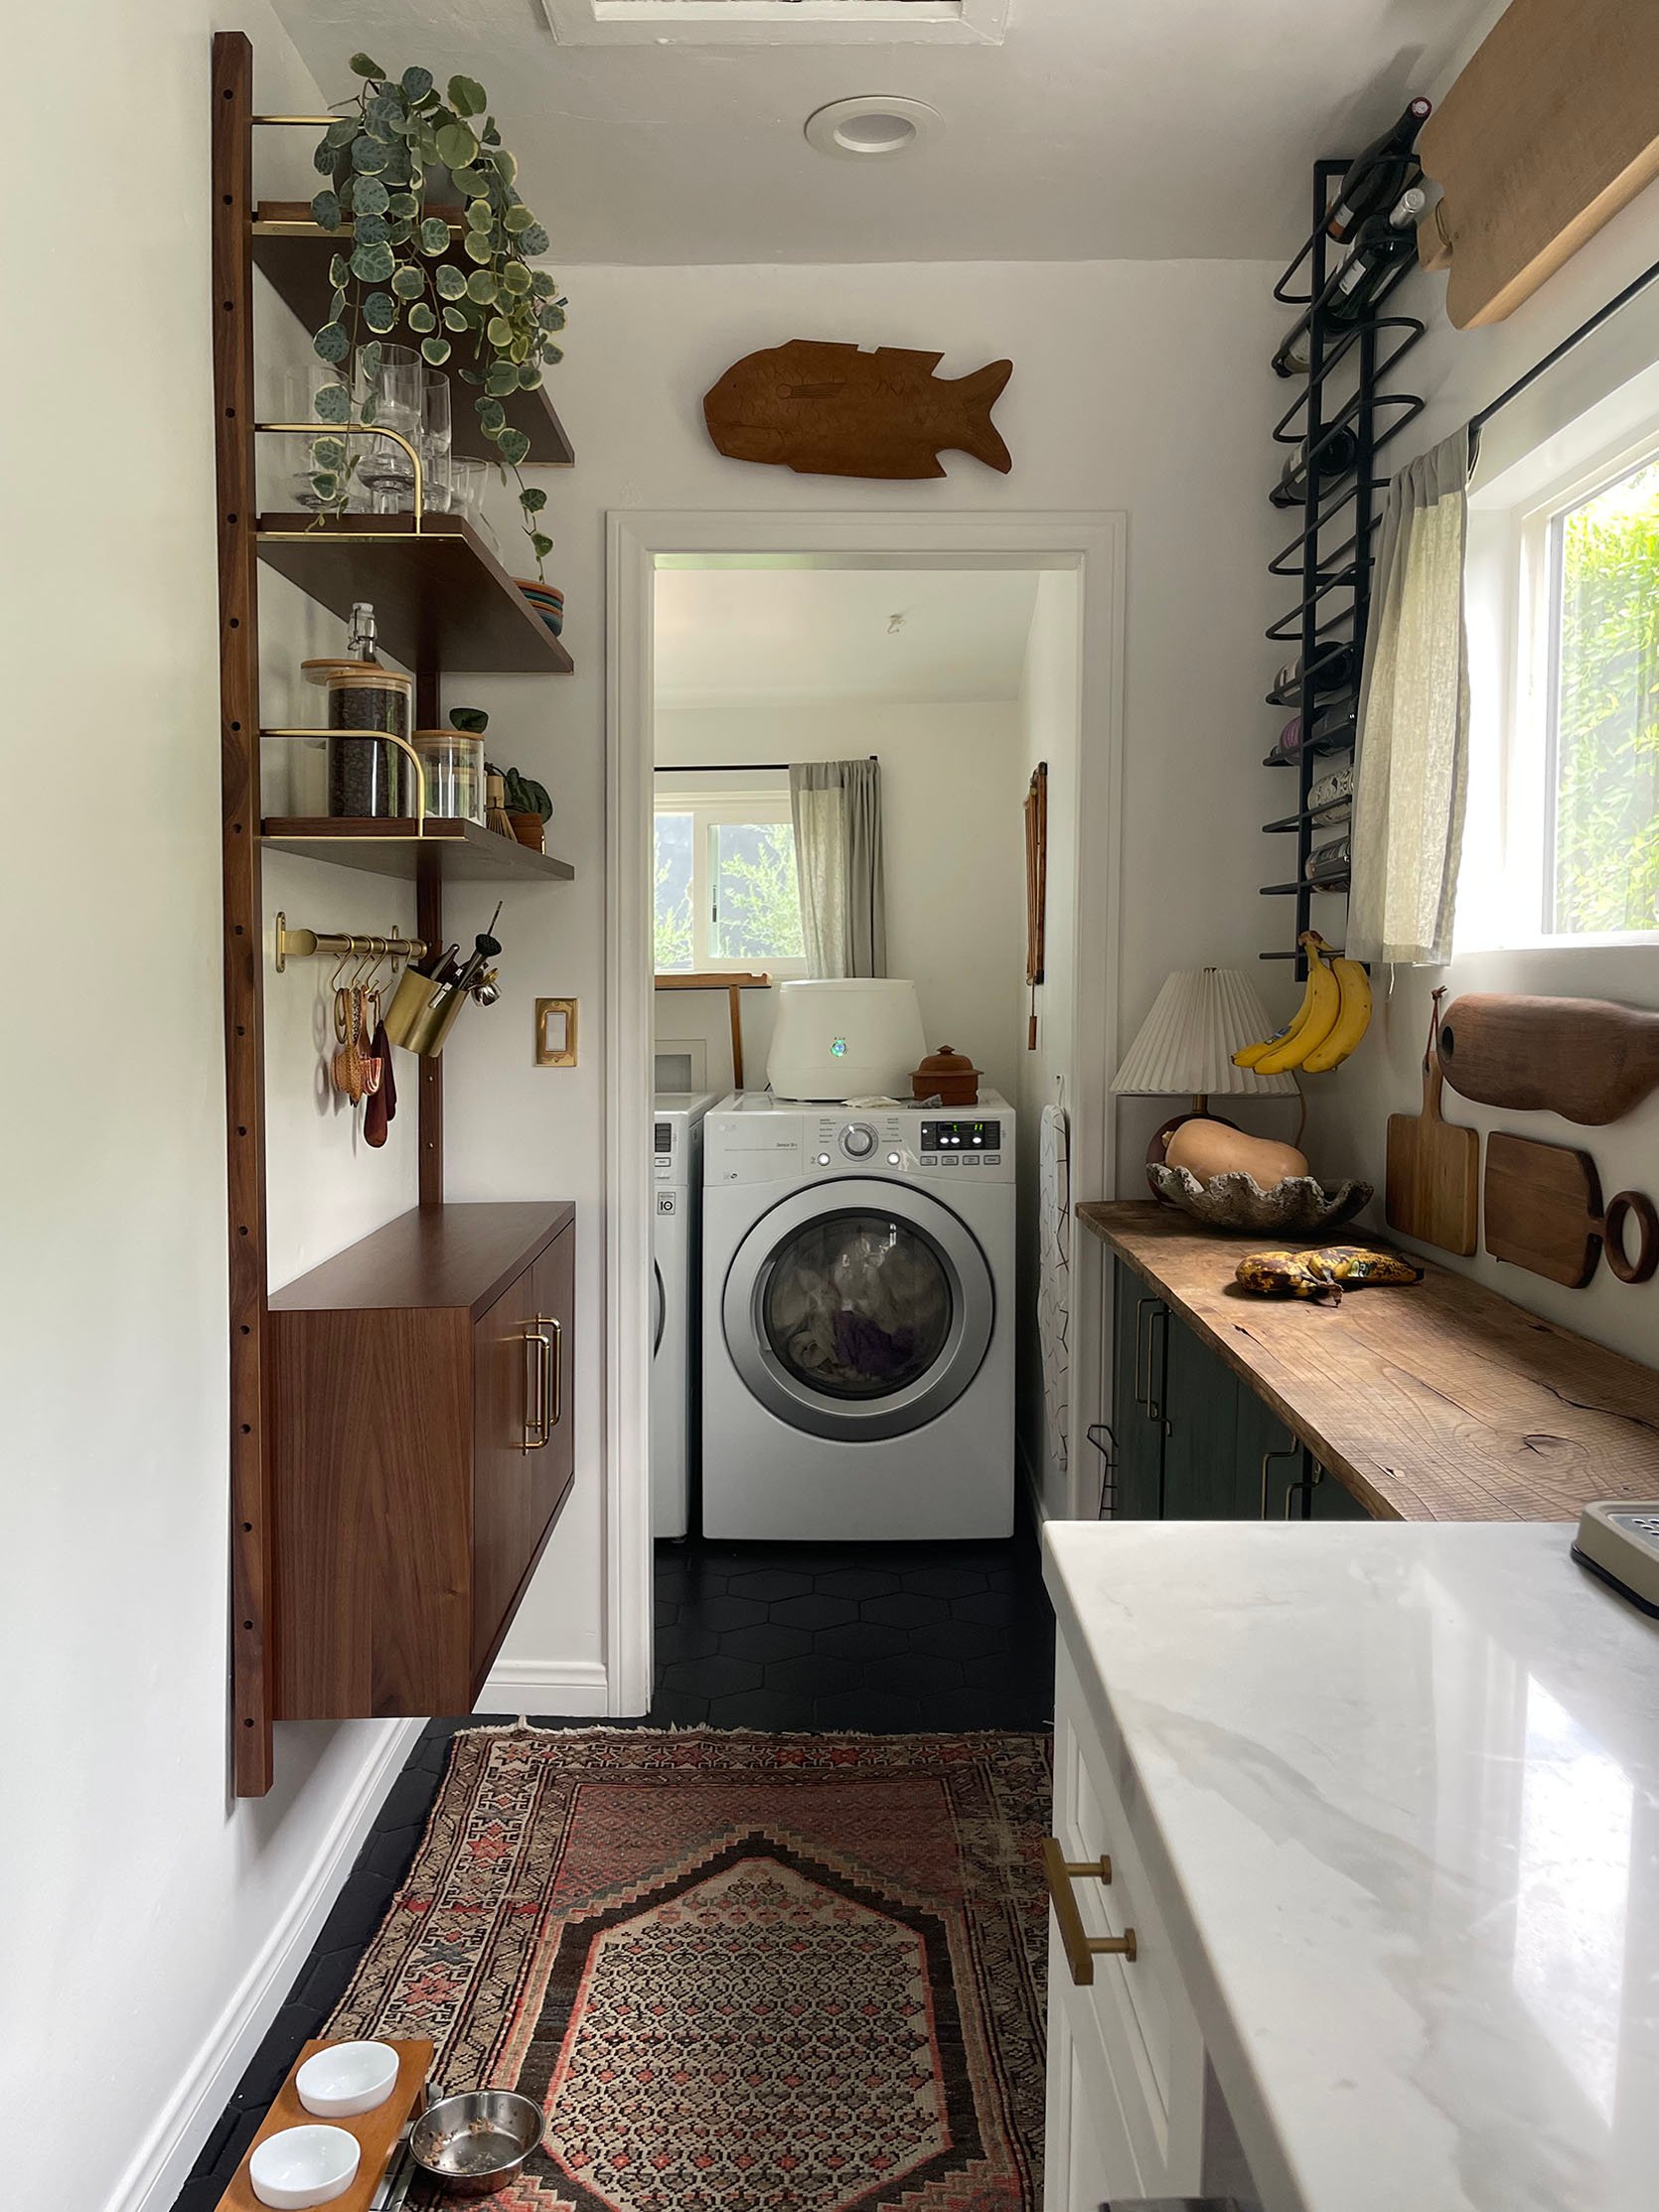
I personally love the banana styling in this iPhone pic. Both the bananas hanging from the wine rack AND the rotten bananas on the cabinet waiting to be made into banana bread. Oh, also the single butternut squash in a bowl. Obviously, this pic was taken to send to Andrew to show how proud I was for figuring out how to hang this by myself. It hasn’t fallen down yet!
As you can see in this picture, the quartz countertop continues a bit into the space that starts to narrow, which makes the walkway feel cramped. This is why I needed the Rejuvenation cabinet to not be too wide. I’m thinking I could continue my ridiculous cutting board collection next to the cabinet since that won’t take up much space. I hung the cabinet so that the top of the cabinet is the same height as the countertops which makes that space feel like another surface to work on. In our case it’s turned into our drink station (coffee, matcha, alcohol, all three at once, etc.) if you look closely you can see another Rejuvenation beaut, their Brookside Rail System that holds all of our drink accouterment – but don’t look too closely! This is a sneak peek!
FINAL PHASE: THE “MUCH BETTER” KITCHEN PLAN
The final straw that made me finally finish this kitchen is:
3. My friend Rebecca started a company making cabinet fronts (and boxes) and got really sick of me complaining on Marco Polo about the space above my cabinets (I think it bothered her too). I met Rebecca when we were working on Orlando Soria’s HGTV show “Build Me Up” (RIP) pre-pandemic. She’s an amazing designer, design producer, and friend. Designer friends don’t let friends have weird spaces above their cabinets!
Her company Design by Numbers (website coming, check out her insta) will make new cabinet doors to fit any boxes and it’s basically magic. You scan your space with an app on your phone, tell her the style and color you want and then they send you this and your jaw hits the floor:
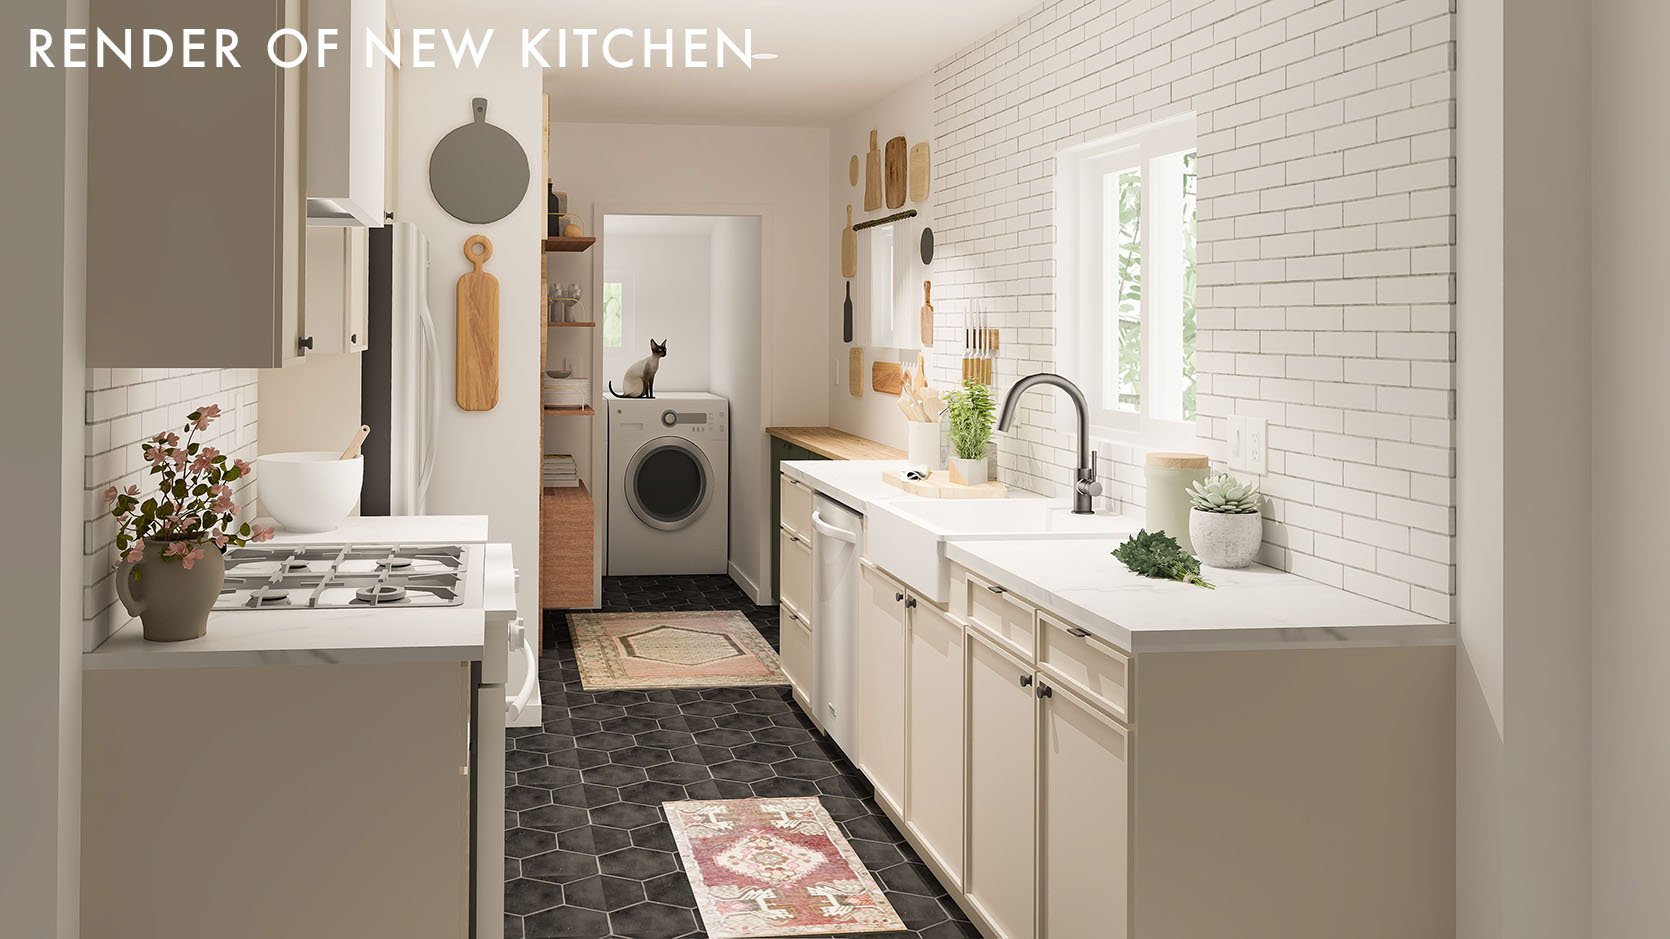
WUT?? THERE’S A CAT ON THE WASHING MACHINE! All of our jobs (and cats, I guess) are being stolen by computers. I mean what is even the point of shooting a reveal post, I’ve basically given it away. As you can see, the microwave is gone with a built-in real grown-up person vent in its place, cabinets that go to the ceiling that also include the refrigerator, and why yes, we have changed the color and style of my cabinets. The color I chose is “Puddy” (one of Rebecca’s paint options) and it’s a greenish taupe? I’m bad at describing colors. We lovingly refer to the style as a “baby shaker” because it has a tiny version of a shaker border. It’s classic but feels a little more modern and fresh. After I was like, “HELL YEAH,” I double-checked their measurements by hand (take that computers!) and they made and shipped them to me. It was that easy (for me anyway).
As the company is launching they are offering 3 styles of cabinets: shaker, baby shaker, and slab. They can do just doors or cabinet boxes and doors. If you are interested in getting more info, you can email hello@designbynumbers.com.
We were able to keep all my original lower cabinet boxes and the inside of the drawers, we just replaced the fronts. Design by Numbers provides the info to purchase the matching paint or ship the paint depending on state regulations. I purchased and had the cabinets professionally painted because as I have mentioned before I *will* DIY if necessary but something like this, no thank you. As far as the uppers, I had to recycle those. Since they were in good shape my contractor was able to take them out to reuse them elsewhere. I also donated the microwave. There was a bit of tile patching behind the microwave that needed to be done but nothing too hard and because I had cheap subway tile, it cost practically nothing. Design by Numbers made the new boxes for the uppers and they fit like a glove – the measurements were perfect.
I don’t want to give too much away because you will get to see it all at the final reveal which is coming soon! I’m waiting on a few stray things to come in to put everything together including a new dining room table! This reveal/refresh will include the dining nook, kitchen, and the laundry room and will be live next month! In the meantime here’s a screen grab from my Marco Polo with Rebecca and Orlando mid-cabinet installation 🙂 Stay tuned.

Opening Image Credits: Design by Emily Bowser | Photo by Sara Ligorria-Tramp | From: Another MOTO Reveal: Emily Bowser’s Happy Dining Nook (With Custom Cat-Friendly Banquette, Because Duh)
THIS POST WAS ORIGINALLY PUBLISHED HERE.
