HERE WE GO. Welcome to 2023 and with it some natural shifts around here. After much debate, I’ve decided to bring you along the process of fixing some mistakes and showing you rooms that aren’t ready for their birthday party but are pretty darn close. I wanted to wait to show you the kids’ bath when it was fixed, perfect, etc – but things are taking longer than I had intended and I’m wanting to shift the blog this year (now that I have a wonderful team up here to help me) and really bringing you in on every part of the process – not just construction and reveal. That should have always been the intent but this last year, transitioning the company and my family up here, I was so underwater renovating that I couldn’t physically do more than 1-2 blog posts a week, without a team to help. And honestly, it was just such a construction zone for so long that it was really hard to understand what was happening visually. That’s all to say that with my small and mighty team up here and in LA, and my willingness to show you my mistakes/regrets/changes, we’ll be doing more quick process posts in hopes that you’ll still come back for the final reveal. Can I get a collective pinky swear?? Ok great. Here we go…
Where Is The Kids’ Bath?
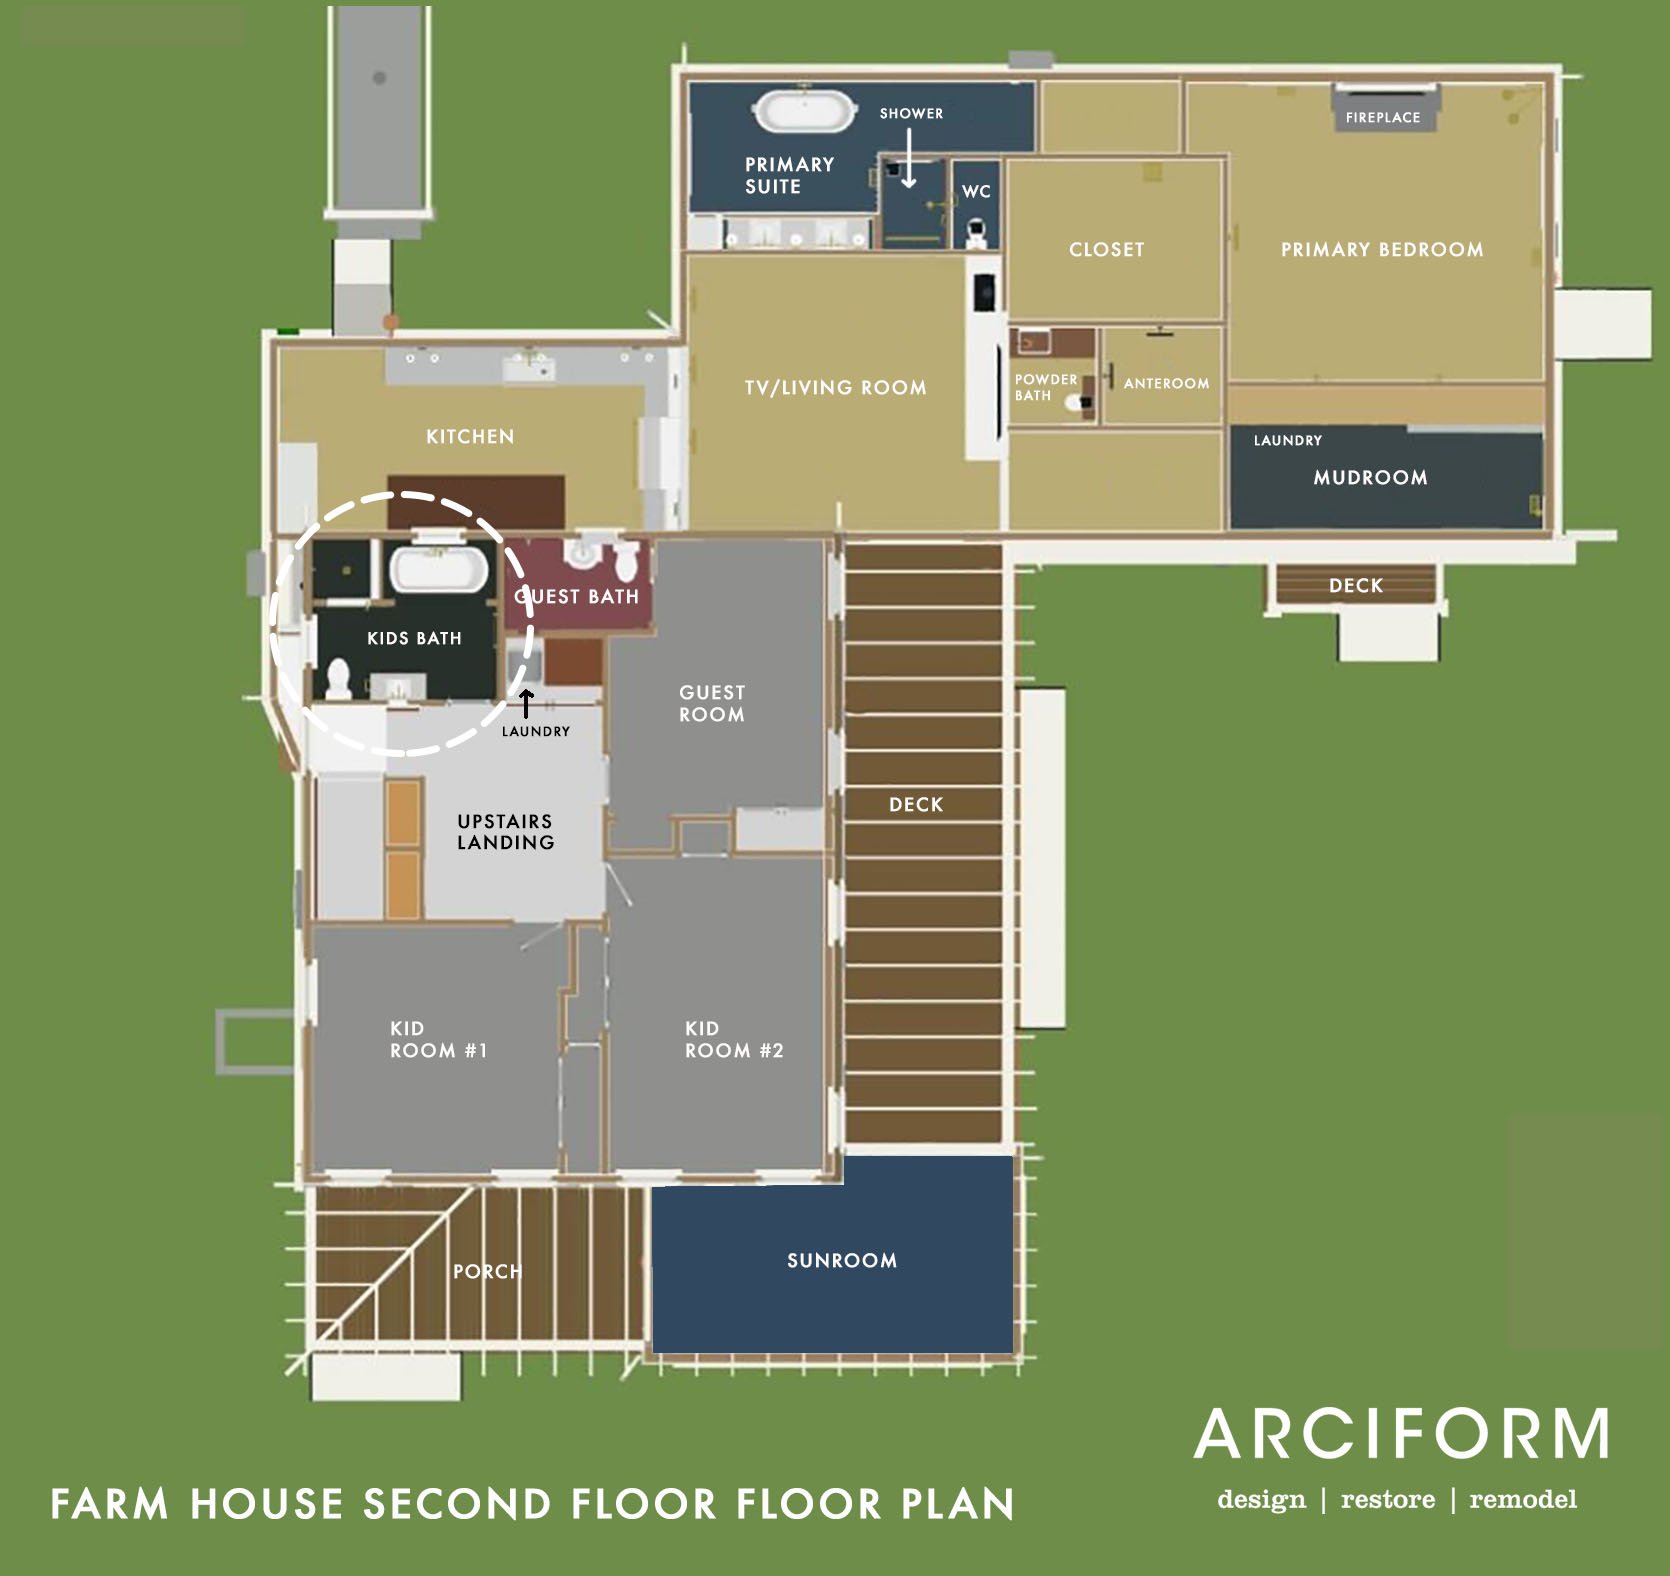
The kids’ bath is on the second floor, exactly where it was originally (I think it was the original primary bath) and with almost the same footprint (it was a good layout and we attempted to save some money here by not moving the plumbing).

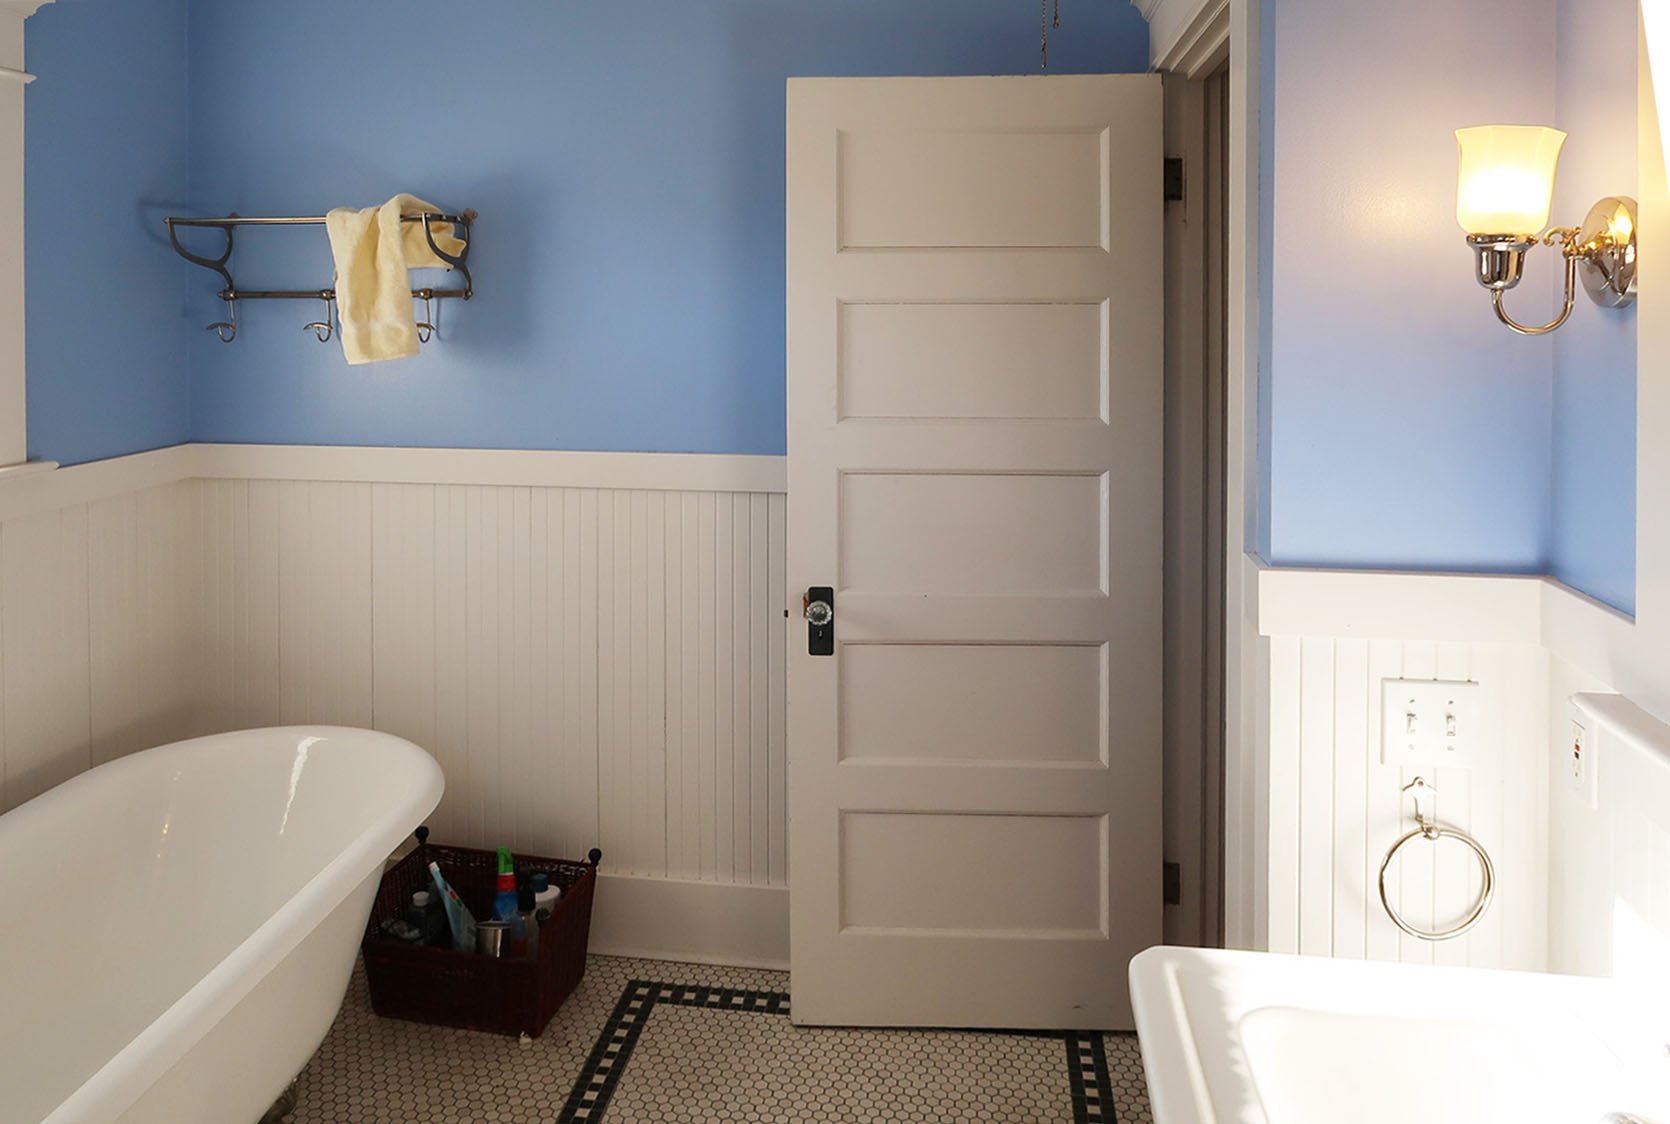
Before – The Mid-90s Renovation

This was the only bathroom that felt like we could leave as-is (beyond updating paint and light fixtures) and we almost did. Now, this bathroom wasn’t original to the house, it was redone in the 90s in a really sweet way and now that it’s almost 35 years ago, it was pretty run down. Once ARCIFORM came over they were concerned about how it was remodeled and pointed out a lot of oddities/flaws. They advised us that we would ultimately be bummed that this bathroom was left as-is, while the rest of the house was a more fresh, high-quality remodel. I’m obviously so glad now that we made that call. Had this been a “doing this over time” situation we would have kept it and waited til the end, but this was more of an “all at once” renovation which is more painful at the time, which obviously means less long-term construction. Had the house been more livable downstairs and not needed full electrical and asbestos/mold removed everywhere we would have done that – I’m only saying that so that you have full information in case you are in that predicament. Slower is better – over time is the wise way to do it if you can. But often you can’t.
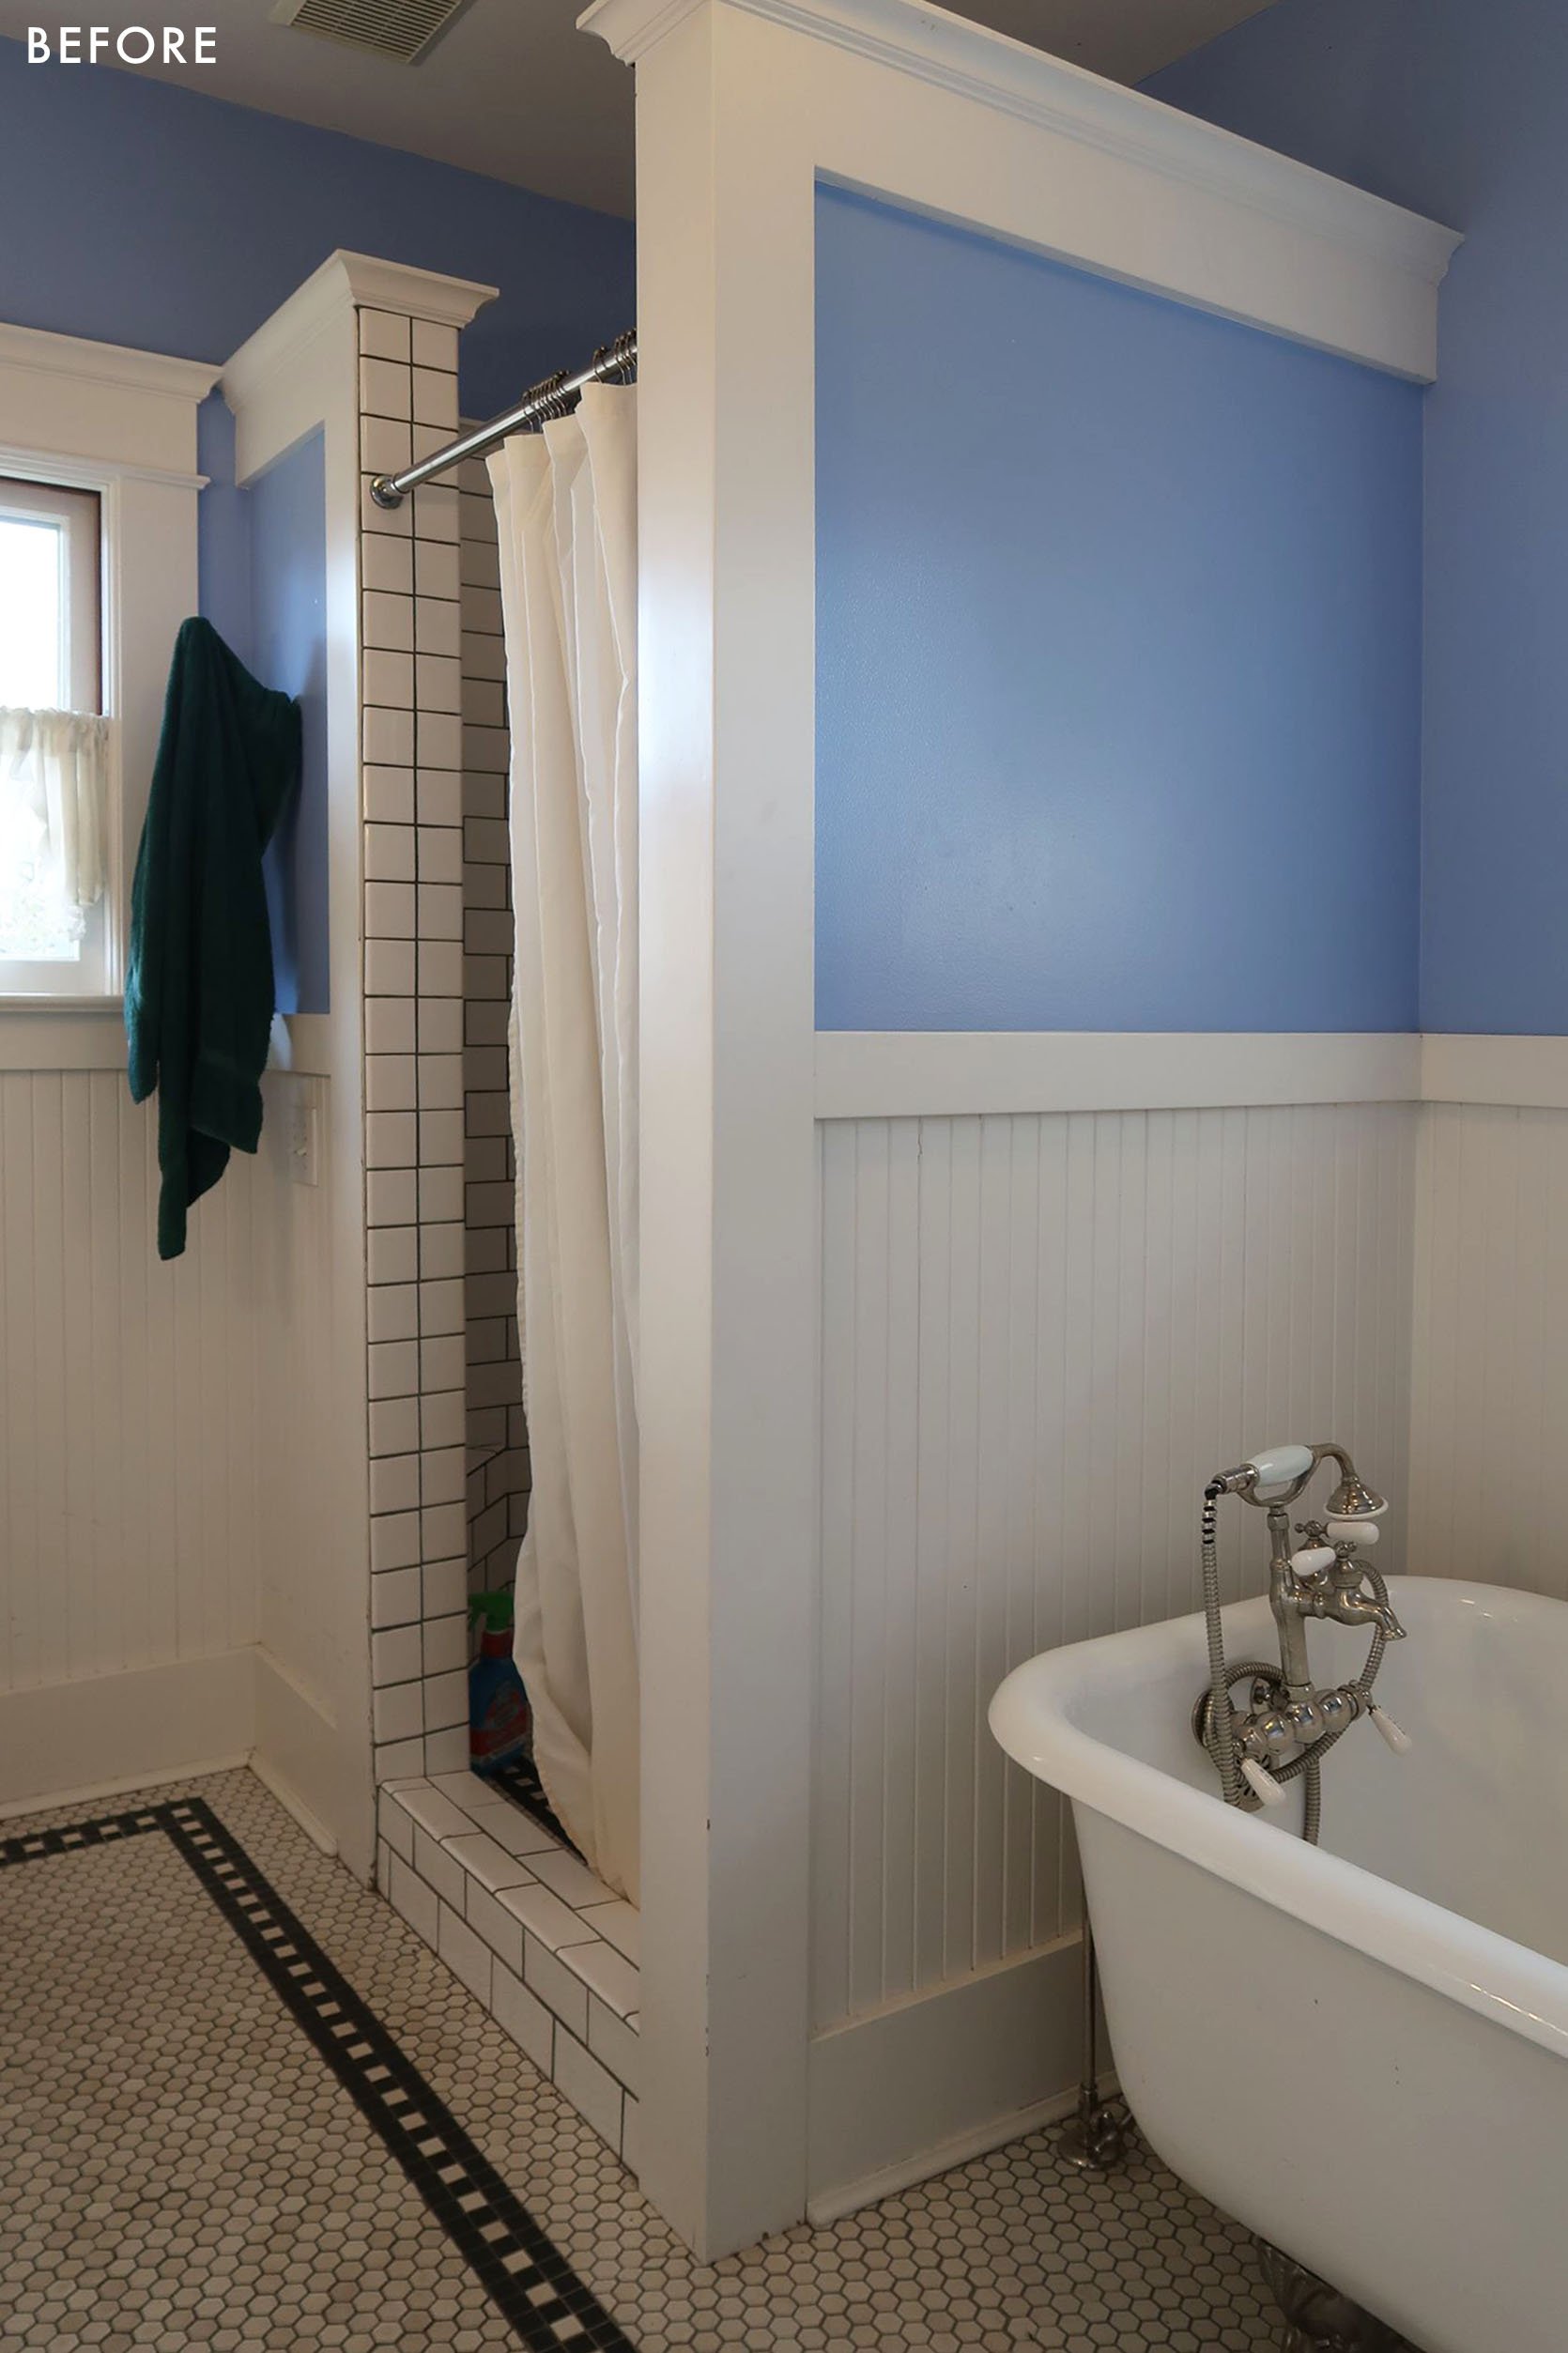

I do kinda miss that toilet (although I love our new one and I don’t think I’ve ever said that before). All the plumbing, lighting, and medicine cabinets were given to the ReBuilding Center and sold to those remodeling on a budget. Now that I’m looking at these “before” photos I’m hoping that we have the train rack shelf thing (below) in the garage as it will work so well in the guest bath!!
So yes, it was all demoed out and new plumbing and electrical were done (in the same location. Then we added drywall, tile, and our beautiful new fixtures. It wasn’t quite the snap of your fingers that I’m suggesting and you can read about the design process HERE. And if you want to see a quick video update check it out here! (just wait for the ad to play…THANK YOU!)
Where We Are Today
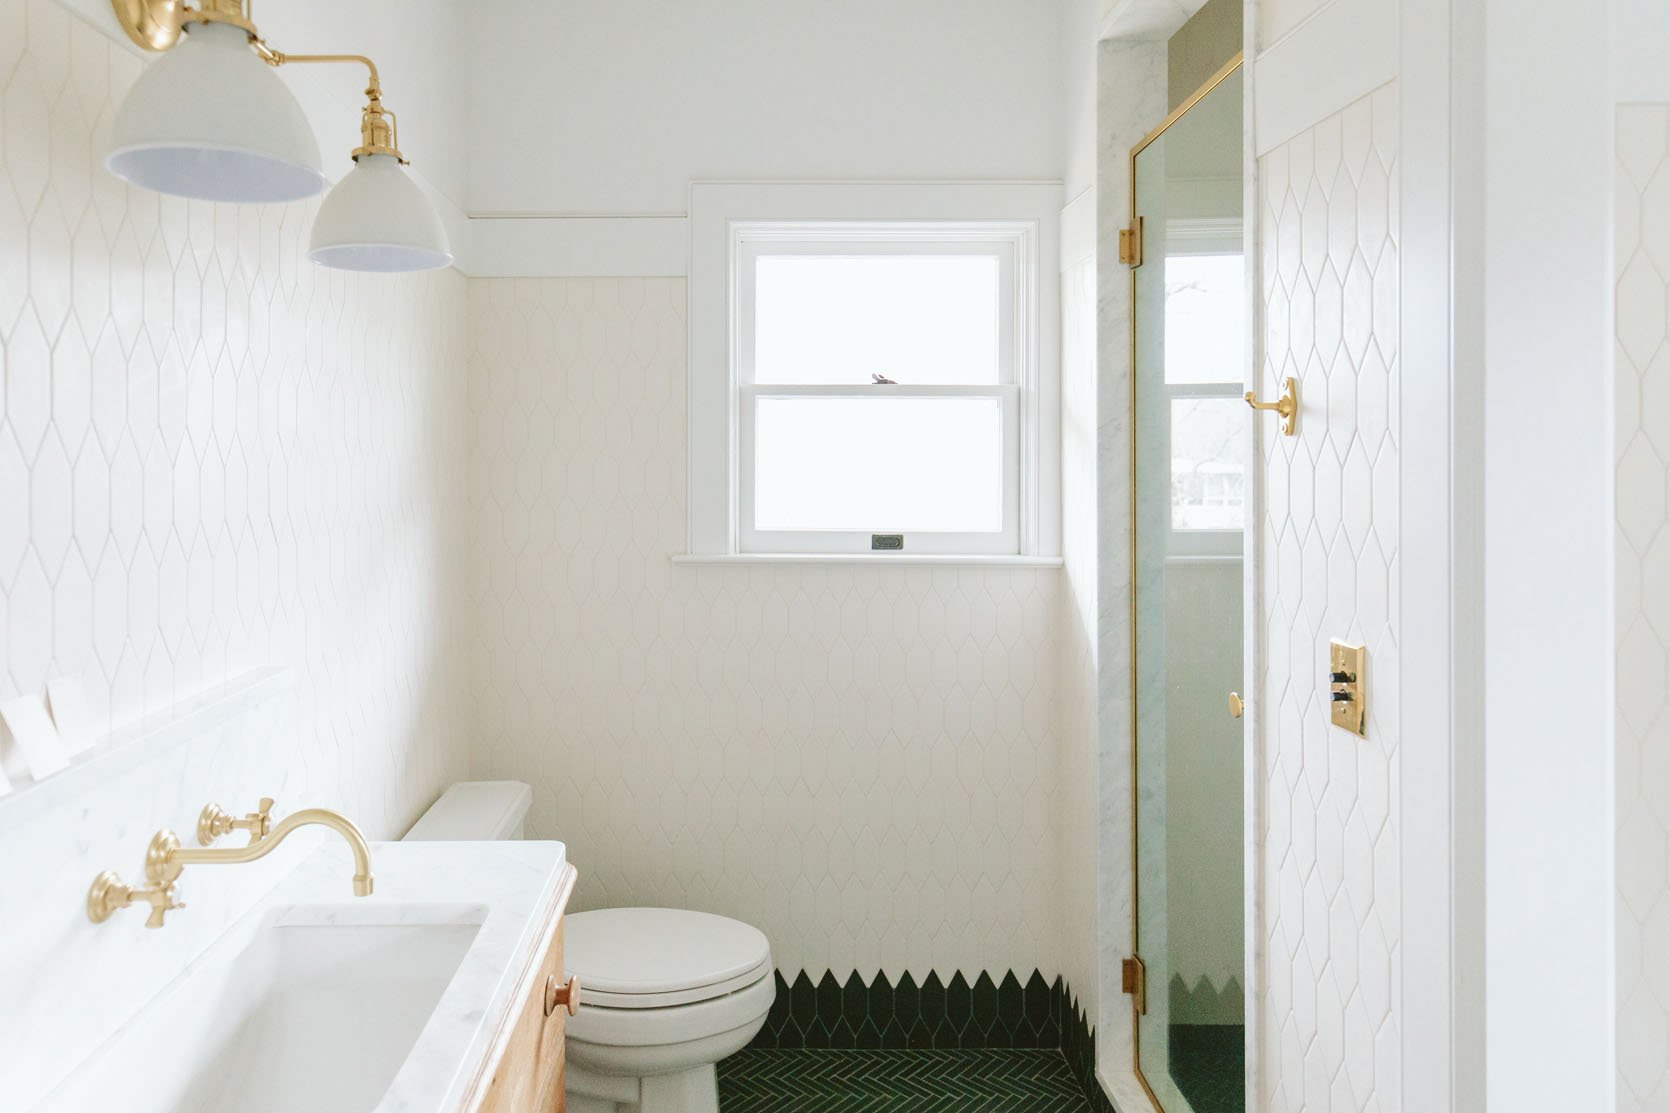
I love so much about it – the green and white tile, the lighting, the plumbing fixtures, the light switches, the shower door – the whole vibe is super special. That tub nook is so cute, and so is the vanity – a lot to love here.
BUT… MY BIGGEST REGRET/PROBLEM
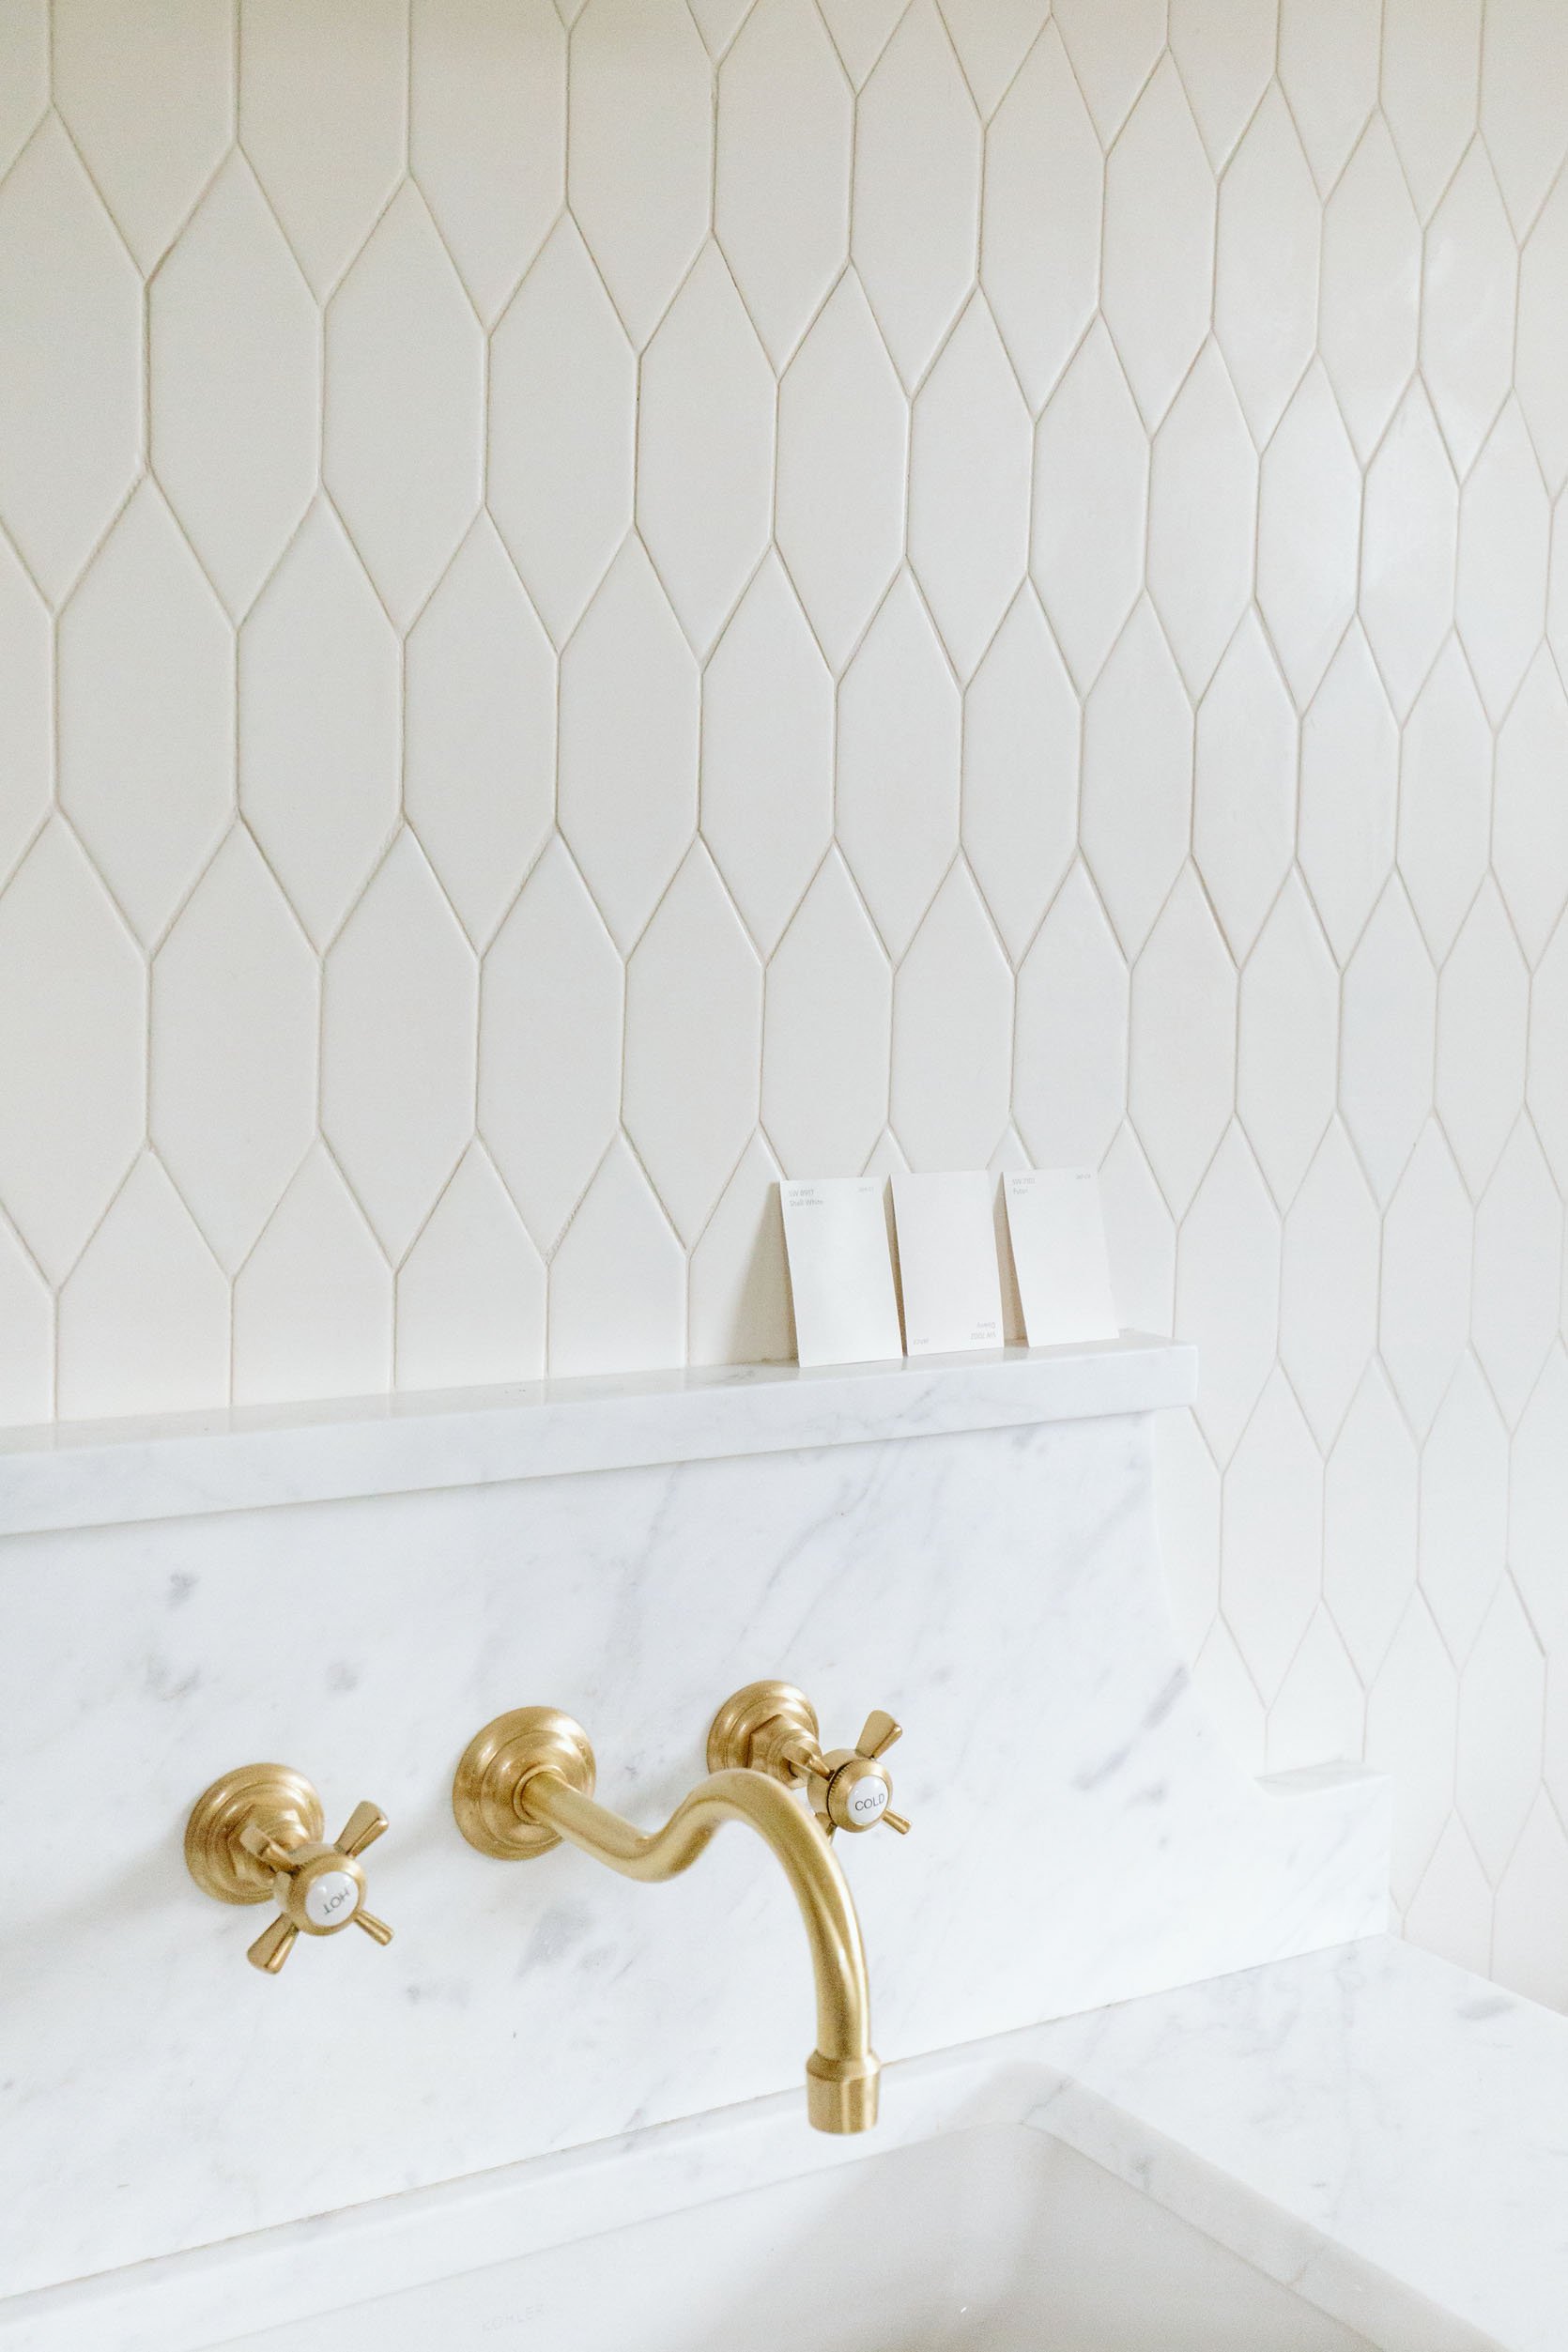
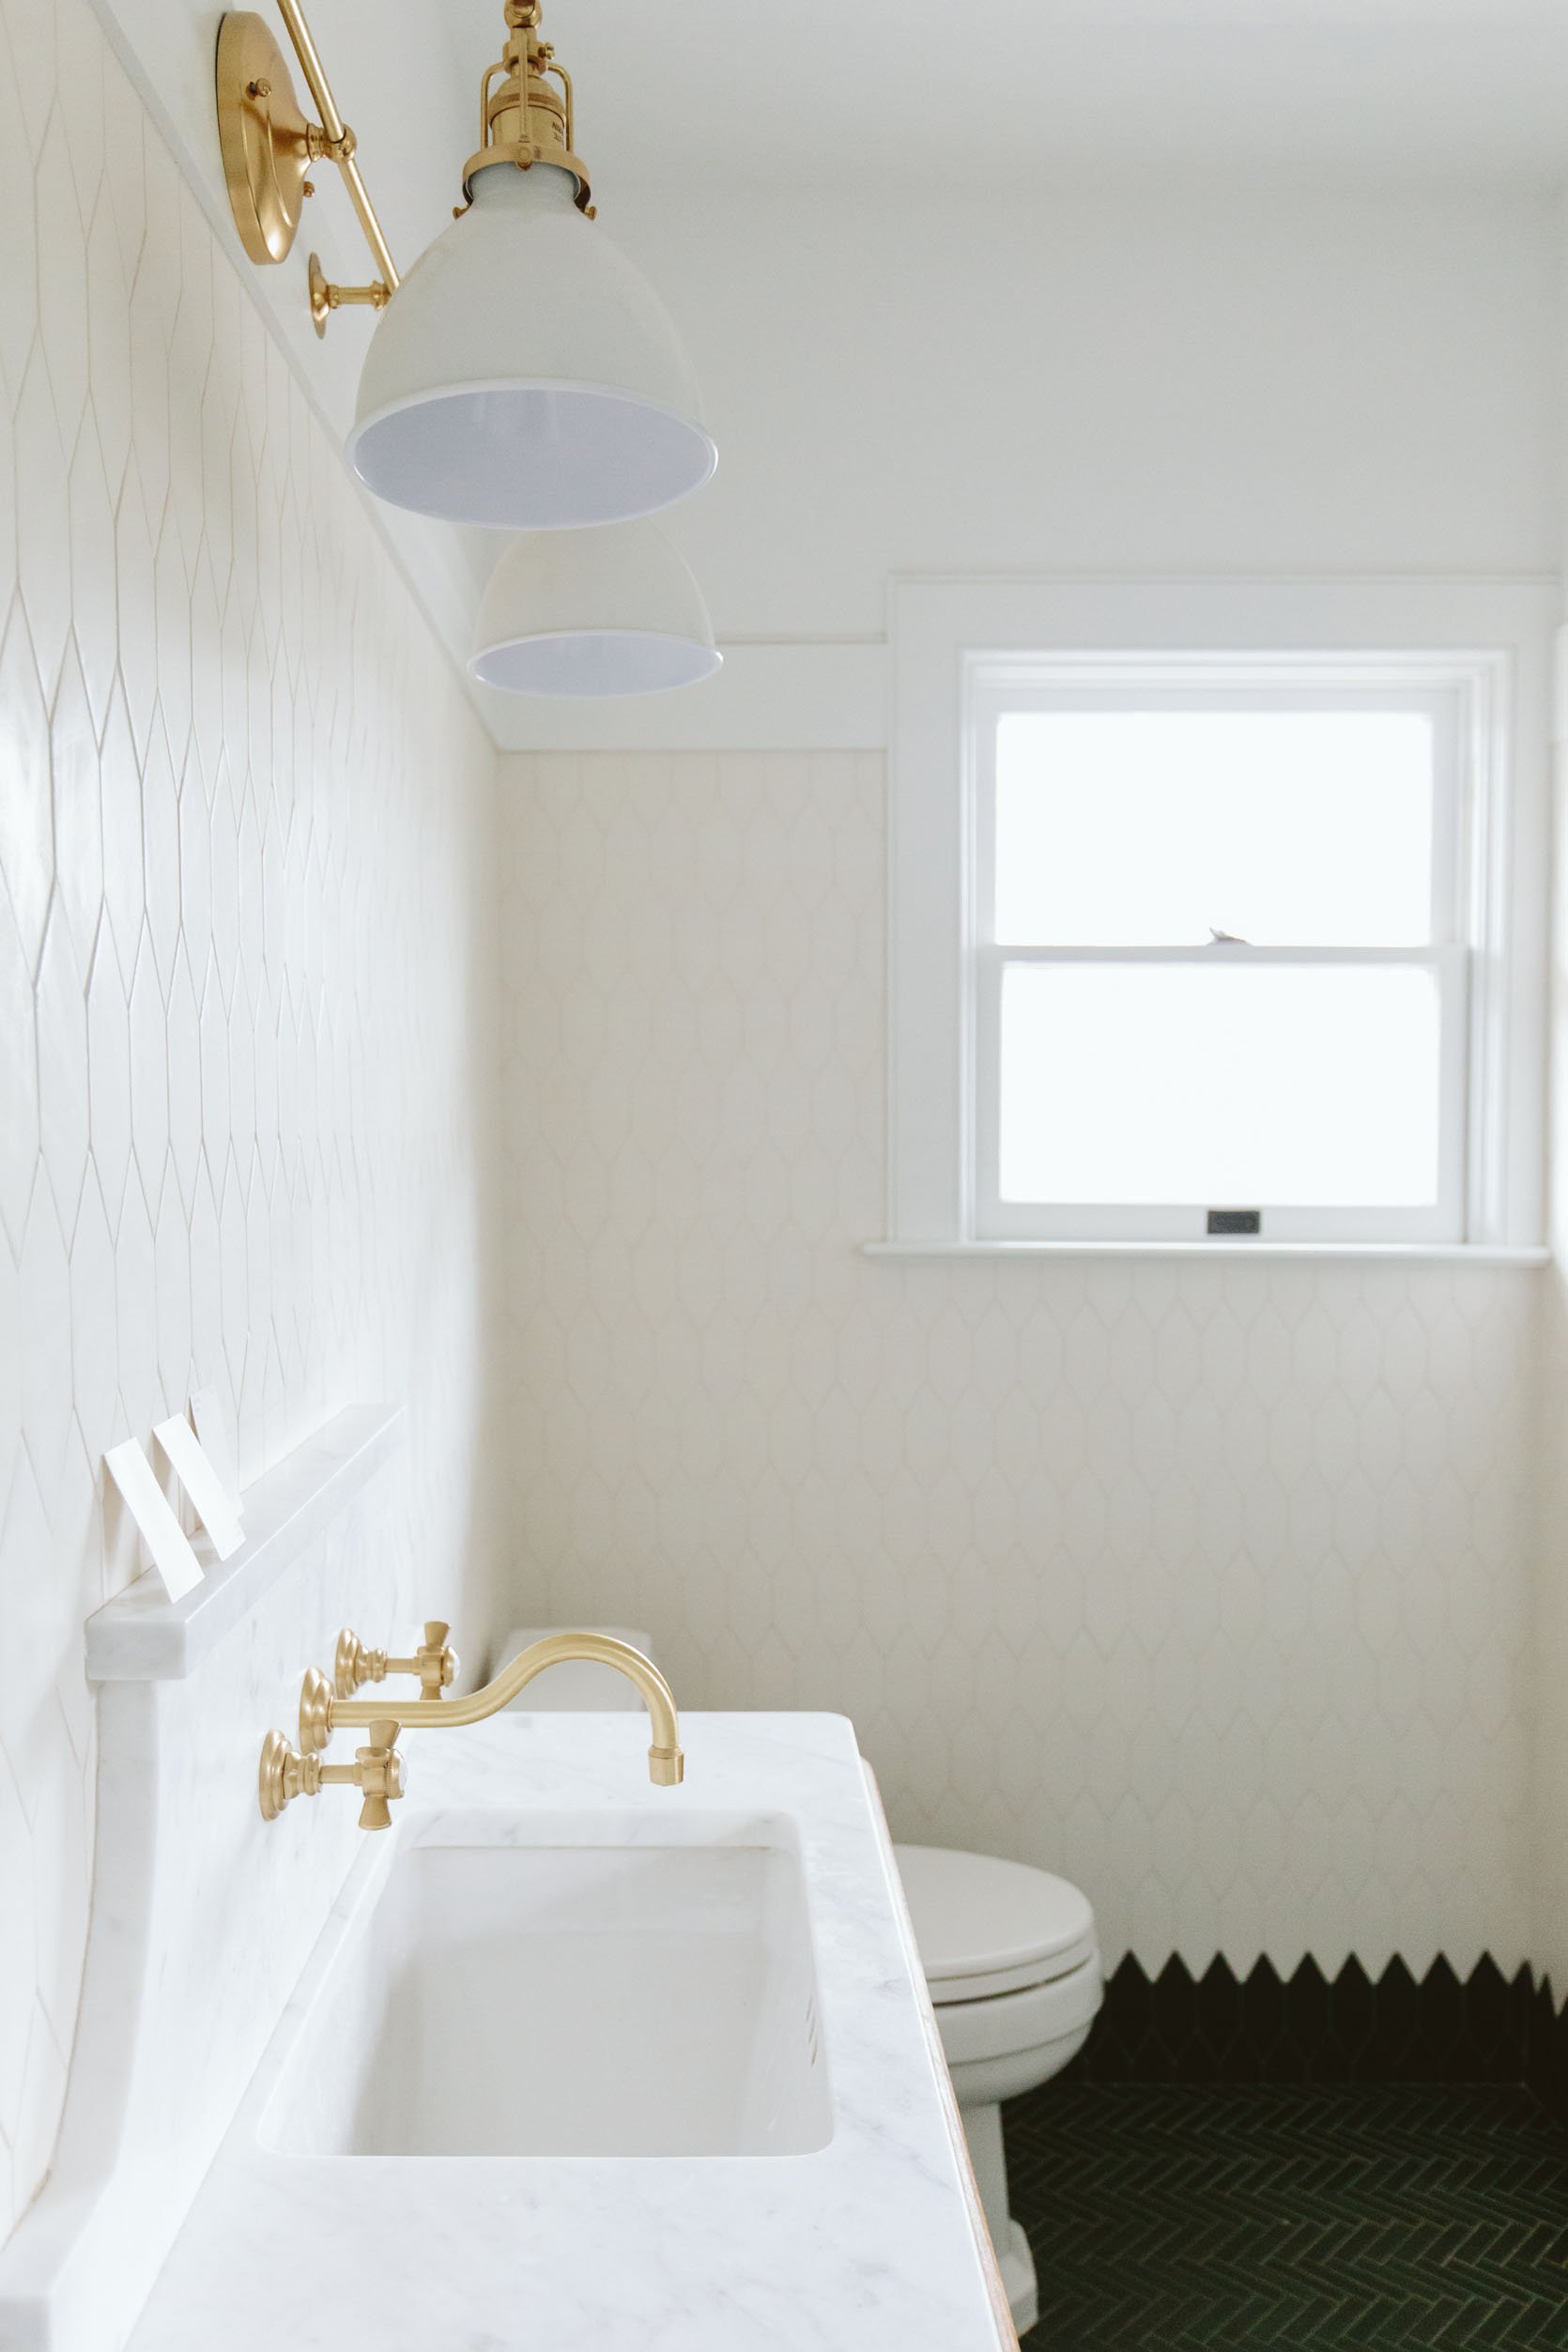
Welcome back to the nightmare situation of publicly dealing with my very own mess up – the “too cool white”. Now when we chose this color there was some confusion on my end when deciding between Pure White (which we chose for the exterior and love) and Extra White (which we love in the rooms and has a lot of blue in it). It was a dumb and very expensive mix-up. And honestly Pure White might have been too cool for this tile anyway. But we chose this white when the bathroom was all covered in plastic and the tile was seemingly a pure white. Y’all, this was the wrong white. I wanted to repaint before I showed you, embarrassed of my own mistake. But it’s taken a while to choose the right “white” and then we have to book a painter, it’s a 3-4 day job with prep and dry times (and the walls and trim are two different finishes – satin and semi-gloss). The whole thing sucks, but now that I’ve had some distance from the initial nausea. I’m accepting of it and have transitioned into problem-solving mode. As I tell my kids “every problem has a solution” and now I’m ready to show my friends:)

As you can see the paint color makes the tile look yellow and THE TILE IS NOT YELLOW. So many lessons learned. I’m not going to harp on it too much here because there are so many other pretty things to talk about. But yes, I messed up and have felt a lot of anger and frustration with myself (ARCIFORM wasn’t involved in paint decisions due to scheduling and needing to make some decisions really quickly – I was like, “I got this!” *hand in face emoji*). I haven’t even let Anne come over yet to see it because I’m too embarrassed. It’s all so dumb. Anyway, I have my strengths – one of them is styling and the other is admitting fault then solving problems.
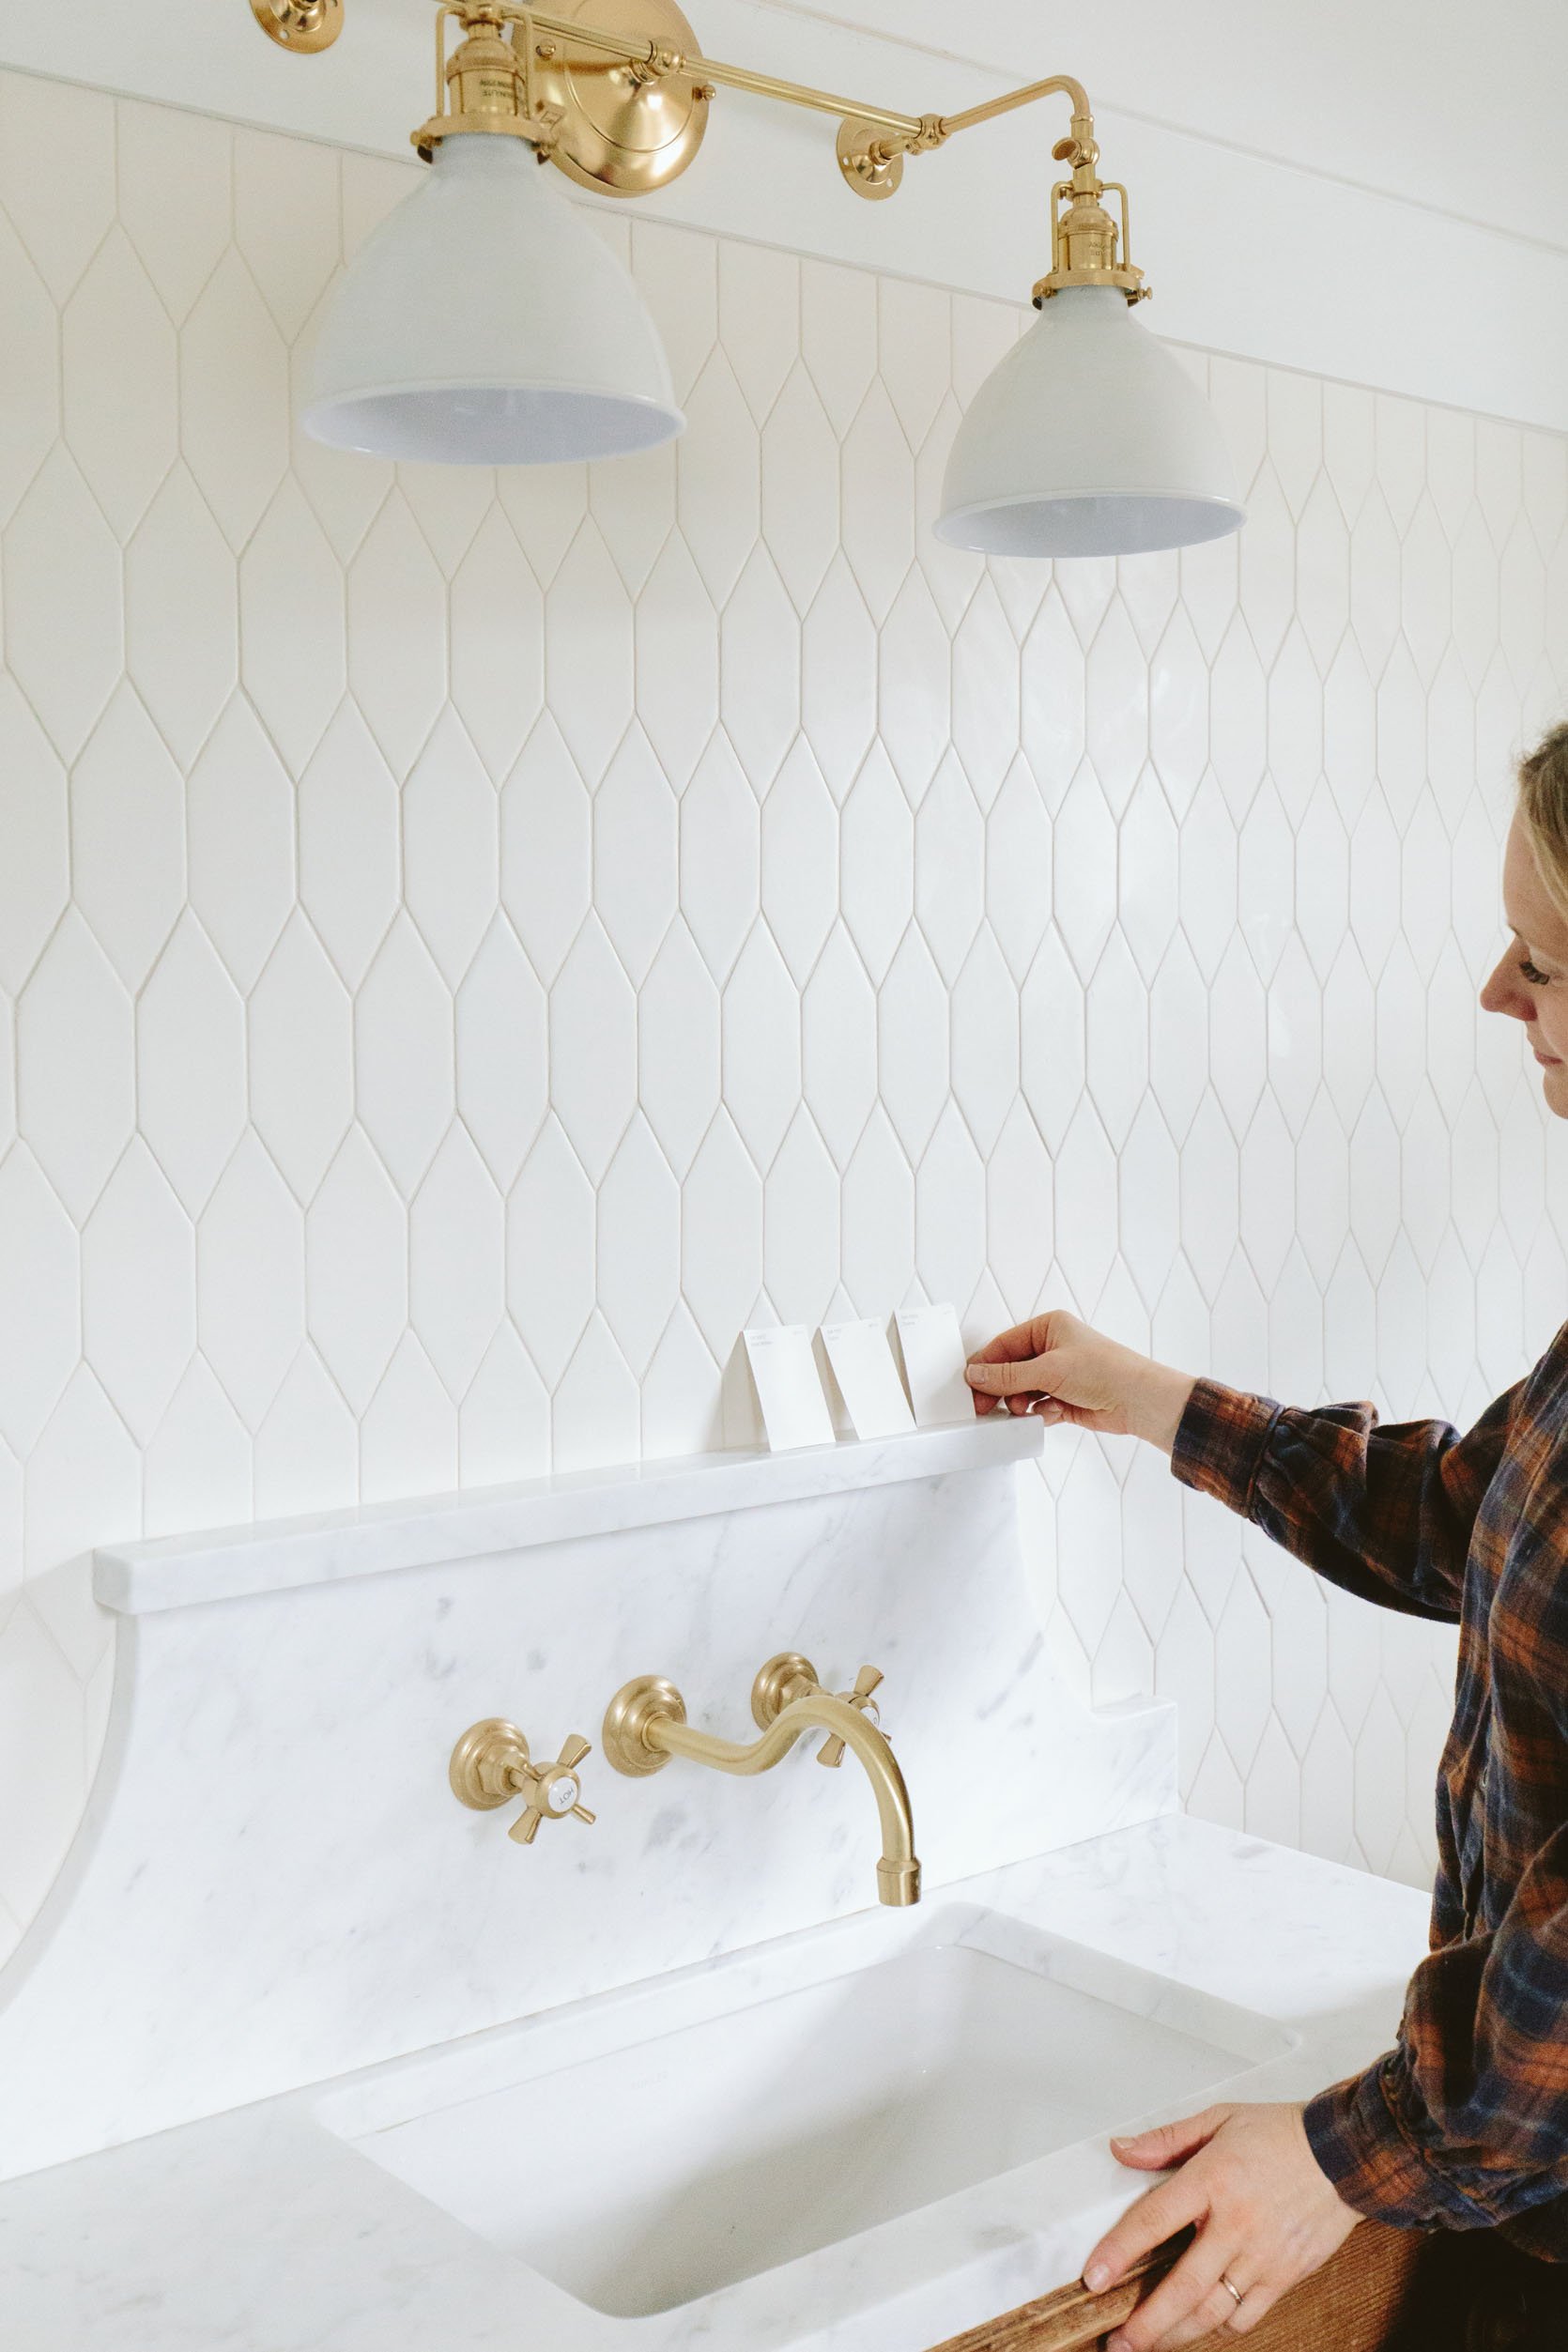
So as you can see we have three different Sherwin-Williams whites that we are choosing from. Rene from Some Kinda Landscape came over and helped pull the whites that she thought would work (she painted our prop closet and part of her service is color consultancy so I figured I’d get someone else to weigh in on this with me). Above we have these three colors – all of which look identical to each other and are creamier, but as we have all very well learned in this process – all whites are very very different.
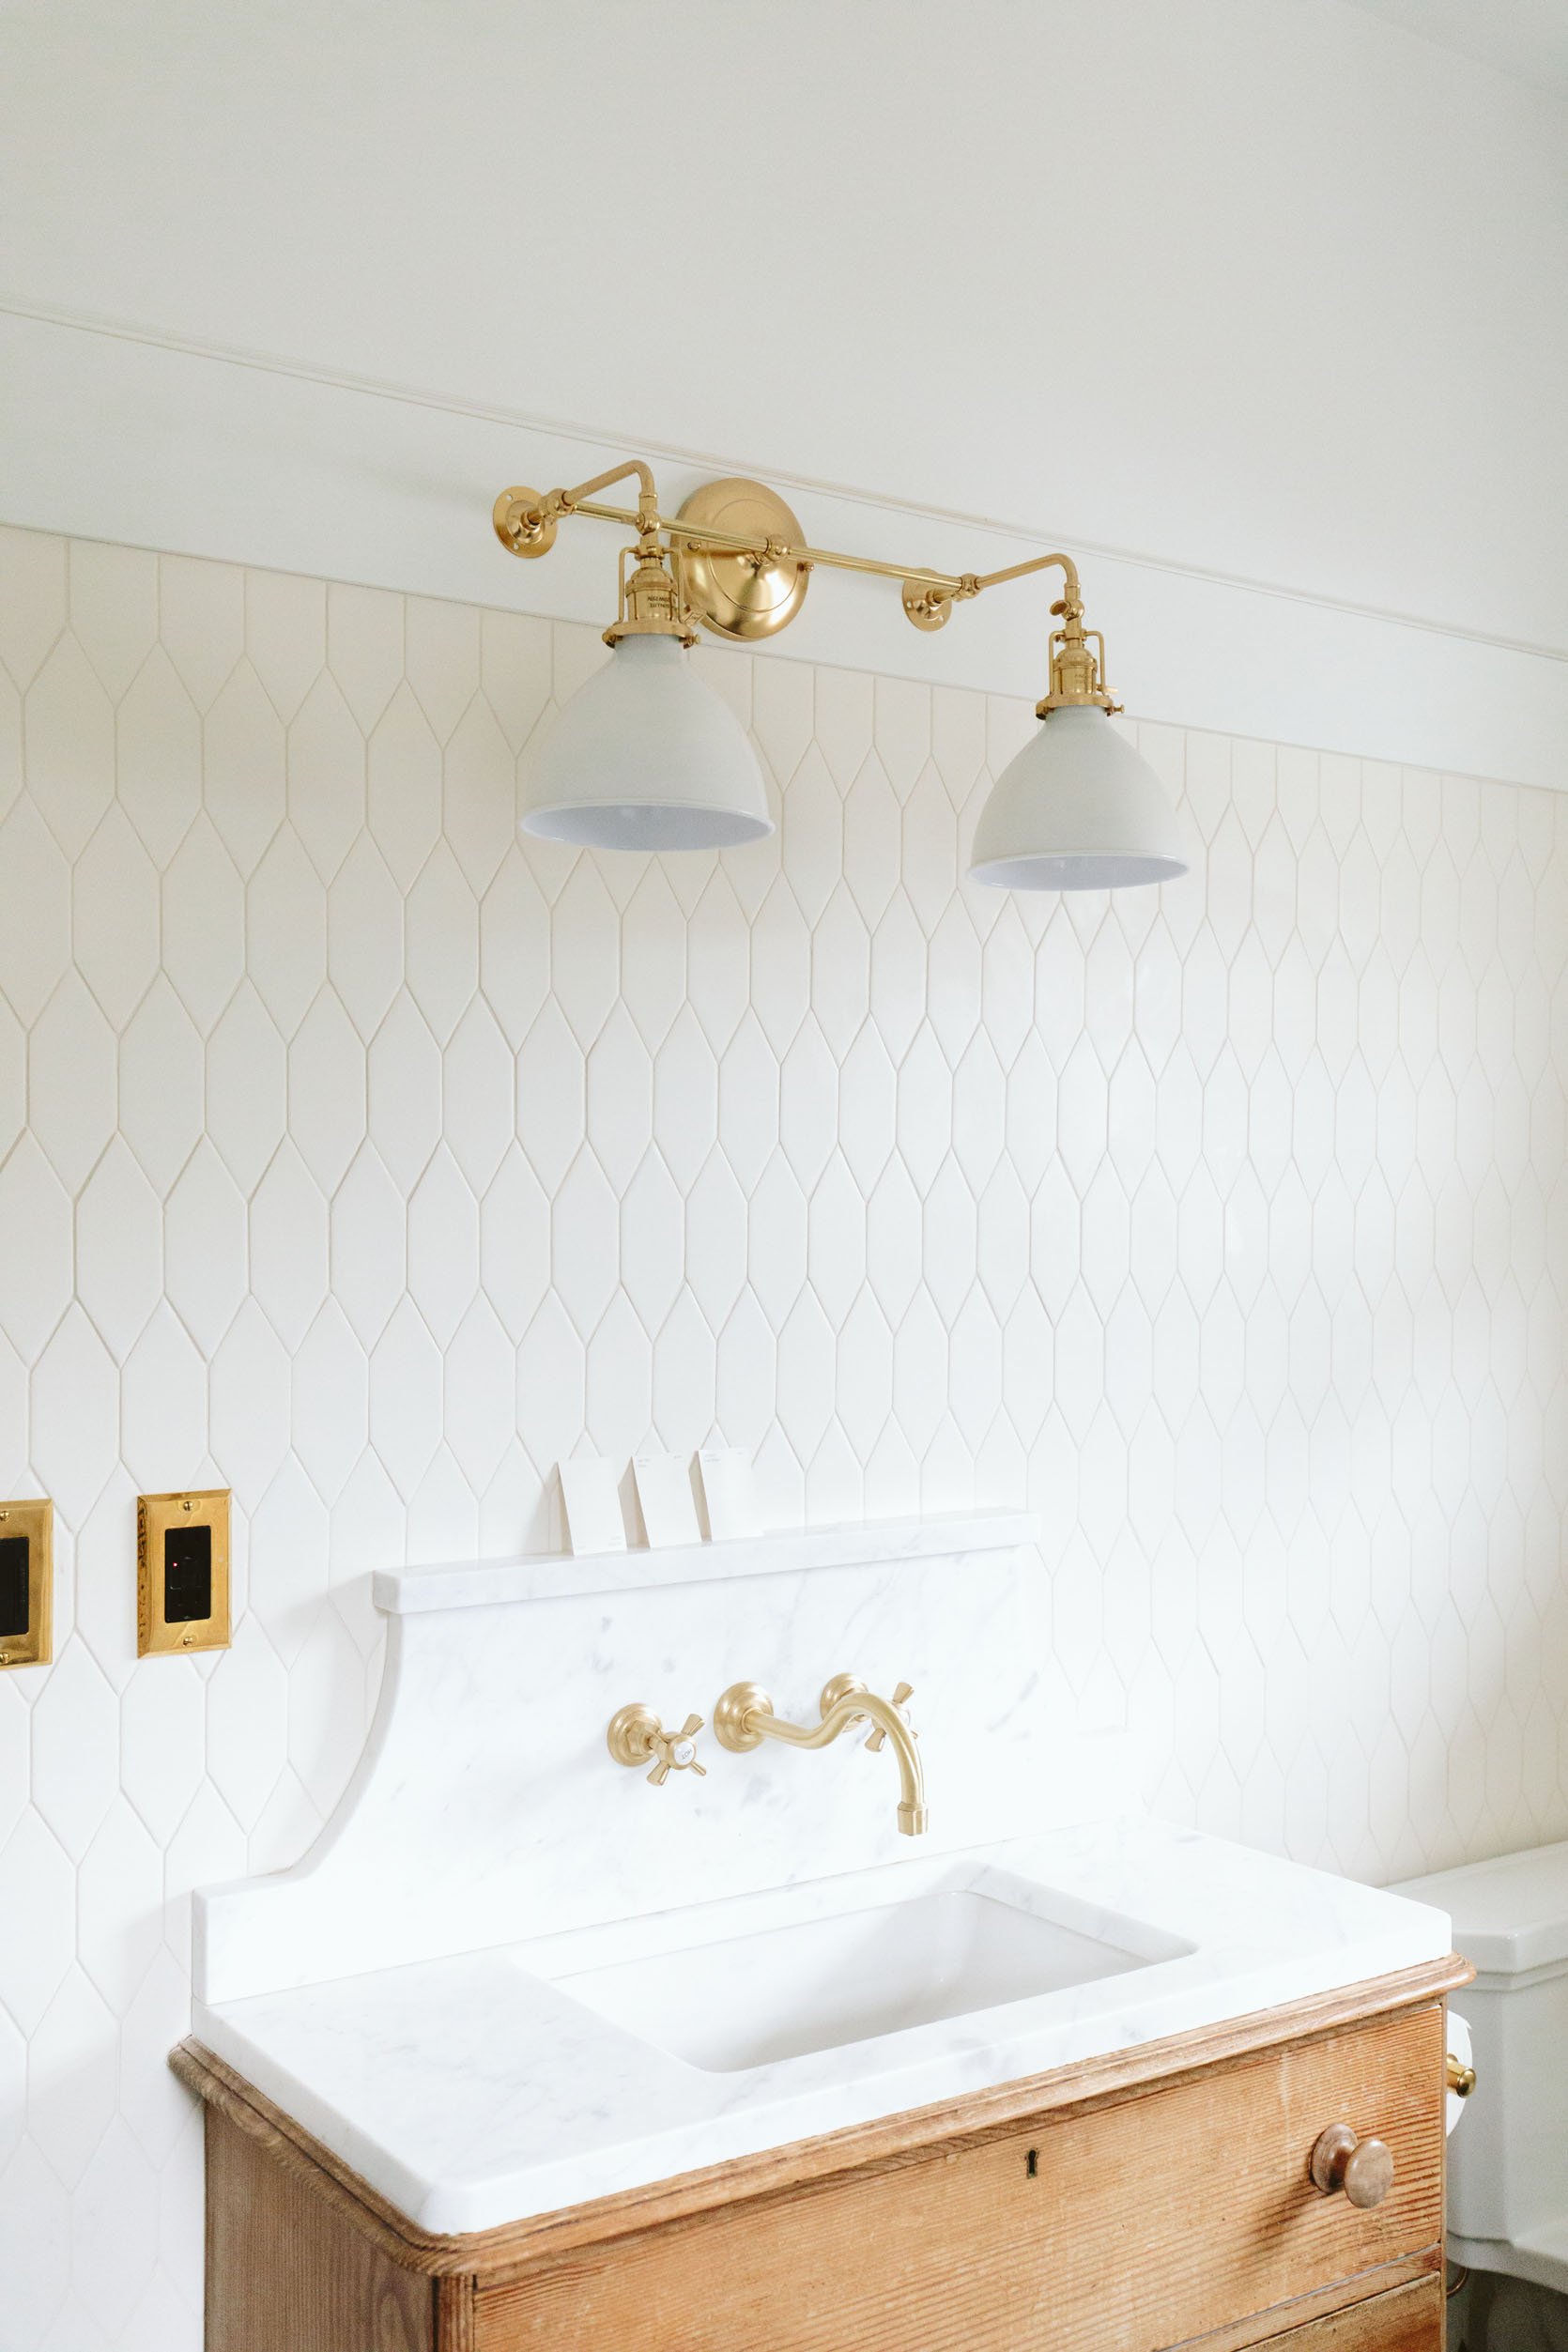
Ugh. How pretty is that faucet? I’ll be talking more about the plumbing and lighting in the final reveal – all from Rejuvenation, but will certainly link up everything at the end of this post. This is the faucet that made me want to reach out to Rejuvenation on partnering on the plumbing – It’s from their Conner line and is just so beautiful.

The Vintage Dresser Turned Vanity

Vanity Base (vintage)
I love that vanity so much. I found the dresser at a flea market a few years ago in LA and up until now, the kids have used it for clothes. But when we were designing this bathroom I wanted something that felt special and soulful (and wanted to save some money). There are a million beautiful vanities on the market, but when you want something unique, your options tend to be vintage or custom…and anything custom is always like thousands of dollars. So Jamie retrofitted this (cut out the plumbing in the drawer) so that we could still have storage. The keyholes just kill me, in a good way.
Anne and Stephyn helped draw this backsplash design that I had referenced for like a year and it was a lot more to do it (and we had a tile backsplash so it wasn’t necessary) but now that it’s done we LOVE it.

Regarding the backsplash – the countertop and backsplash were supposed to be a white Thasos – a creamy white marble. But after spending some time this summer at the mountain house where we have Thasos in the kids’ bathroom, I was reminded how annoying it can be for kids (on honed Thasos you can see all toothpaste or soap marks, and they often stain for months). So I stopped that and went stone shopping. At the same time, the kitchen and main bath stone (a beautiful Carerra) was picked up from Bedrosians and dropped off for fabrication. They had enough to do this bathroom (the vanity and the shower jamb). So my options were to keep shopping and see what I could find that works with the green/white that wasn’t a full slab or just literally give them the green light to fabricate this as well out of the same stone. I chose the latter (mostly out of ease) knowing that this stone is beautiful and more forgiving than Thasos (Thasos is so white that it almost doesn’t even look like a real stone and you may as well get a Quartz IMHO). That’s all to say that the stone is also cooler than the tile so when choosing the new white color for the walls I need to make sure that it shares the undertones of the stone as well. This is hard for someone who I’ve come to realize sees colors differently than other people – not saying I have any sort of color-blindness, but the number of times I’ve gotten in debates with people over what color something is, is A LOT.
The Tub/Shower Area

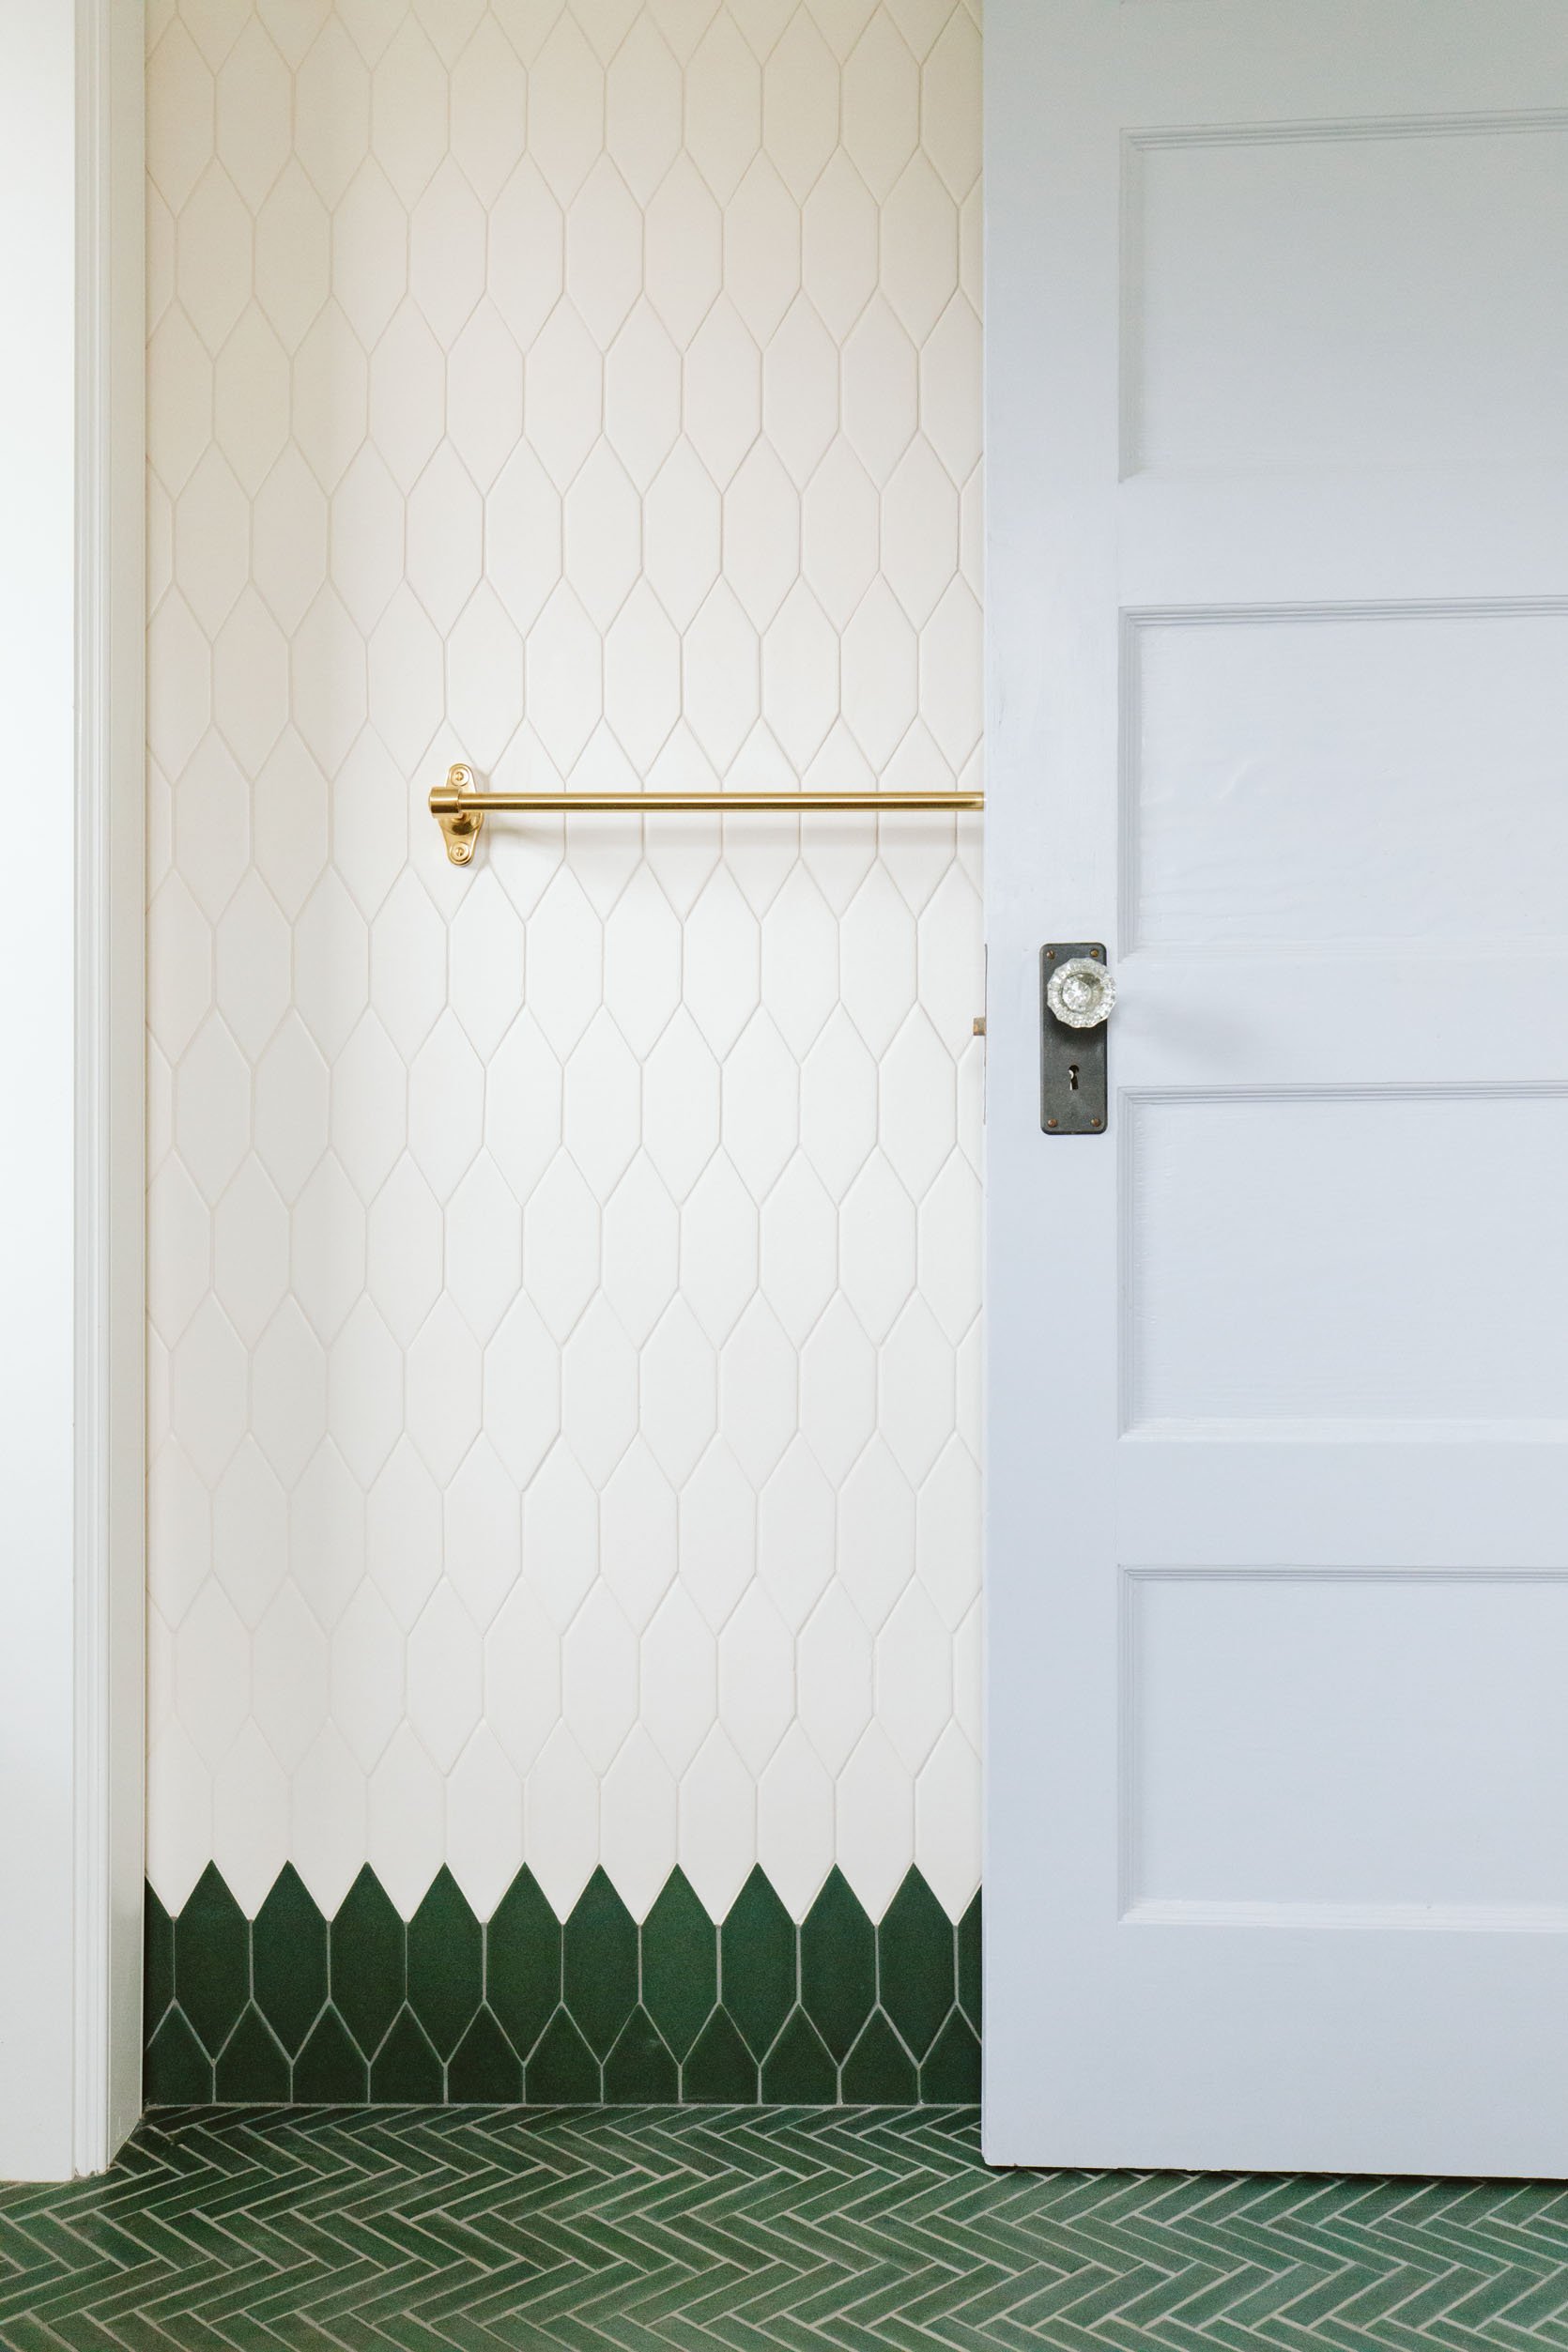
Should we talk tile here??? I wanted to do something unexpected but not crazy busy so I brought the floor tile up the wall, mixing the different shapes (and mixing the grout on the wall). It’s pretty darn fun if you ask me. The tile is from Pratt + Larson and install was by Level Plane Tile and Stone. On the other side of the room, we have the shower “room” and tub nook. I like the shower room versus one that is more open with glass so we did this twice in this house.
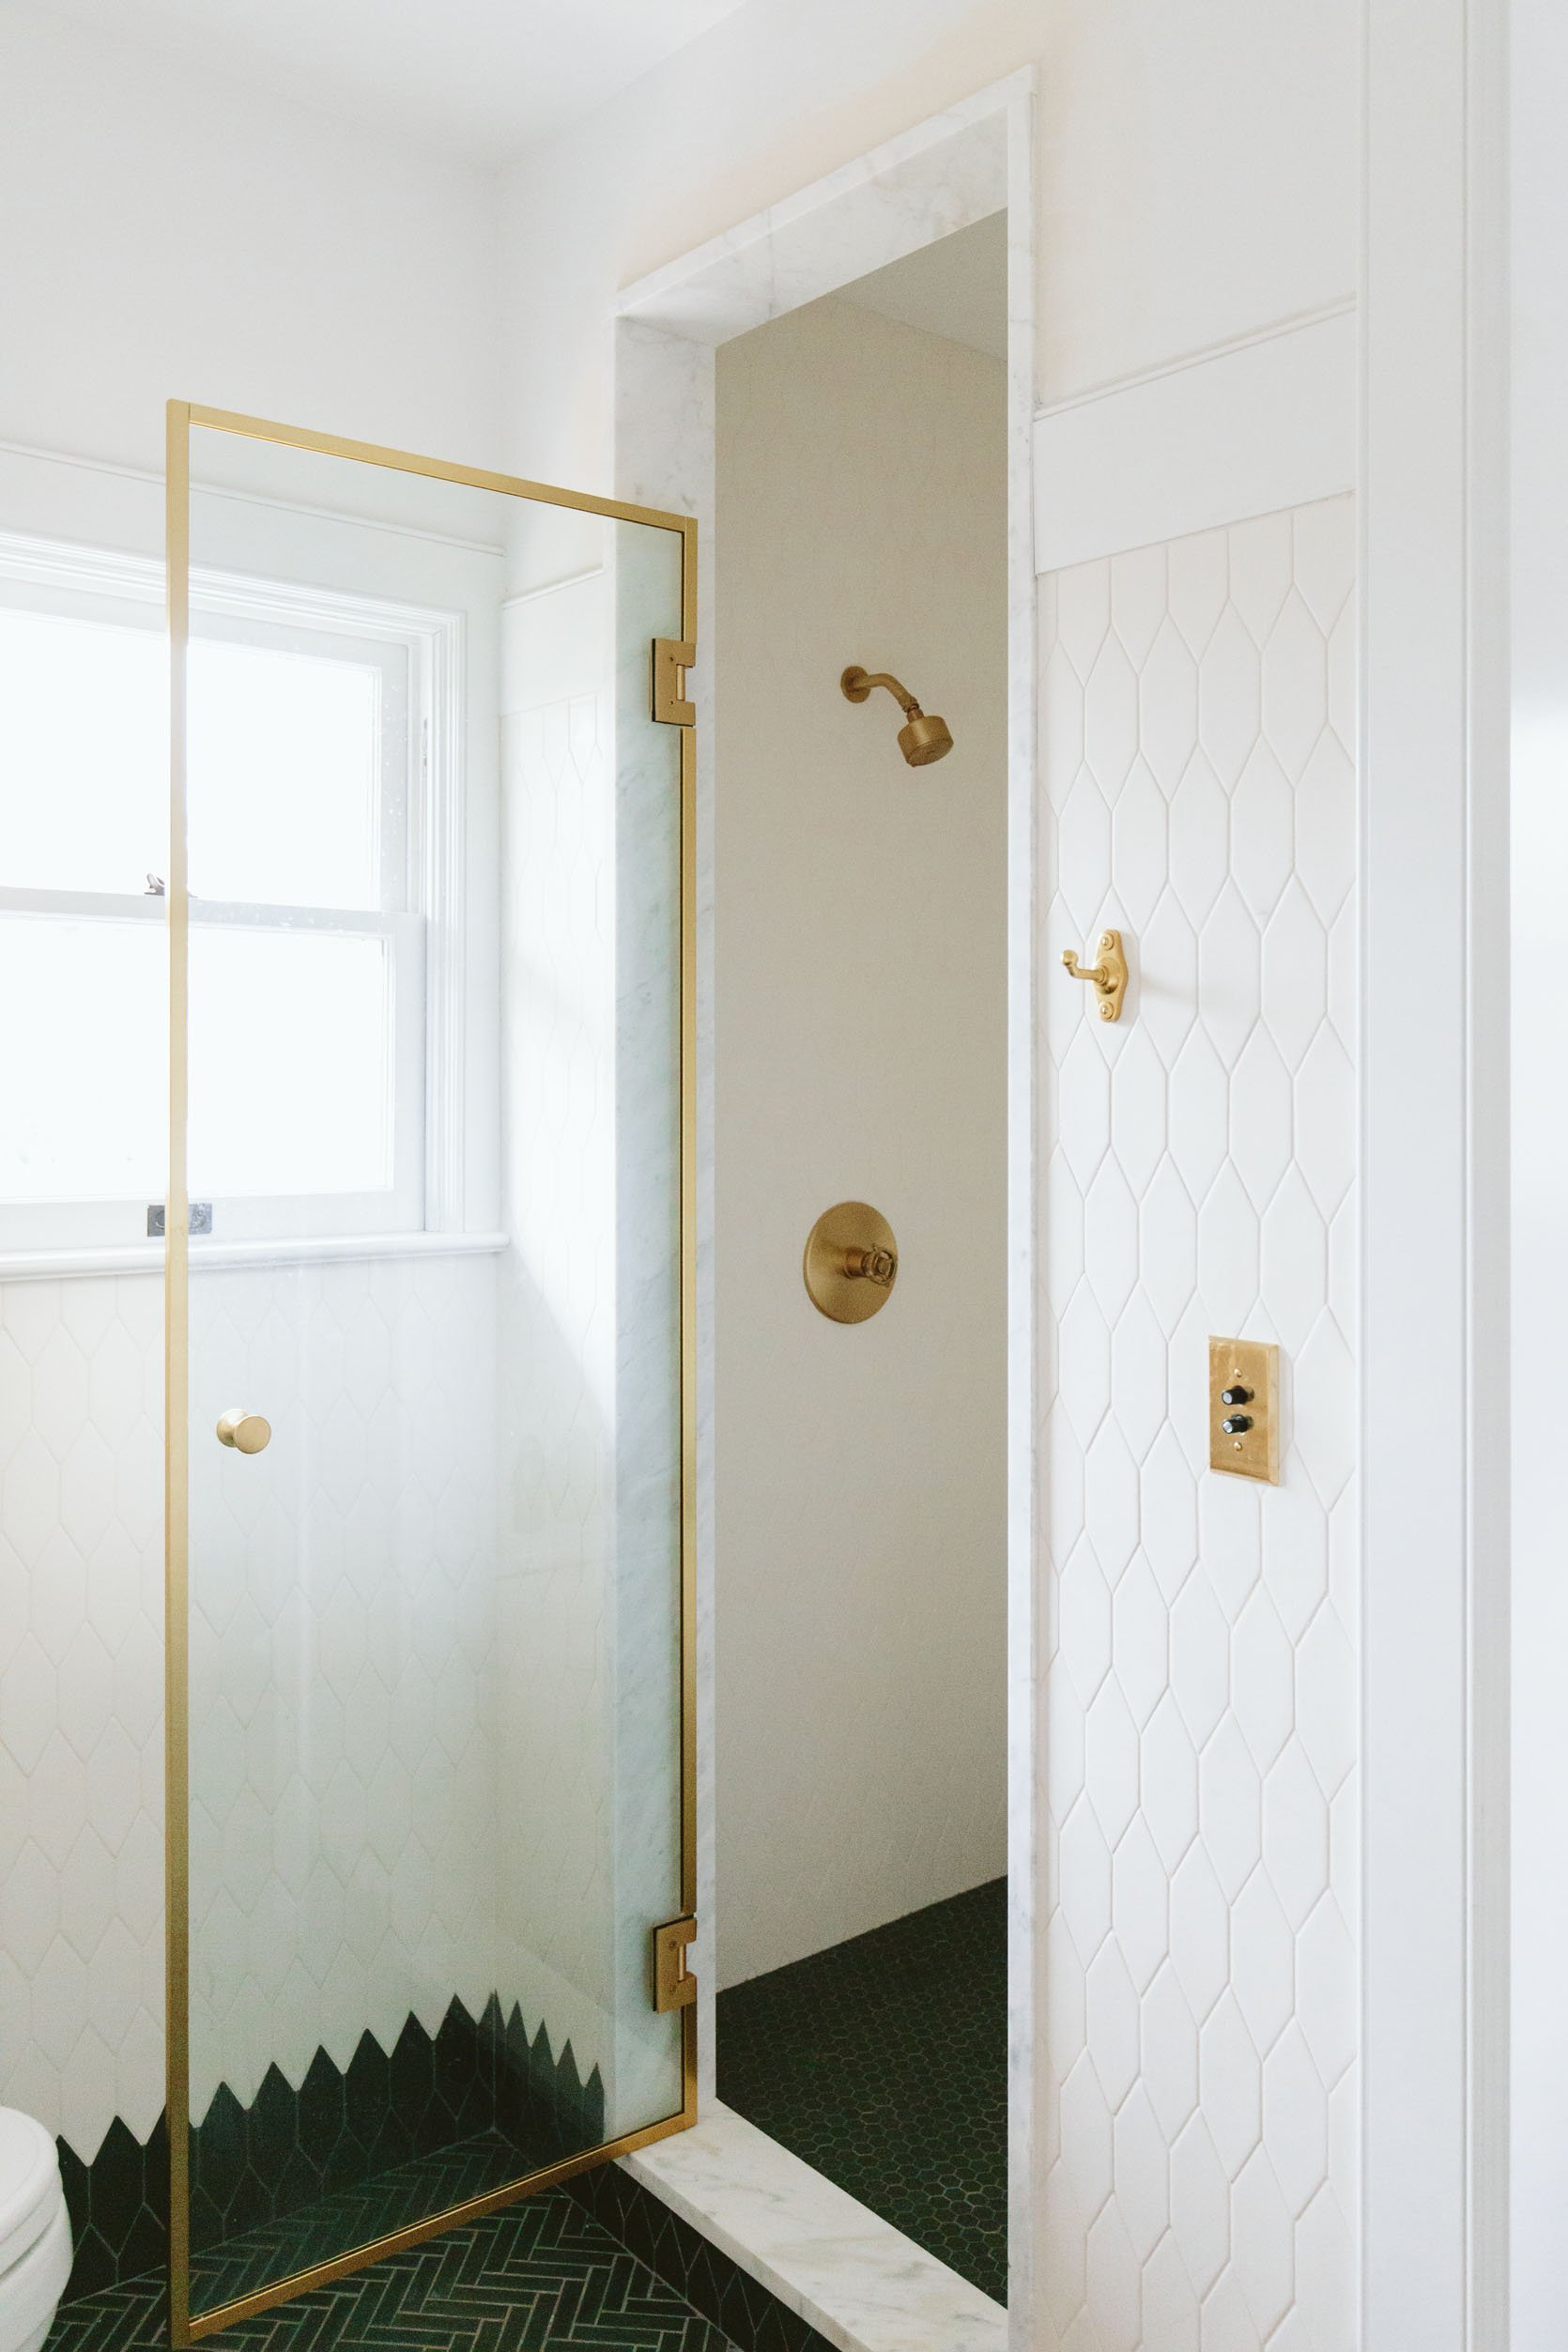
Shower Door (custom) | Shower Set | Shower Head
At first, I thought that the shower door came in short, but then realized its likely for venting. I’ve gotten used to it and it’s not something we are going to redo but wish that we had put a venting transom above it. Not a big deal though at all. I love the brass around the glass and the little knob (all per ARCIFORM’s recommendation).
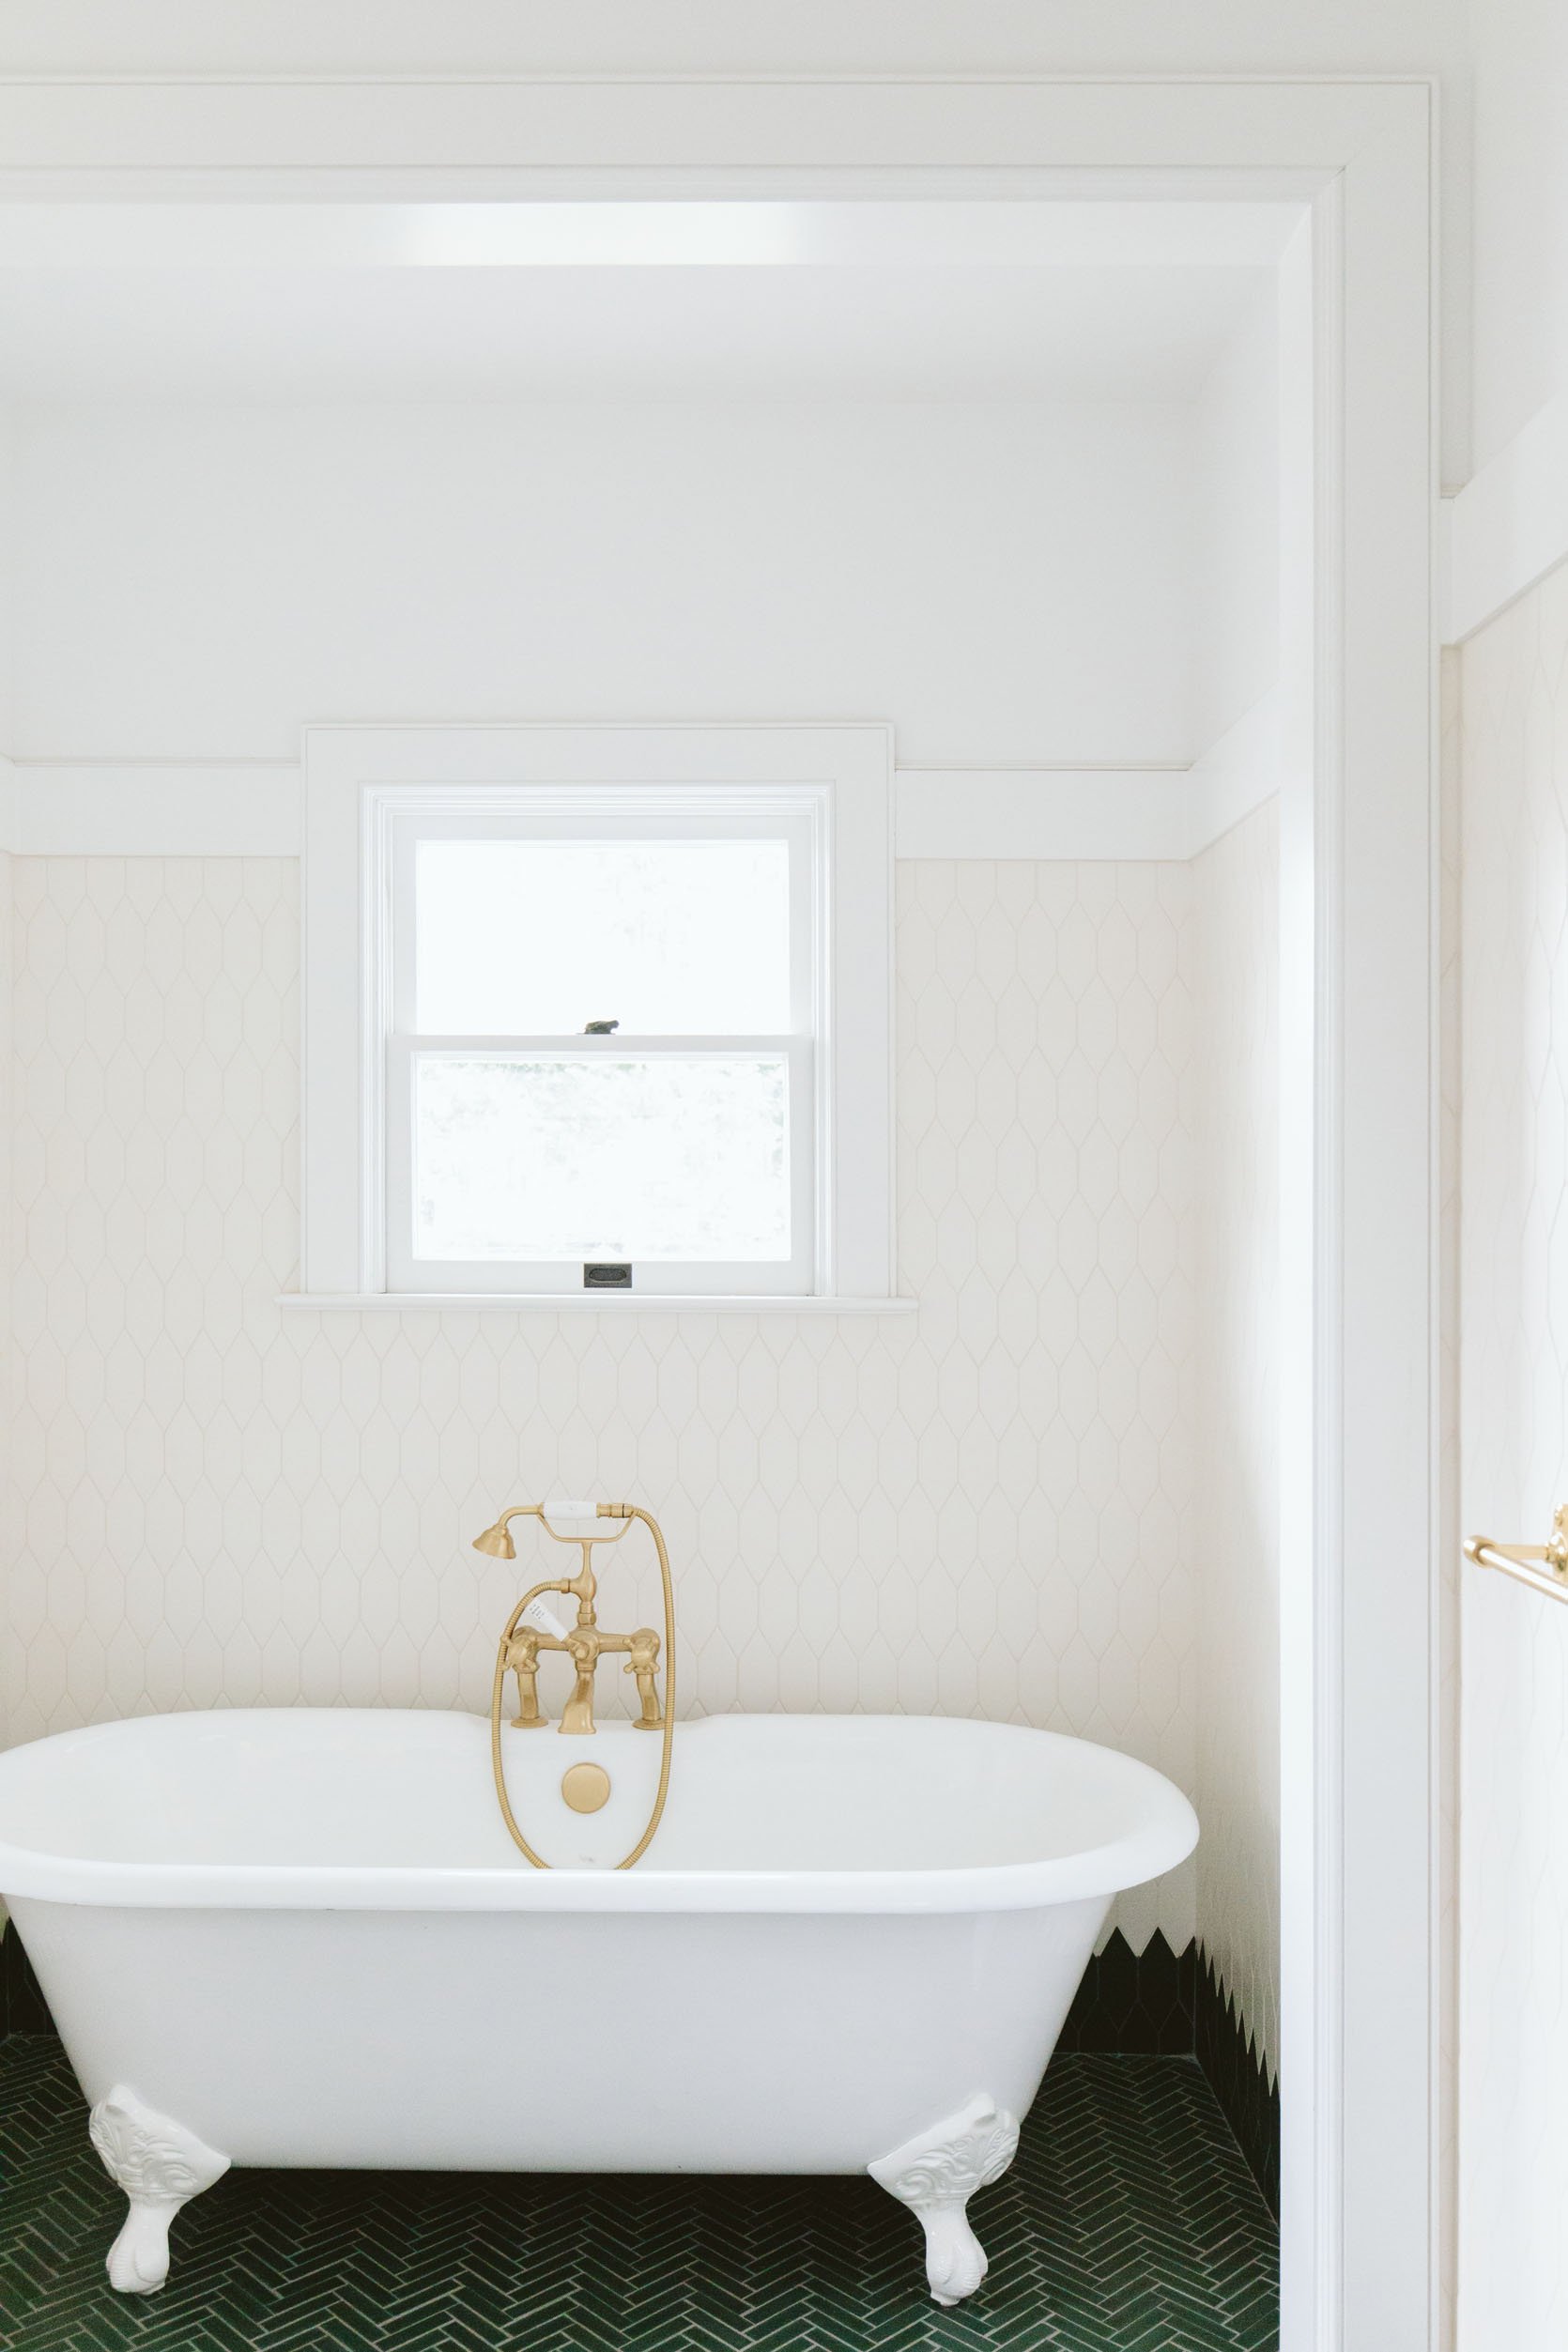
The clawfoot tub was something that Brian specifically wanted to keep from day one. We didn’t keep the one that was in there because I wanted to give my partner Rejuvenation rooms with 100% of their product (if they sell it). So we donated the tub to the ReBuilding Center and it’s in someone else’s house now 🙂 We do like that this one is double-sided and allowed us to do the faucet behind it and have perfect symmetry in this nook.
The Tweaks And What We Are Adding

We want to change out the white shades to glass shades so we don’t obstruct the future mirror too much.

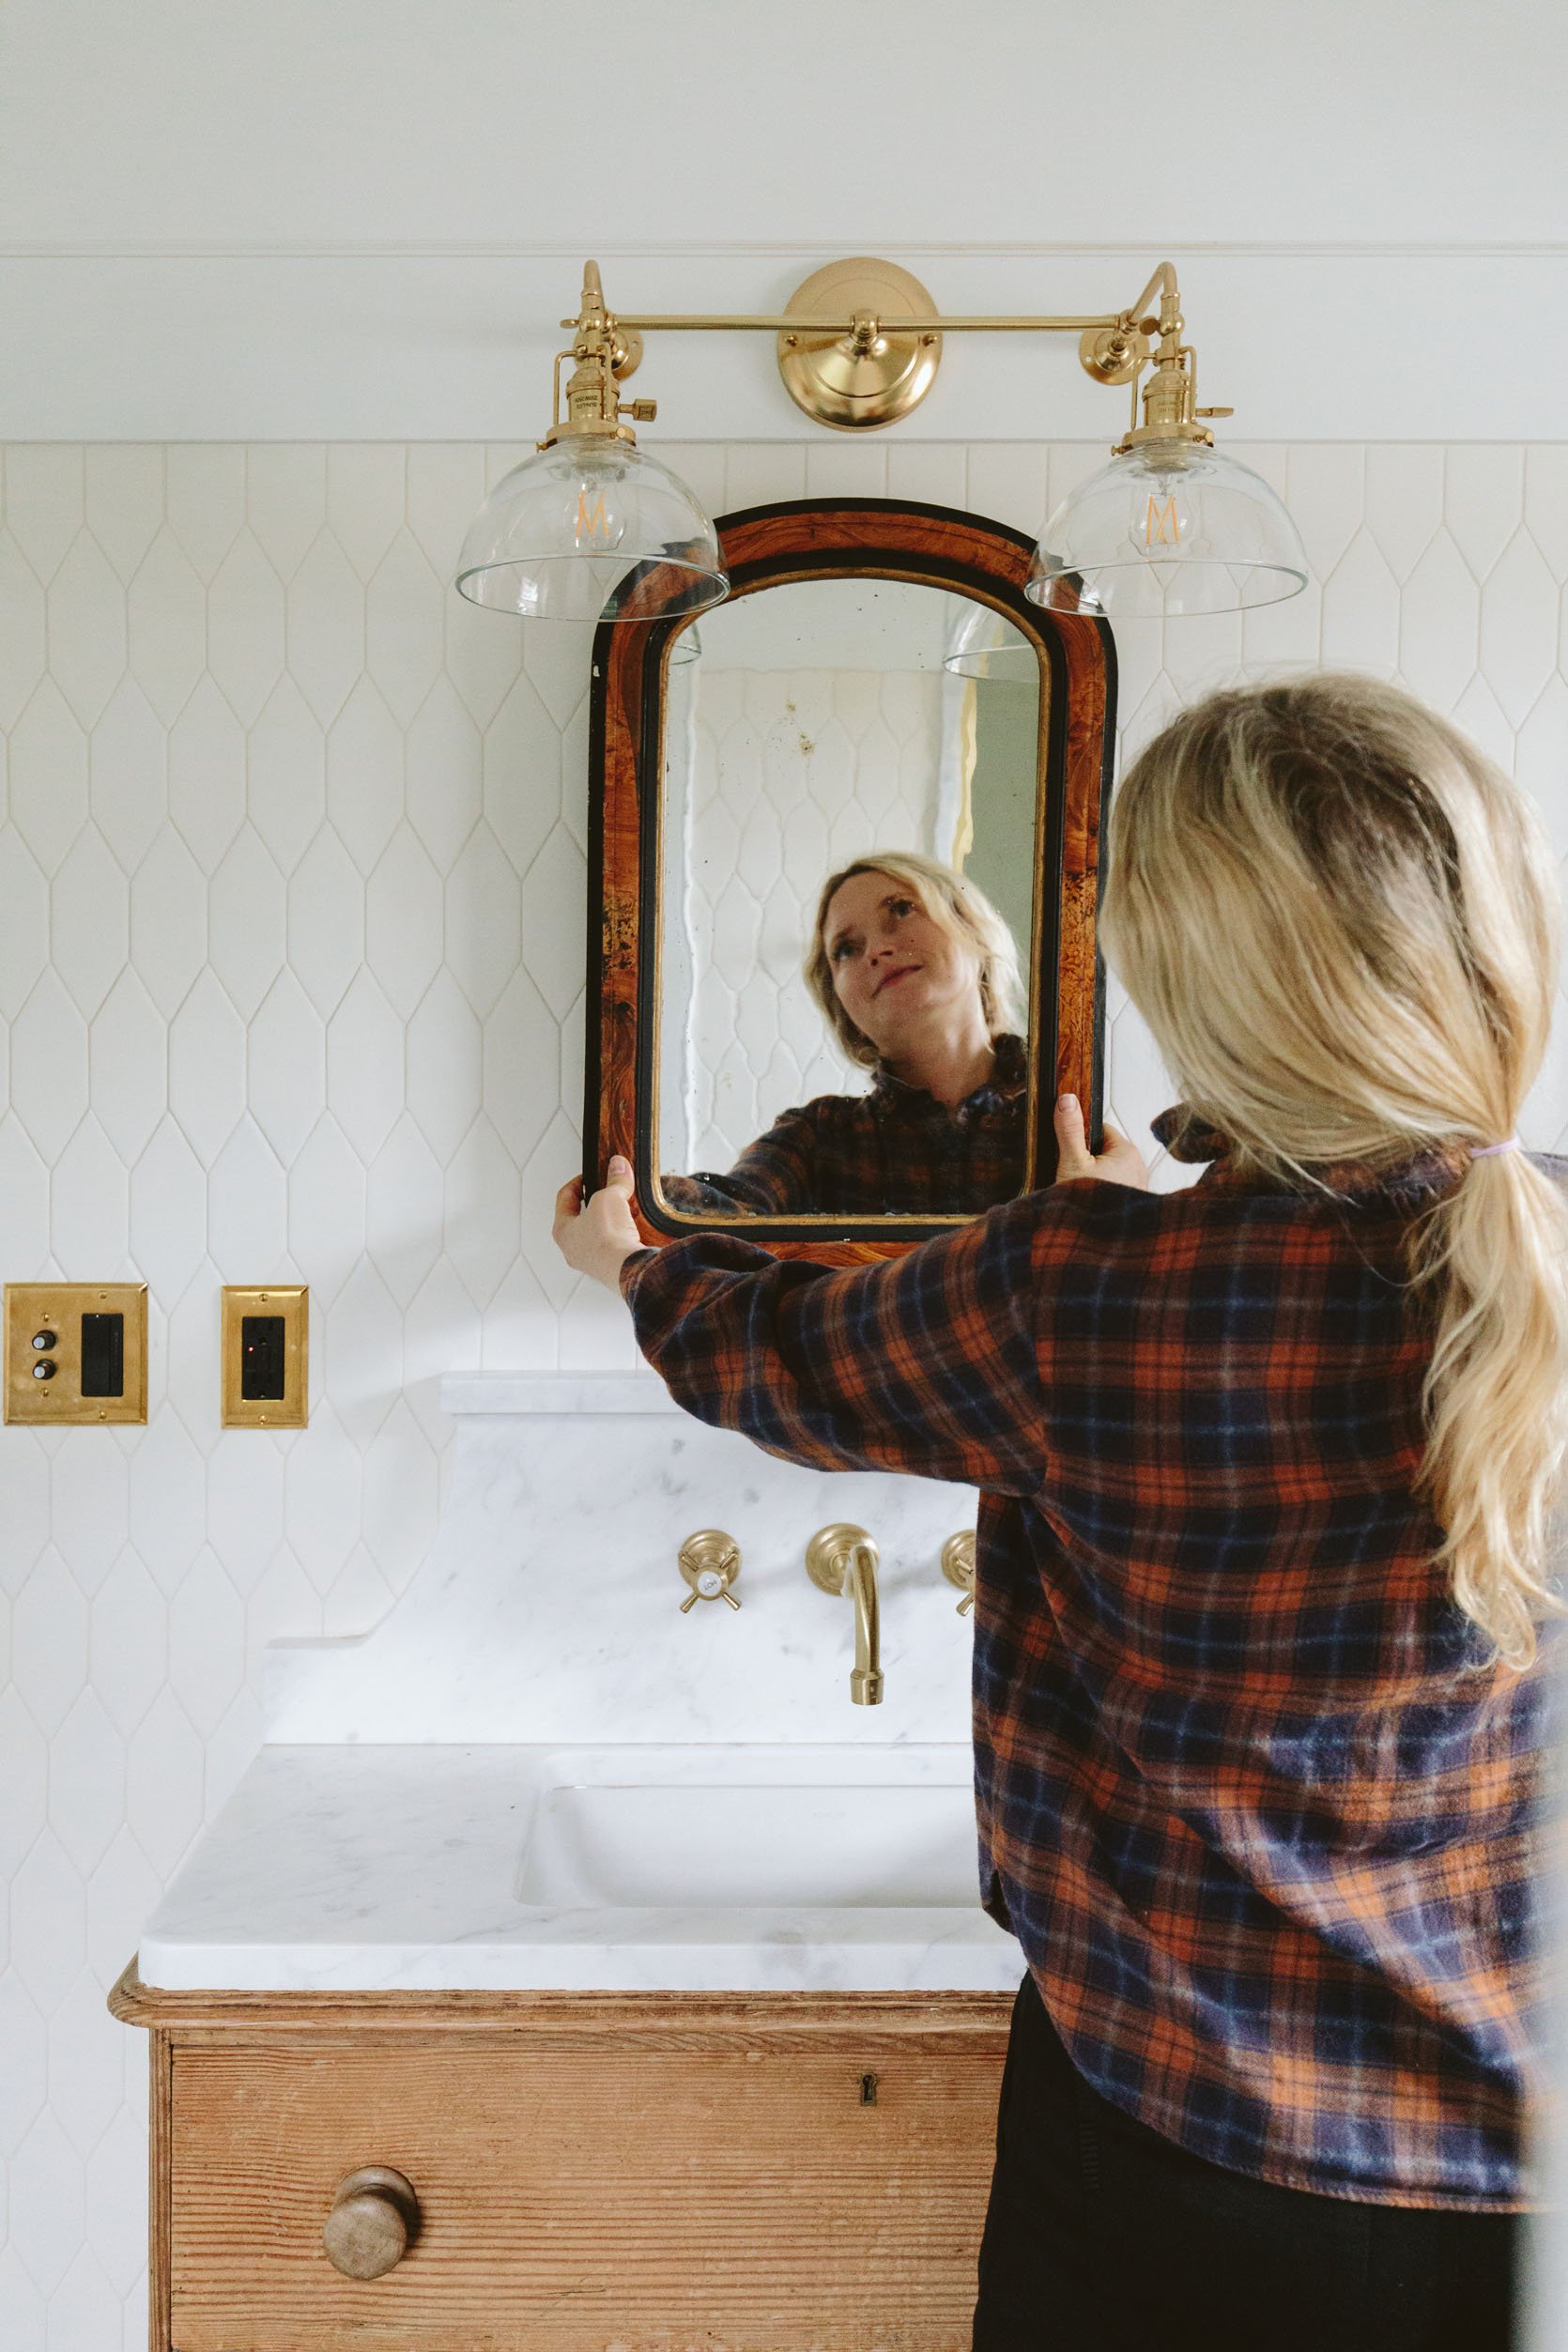
Mirrors (vintage)
Add a mirror over the vanity:) And yes, we wanted an inset medicine cabinet but I don’t totally remember why we couldn’t. It was due to framing/electrical I think…it’s definitely something we could have had if we planned better for it, but I think it would have had to be really small between framing (or we would have had to reframe). Near the end, I just wanted to move in so no, we weren’t going to re-frame (it’s the kids’ bath after all).
Changes/Ideas For The Tub Wall Side
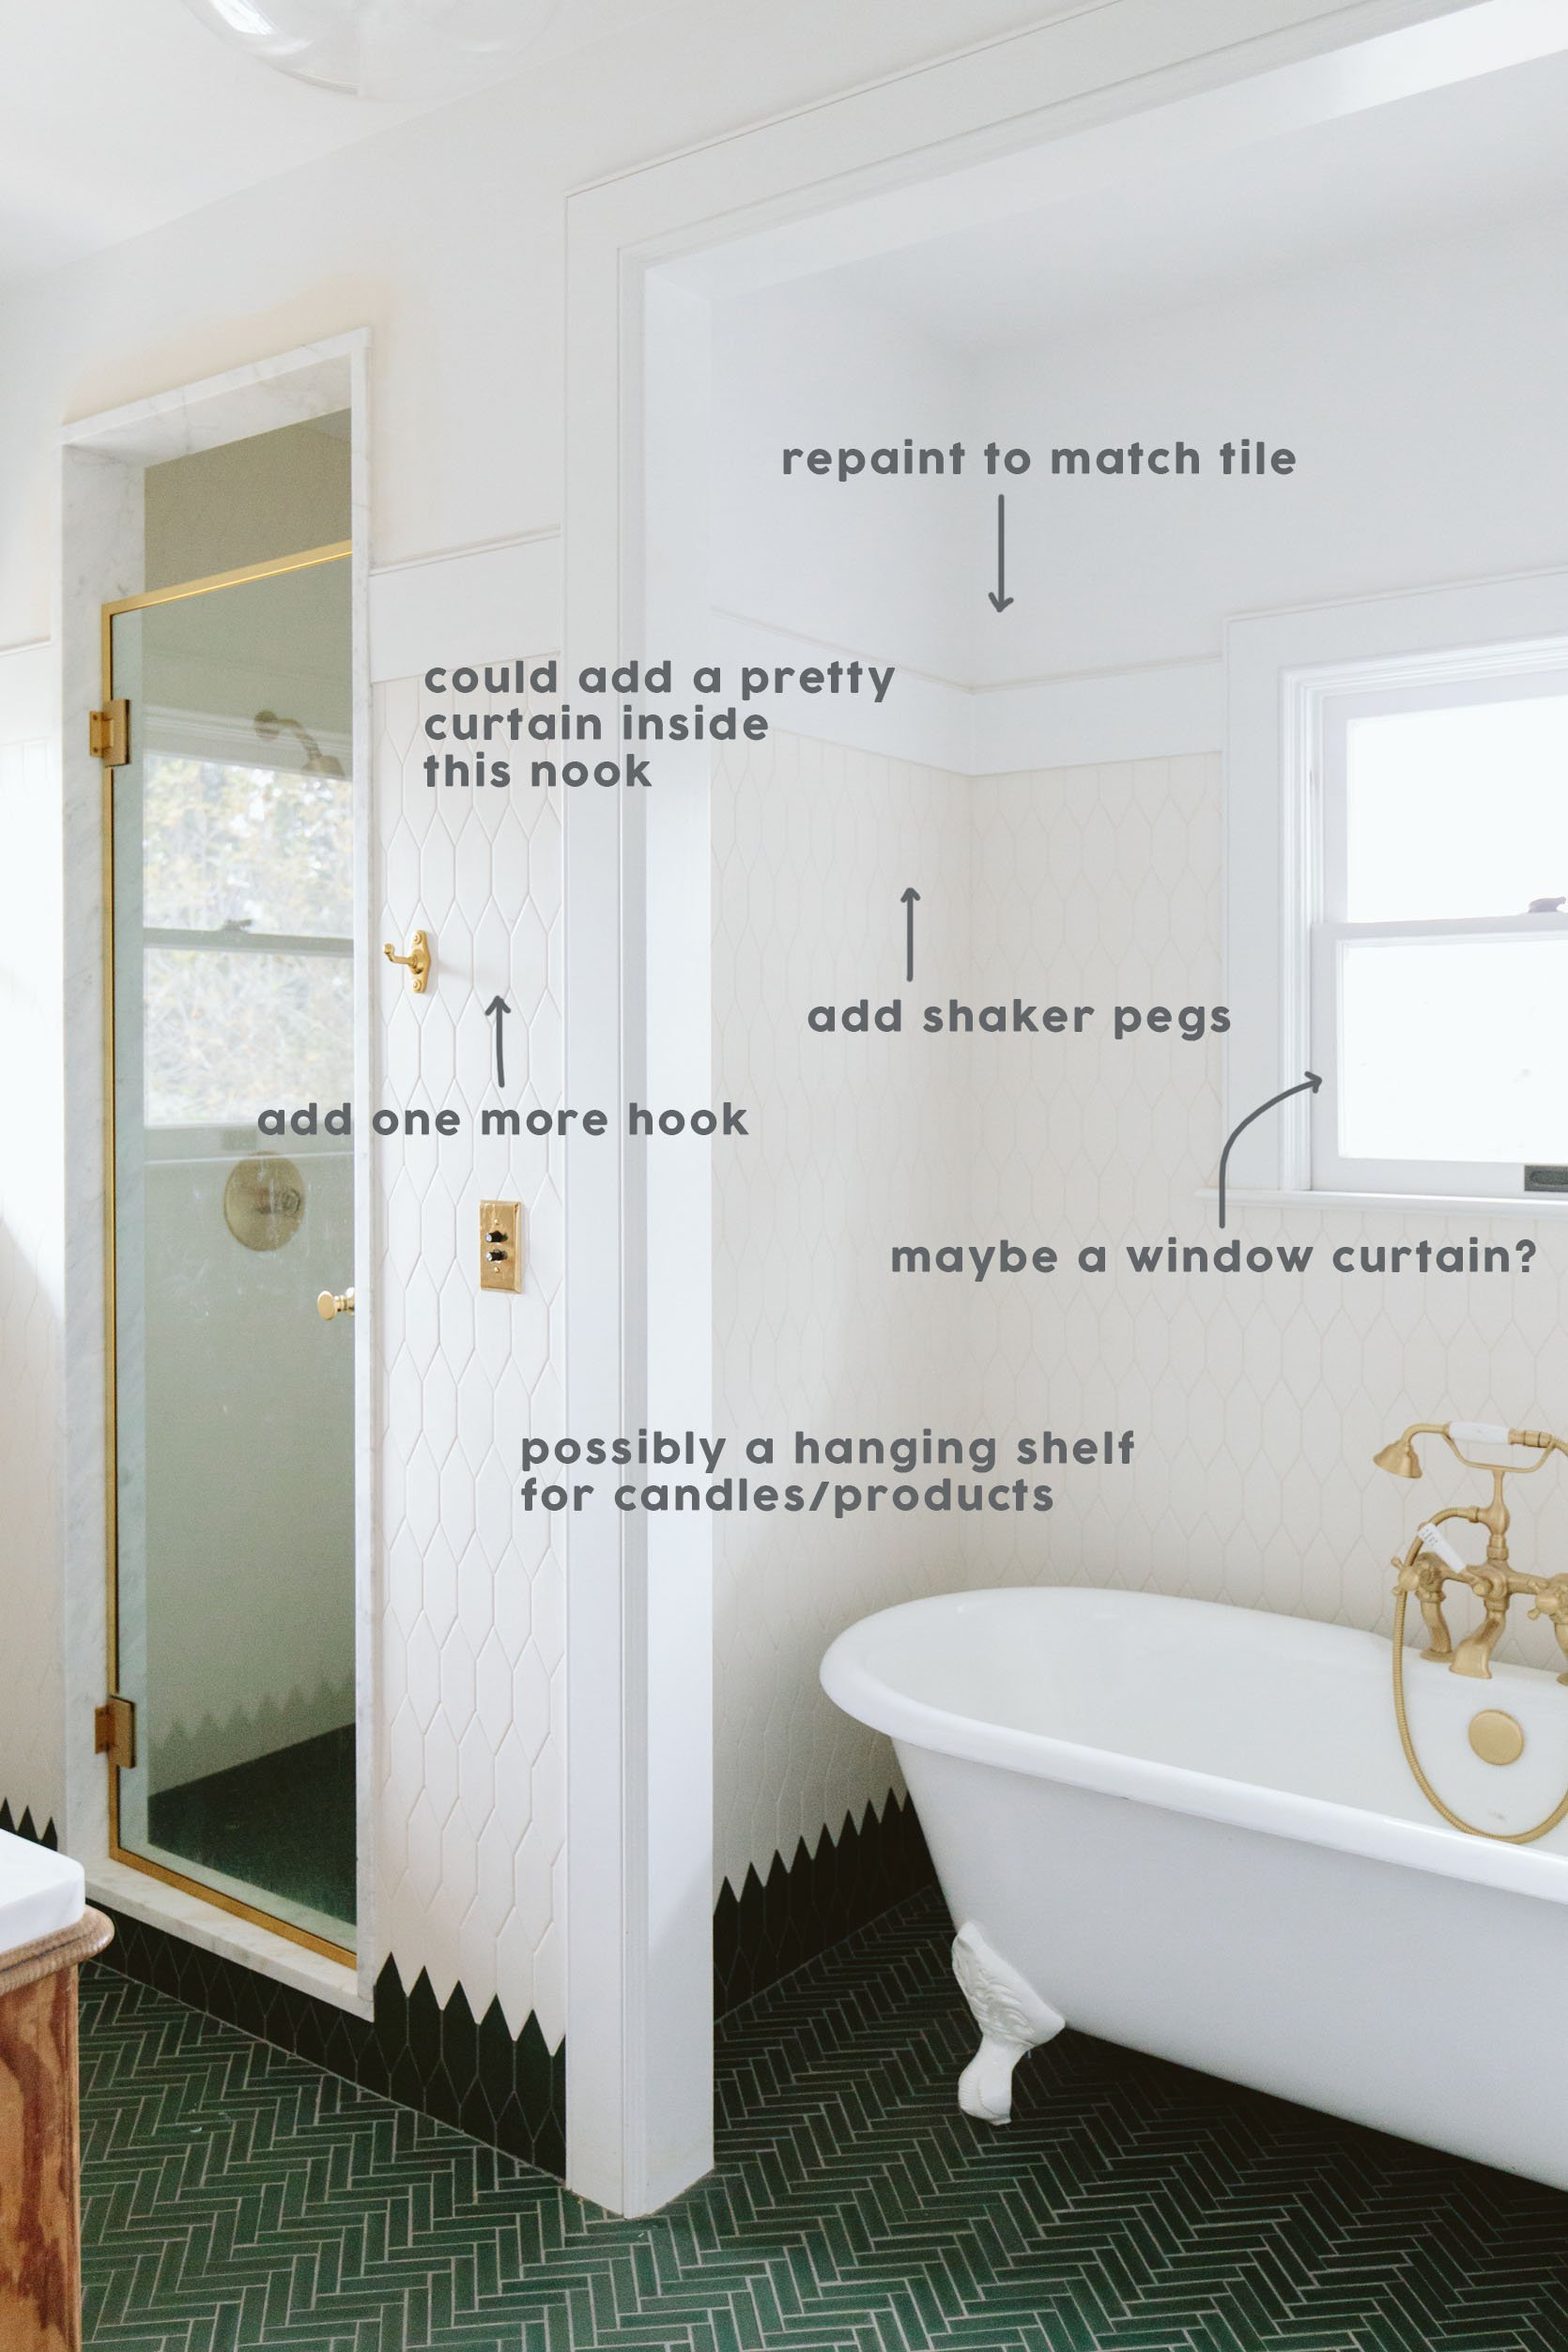
Changes/Ideas For The Vanity Wall

Looking at these photos while writing this post, not at the house (on vacation) makes me so excited. I can more objectively see the potential with one final layer and a couple of tweaks. Oh, one more thing I want to call out that someone recently said. Ahem, “Ooh the tile looks like grass,” which wasn’t exactly what we were going for by bringing it up the wall but of course, I can see it. I thought about it for a while and was like, “Does it look like grass? Would blue or pink have been better?” But then I reframed it quickly, as I do, reminding myself that we love grass and actually moved back to Oregon so that our kids could have grass instead of concrete to play on at recess (something missing in most LA schools). Anyway, so if you are thinking “that tile looks like grass” you aren’t alone, and yet we are still very into it 🙂
Bathroom Resources:
Plumbing Fixtures: Rejuvenation
Switchplates and Hardware: Rejuvenation
Elongated Picket Tile: Pratt and Larsen
1×4 Herringbone Tile: Pratt and Larsen
Clawfoot Tub: Rejuvenation
Sconce: Rejuvenation
Semi-Flush: Rejuvenation
Vanity and Mirror: Vintage
Toilet: Kohler
Shower Door: Custom/Local
Tile Install: Level Plane Tile and Stone
Stone Fabrication: Alphaworks
Renovation and Carpentry: ARCIFORM
*Photos by Kaitlin Green
THIS POST WAS ORIGINALLY PUBLISHED HERE.
