Well, the day is finally here and I hope you’re all prepared! It’s been a long time coming and I know we’ve all been anxiously awaiting it: tax day. Did you do them? If the answer is yes, congratulations! Your reward is this post, where I finally reveal just how I was able to use fabric as wallpaper in my bedroom makeover. It’s completely renter-friendly and won’t break the bank, so you can spend your return on something fun, like a tropical vacation, instead of hiring a professional installer, after paying $100/roll for wallpaper.
If you’ve been following along since last week, I sincerely thank you for your patience! Now, many of you already guessed the answer to my magic trick: fabric starch. But hopefully, today’s post will answer any remaining questions you might have about applying wallfabric. I’m offering up my full, tried and true, step-by-step process so you can recreate this look for yourself–with modifications for my lazy girls and perfectionists alike! Though this is the first full room I’ve done myself, I’ve used this technique a number of times and can fully vouch for its effectiveness in transforming a space. And if you need a reminder of just how transformative it can be, here’s where we left off:


Now, before I fully dive in, I must give credit where it’s due. I first came across this application through Apartment Therapy years ago and I’ve been experimenting with it ever since. So while I wasn’t the first to discover it, I’ve fine-tuned their instructions, based on my research, and am writing my findings here, for you. Also, they weren’t the first to discover it–I recently picked up a 1976 Sunset Magazine guide that provided a how-to for fabric walls. And I’m sure Queen Elizabeth had fabric hanging from a wall or two in her castle (not fact-checked, but seems like it). Point being, knowing this technique has spanned YEARS of decorating eras, I say you should feel pretty confident in trying it out for yourself. Let’s get started.

You will need (almost) everything pictured here. Anything labeled in white is a MUST and anything labeled in blue will just make your life easier.
- Your fabric of choice, enough to cover your intended walls (ideally a lighter-weight cotton) Hot tip: Check out the bedding section at the thrift for big sheet sets–an even cheaper way to cover a large surface area!
- Liquid starch (this one is the best bang for your buck)
- Bucket (or a paint tray works, too)
- Paint roller (make sure it’s clean!)
- Fabric scissors (regular scissors could also work)
- Painter’s tape (any color)
- X-Acto Knife or Utility Blade (the newer and sharper, the better)
- Staple Gun (this, in combination with the painter’s tape, will help a TON, especially if you tackle this project on your own. But it’s not 100% necessary (and will leave tiny holes))
- Step Stool (or a chair, whatever will help you reach your fabric to the ceiling)
- Iron (only really necessary if you plan to hem your edges–more on that later)
- Hem tape (used with your iron, to achieve a cleaner seam line)
- Measuring tape (if you want to be more exact with the length of panels needed, also helpful when measuring your room)
- Drop cloth (it’s nice to have a towel handy to catch the larger spills, but I’ve found that this stuff can really get anywhere and be fine)
- Spray bottle (filled with starch solution, sometimes handy when you need to smooth out any bubbles on the spot)
To Begin:

After gathering your supplies, you’ll need to locate a good spot for your wallfabric application. Maybe it’s an entire room, an accent wall or the just the upper half of some wainscoting–I’ve done and loved them all! Here, I’m just demonstrating on a better-lit wall in my living room, mostly so I can show you how clean the wall is after removal.
A few of you had questions about the types of walls you can apply this over. Though I’ve only wallfabric’d over typical, textured drywall, I would be surprised if it didn’t also work atop wood paneling. I once applied it to a cardboard cutout (that I then attached to my ceiling) and it adhered just fine to that, too! I think as long as the surface is flat-ish, it should stay (and remove) no problem. I would proceed with caution if applying over existing wallpaper. Since wallfabric requires a lot of wetness, I’d first do a small test spot to see if the moisture interacts negatively. If you don’t care what happens to the wallpaper underneath, you should be totally fine.
Prepare Your Panels

Depending on the space you’re tackling, it might make better sense to cut/prepare all of your fabric panels at once–or cut as you go. You do you. You’ll need to measure the height of the space you’re covering, and do the math on how many panels across you’ll need to complete your space. I knew I had a LOT of fabric to work with, but I still cut all the panels I would need for my bedroom at one time to make sure I had enough to complete the pattern, 360°.
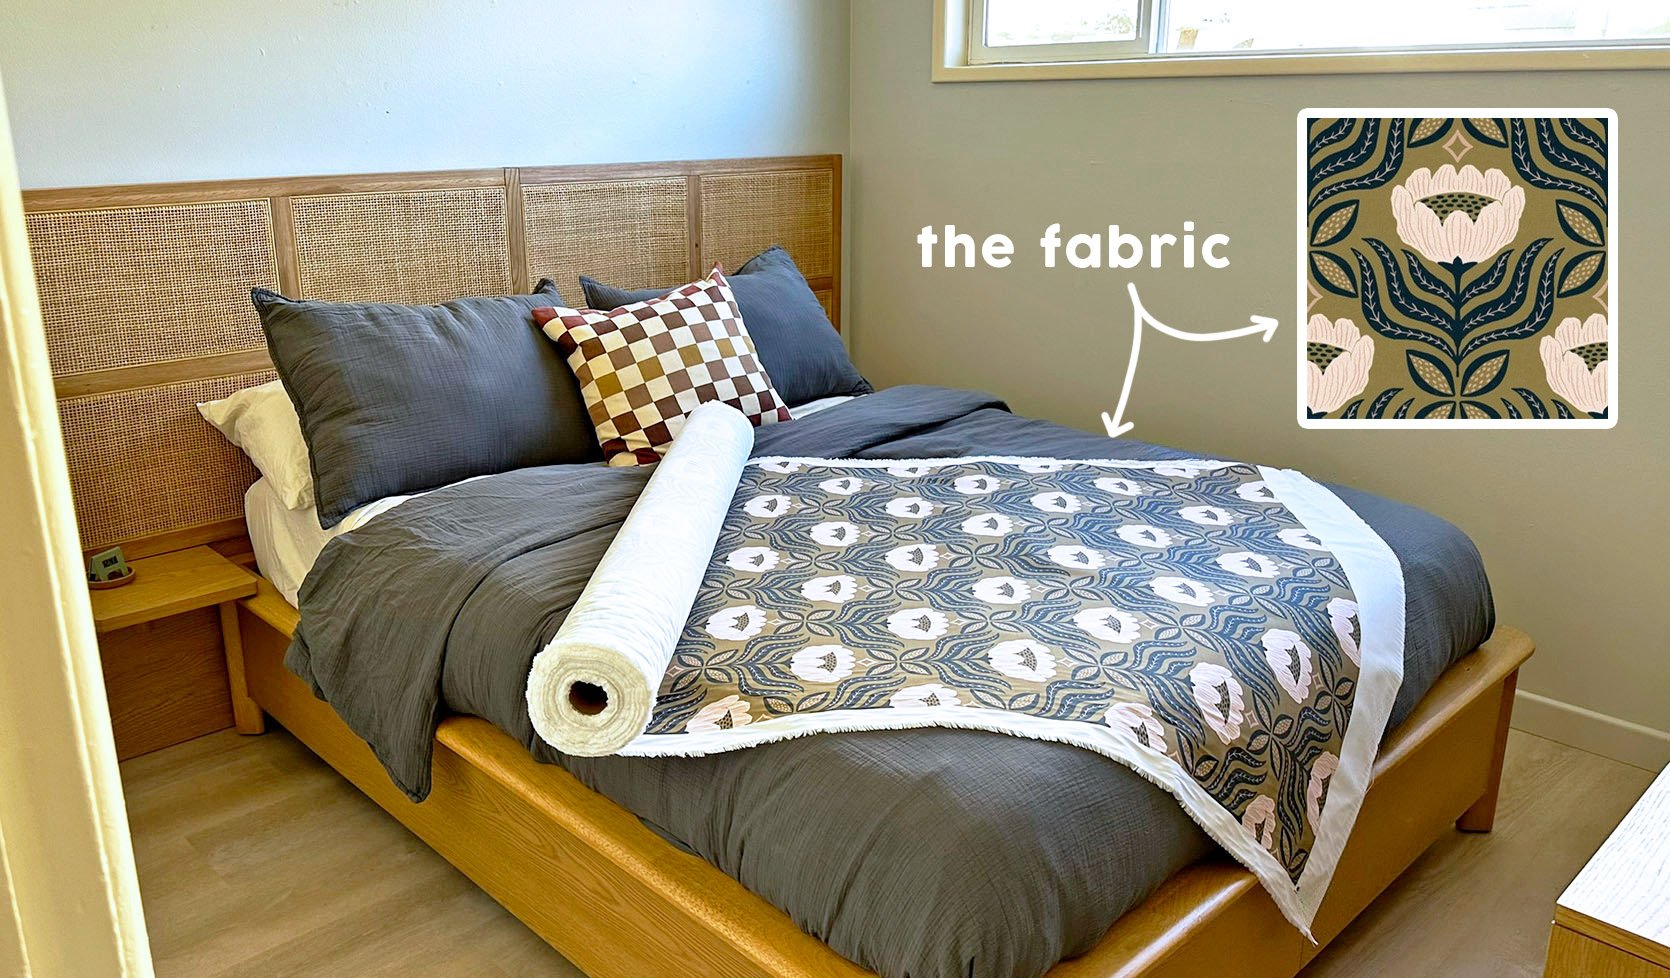
Since my fabric’s motif was pretty streamlined, I could simply count the flowers vertically to find my cutting spot, and then repeated this 13 times. When cutting, make sure you leave at least an inch or two of overage at the top AND bottom. You’ll be trimming this away later. Another important note: when cutting your panels, the cuts should start and end in the same place each time (if there’s a repeating motif), so that each panel’s pattern will line up horizontally, as they’re placed side to side. Once you cut your first piece, the additional cuts should be easy to figure out (lay them next to each other as you cut, if you need). It may mean that you tack on more than 4″ to keep the same repeat, which is totally fine. You’ll cut that off later.
You can see that my fabric has a pretty noticeable, white selvage edge. Not all fabrics will have this, but if yours does, THAT is where the iron and hem tape comes in handy (I’ll get there). Regardless, your first panel can be applied with these edges showing.
Mix Your “Glue”

Arguably, the most important step is your liquid starch mixture, and it’s basically impossible to get wrong. This stuff is truly liquid gold, and you could absolutely dump the whole thing in your bucket and get rolling. But I’ve found that mixing it with water, roughly 1:1, really helps it stretch, without compromising the grip. To do my small bedroom, even after mixing it with water, I still needed about three of these bad boys, but I also wasn’t too careful with how much ended up on the floor vs the wall. It can be helpful to fill a spray bottle with this same mixture if you want to limit the mess and better concentrate the solution to certain areas of the fabric. The paint roller, though effective for most of the application, does tend to drip everywhere.
Stick ‘Em Up

Once your mixture is ready to go, start by loosely taping your fabric panel a bit above where you’ll be trimming it back later. In my case, that was roughly 4″ into the crown moulding. Tape works pretty well to hold it up–the more, the better. But if you’re okay with a couple of small holes, I highly recommend a staple gun, to truly lock it in place. Just one staple, right below your future trim line, is all you need. Any more and you might be locked into a placement that isn’t ideal. That’s why tape is your friend, because it can move with you as you plaster down the fabric. Also, it’s why you don’t want to hang it too taught right away, because once wet, it’s necessary for the fabric to shift as you smooth it. In the picture, the fabric is already a bit wet, so know that you’ll have to adjust initial loose-ness more than this.
Let’s Roll

Other people will tell you to coat the wall in starch first, but I think this is a waste of time. So long as your fabric isn’t too thick, rolling directly on top of your dry, hanging panel should totally suffice. This is where things will likely get messy. But remember, this is basically just cornstarch and water. It wipes up so easily, whether you catch it as soon as it drips or after it’s dried down. It’s never left a noticeable trace for me and is generally so forgiving. It’s meant for fabric, so if it gets on your clothes, all it takes is a wash to get it gone. Floors and furniture just require a damp rag.
Dip your roller into your mixture and begin rolling on top of your fabric panel until it’s completely saturated. It is VERY likely you’ll have wrinkles or unevenness as you do this. That’s okay. Pulling up on your newly wet fabric and re-placing it is totally allowed and encouraged.


Once everything is wet, use your hands to smooth it out, like you might with pottery or paper mache. I like to start in the middle, smoothing outward and upward, readjusting as I go to ensure that everything is straight and flat to the wall. Take a step back every so often to make sure the panel looks straight. Lift, tug, and manipulate the edges out where needed. For the “eyeballing”-ly-challenged, a level can come in handy here. Around any moulding and baseboards, do your best to push the fabric into the creases to aid in your trimming, later.

This is the first panel applied. Now you’re ready to repeat the process on either side, but you might have to finish (or carefully trim) the edges of your next panel. Let me explain…
Creating The Perfect Seam


As you’ll see in the pictures above, my fabric has a FAT, white selvage. I can’t apply this piece onto the last without first trimming it back to the edge of the repeating pattern–or as I prefer to do here, iron and “glue” it back. With some iron-on seam tape (and a little patience) I can hem the edge of this fabric to line up PERFECTLY. This way, you don’t risk the fabric edge fraying (which is likely to happen if you cut it (and annoying, but still workable)). It becomes a lot easier to line up on the wall with a finished edge. Just be sure that if you choose to hem the sides, your pattern still repeats seamlessly (pun-intended), side to side.
You can opt to hem just one side, leaving the other side to be covered up, again, with the next hemmed panel. So on and so forth, until the last panel, where you’ll have to hem both edges to finish it off.
Let’s Speed This Up A Bit

You’ll repeat the same steps as before, taping your newly hemmed, dry panel to one side of the pasted panel, being careful to match up the seams. Here we see Gretchen in her natural habitat, being a mess and a perfectionist, all in one.


I start by wetting just along the new seam, lining it up, and smoothing it down on top of the panel next to it. You may need to shift your panel around a bit, but you really won’t get it matching up perfectly until it’s wet and pasted to the wall. Once you like how it’s laying, continue saturating the rest of the panel, adjusting as needed. Then repeat and repeat again, until you’re done.

This stuff dries pretty quickly with just a breezy window open, but a fan can aid in speeding it up a bit. It can take as little as a few hours, but I like to stretch a project out, and usually give it until the next day to dry. You’ll know it’s dry and ready to trim when it feels a bit stiff or scratchy to the touch.
There might be a few bubbles after it first dries. I like to go in with a second-coat, spot treatment only, and roll out these spots. This is also where the spray bottle can come in handy, to wet small spots, smoothing with your hands. Rarely do I need a third pass, but will occasionally need to apply to just the edges to lay them back down after trimming.
Trim Time


To finish your wallfabric installation, take your SHARP X-acto blade and carefully cut along your trim lines. Mine was fairly easy because I just needed to press my blade into the underside of the moulding, going slowly to keep my cuts straight. A sharp blade and truly dry fabric make all the difference, but keep in mind no one will be SO CLOSE that they see all your imperfections. In some cases, it may help to peel the trim edge up enough to cut your (newly indented) fabric with scissors along the line to achieve that finished edge. Not pictured is me repeating this step along the baseboards, windows, and outlets.
You may also have obstructions you’ll need to trim around. This should be fairly straightforward, but I always like to hang the full panel, regardless of what’s behind it, be it light switches or windows. This will ensure the pattern is continuous from top to bottom. When it comes to windows, I roughly cut out the necessary holes while the fabric dangles from the wall, leaving enough space on all sides for a clean trim, taping or stapling any new top edges.
With outlets, I like to cover plugs with a piece of painter’s tape to repel the liquid starch, then cut an X in the center to each corner, later trimming the sides when dry. In some cases, you can skip the X and just trim the box out when it’s dry because the wet fabric has enough give to fully stretch over it.
When It’s Time To Move Out


Literally, peel it off the wall. Done. So long as the surface won’t come with it when you peel it off (ie potentially, wallpaper), you won’t need to wet it to remove it. Some suggest doing this anyway, so you’re welcome to try it, but I’ve never had issue with doing it dry–the paint always stays in place.
If you’re someone who really likes to deep clean a place before leaving it for good, you might give the wall a wipe down, but I never find I need to. It looks like nothing was ever there. The mixture soaks in and dries more to the fabric, than the wall.
The best part? Now you have huge, starched panels of fabric ready to re-use in a new project! Take your wallfabric with you to apply in your next place, or make a pair of overalls to wear and remember your past room fondly. My mom says she’ll sew me a pair with my leftover fabric scraps, and the EHD crew told me I should ‘go as my room for Halloween’–I’m kind of into it.

So that should be all, folks! If I’ve somehow managed to not address your burning questions in this girthy, Monday post, please feel free to ask away in the comments and I’ll do my best to answer, though I will NOT be giving out tax advice. You wouldn’t want it, anyway. As always, thanks for reading! And if you try this yourself, I’d love to see it! DM me or something, @gretchenraguse.
Sincerely, Gretch
Opening Image Credits: Design by Gretchen Raguse | Styled by Gretchen Raguse and Emily Henderson | Photo by Kaitlin Green | From: Gretchen’s Bedroom MOTO Reveal
THIS POST WAS ORIGINALLY PUBLISHED HERE.
