The Power of a Mortgage Pre-Approval

Some Highlights 

Mortgage pre-approval means a lender has reviewed your finances and, based on factors like your income, debt, and credit history, determined how much you’re qualified to borrow.
Being pre-approved for a loan can give you clarity while planning your homebuying budget, confidence in your ability to secure a loan, and a competitive edge in a bidding war.
In today’s market, connecting with a lender to get pre-approved may be the game-changer that helps you secure your dream home.

The post The Power of Mortgage Pre-Approval [INFOGRAPHIC] appeared first on Keeping Current Matters.… Read More

8 Tips for Achieving Maximum Coziness

Gray skies don’t have to mean a drab indoor life.
As winter plods along, you may wish you could just hibernate until spring — and that may be more true than ever this year. But there is, indeed, joy to be found in the quieter months of the year.
While the trend may have come and gone in the U.S., the art of hygge, that feeling of being ultra-cozy and content, is just part of everyday life in Denmark.
The thing is, the Danes know how to thrive in winter. You might already know they’re the happiest people on earth, but did you know a lot of them attribute their unseasonably sunny outlook to their home- and self-care habits?
When it’s cold and rainy out, and you’ve been stuck inside for — who knows how long? — binging the next series on your “recommended” list might feel like the most appealing option. But if you’d like mix things up, here are a few ideas to channel the Danes and make an intentionally delightful day out of drab weather.
1. Set the mood
Candles are a key ingredient to a supremely comfortable atmosphere. Not only do they provide beautiful, soft lighting, they also add warmth and scent to your space.
Tip: Choose seasonal scents to inspire celebration, or choose a summery scent, such as coconut and floral, to help combat the seasonal blues.
2. Bake something
Comfort food is central to the cozy experience. But it doesn’t just begin when you eat the cake (or cookies or pie) — it begins when you imagine the creation.
Leaf through your favorite cookbooks or browse some eye-candy baking sites, choose your ingredients carefully, and mix them with care, taking your time to enjoy the task at hand. It’s just a bonus that your baking will flood your space with delicious smells — and taste good too.
Tip: Reach out to a friend or family member whose recipes deserve appreciation, and ask if they could show you how to work out their spectacular skills. You can set up a video call if you’re not able to meet in person.
3. Add texture
Plush throws, sheepskins and cushions make for a much more inviting space. Cover your surfaces in as many luxurious fabrics and pillows as you can find and snuggle down.
Tip: Feel free to go faux, or if cost prohibits, find inexpensive alternatives.
4. Get out the board games
Pull your partner or kids away from their screens and gather around the table for some old-fashioned fun. Whether you go for the competitive strategy variety or laugh-out-loud social games, there are options for everyone. For the minimalists among us, even a deck of cards can offer plenty of entertainment.
Tip: Looking for remote gaming options? There are many online group gaming apps, and many people have come up with creative ways to play the classics via Zoom as well. Start up a game and maintain your connections year-round!
5. Perfect your hot drink game
Hot cocoa, hot toddies, apple cider, mulled wine — pick your poison. Whatever it is, find your own special recipe that is so delicious you can’t wait to show it off. Host a virtual happy hour and share it with family and friends.
Tip: Why, yes, you can put whiskey in those drinks. But it’s usually a good idea to perfect a mocktail version, too, for those who don’t imbibe.
6. Embrace sweater weather
If you don’t already have a favorite sweater, it’s time to find one. It should be something that makes you feel at home when you slip it on. Cashmere, wool, mohair — anything will do. Whatever you choose, pair it with thick socks!
Tip: Find some beginner books or tutorials and try your hand at knitting, crocheting or weaving, and make your own sweater over the course of the winter. Find an online knitting circle for tips and encouragement.
7. Curate your cold-outside playlist
Make yourself a mix of music that inspires you to do all those things that make you feel absolutely endeared to your space. Put it on shuffle, relax, repeat.
Tip: Instrumentals are classics for a reason — they can work as background for just about anything. When in doubt, most music services have premade playlists, some of which you can filter by mood.
8. Do seasonal activities
Making caramel apples? Check. Working on (or giving up on) your New Year’s resolutions? Check. Canning, puddle jumping, snowball throwing, signs-of-spring spotting? Check!
Tip: Whatever your favorite seasonal activities might be, create a plan to make them happen — put it on your calendar, set a reminder on your phone, or find an “accountability partner” (a friend or family member who will give you the nudge you need), and feel the magic of even the most blah weather wash over you.

Originally published October 2018.… Read More

A 3-Step Downsizing Plan

When it’s time to move to a smaller home, these tips will help you save the memories while minimizing clutter in your new place.
Moving into a new house is often bittersweet. You are excited for the change, but sad to leave a home so full of memories. Downsizing can be even harder — a smaller place means you don’t have room for all of your current possessions.
But downsizing is also an opportunity to refresh and start anew. If you get rid of the clutter, you can fill your new place with the things you really love, making it feel like home.
Here are three steps for downsizing without sacrificing your meaningful belongings.
1. Make a plan
Take a trip to your new place and measure the size of your rooms and storage areas. This will be your guide for how much you can take with you. It is better to underestimate than overestimate.
As you’re deciding what to keep and what to get rid of, do one room at a time. Moving is a big job, and you don’t need to tackle it all at once. Plan to do a little bit each day, and leave extra time so you aren’t rushed.
Decide on your furniture first. Going from big to small will give you a better idea how much space you have left to fill. You don’t want to have to reshuffle everything if you can’t take that bookshelf with you.
2. Sort your belongings
Will you use it? It’s easy to convince yourself you might still wear that 10-year-old shirt with the tags still on someday. But if you haven’t used it in the past year, it’s likely you never will.
Also, get rid of multiples. Do you have multiple coffee pots, or several sets of china? If you can only use one at a time, you don’t need to keep both.
As you sort, follow a strict yes/no policy —no “maybes” allowed. Make a “yes” pile and a “no” pile, and force yourself to choose. If you aren’t convinced the item deserves a yes, then it’s a no. “Maybe” piles just mean more work for you later.
Decide how to divvy up your “no” pile. You may not want or need these items anymore, but they’re probably useful to someone else. Special items may handed down to friends or family members. Furniture, housewares, clothing and other items in good condition could be sold at a garage sale or on sites like Craigslist. Or, you can choose to donate reusable items to organizations like Goodwill, who sometimes offer neighborhood or even residential pickups, making your task that much simpler. Anything damaged or worn beyond repair should make its way to the recycling bin or a trip to the dump.
3. Preserve memories
Digitize photos to save space and easily share them with family. Photo albums take up a lot of room, and how often do you actually go through them? Pick up a digital frame and enjoy all of your photos in a rotating slideshow or create a slideshow screensaver for your TV or computer.
Take photos of items that bring up good memories, but you no longer have room for. You can look back on the memories without actually keeping the items.
To make sure those treasured items are in good hands, pass them on to your children, grandchildren or close friends. They will love the gift, and you get to enjoy seeing the items being used.
Another strategy is to give keepsakes a new life. If you love to craft, items like old movie stubs, letters and photos are perfect for scrapbooking, letting you create a record of your experiences. Or make three-dimensional pieces of art using shadowboxes. Gathering up your memories in one place will make them easier than ever to enjoy.
Downsizing is an emotional process. You will discover items you haven’t seen in years, and you will have to decide what to do with them. Give yourself some time to reminisce, and then make a decision. Keep in mind your space limitations. Take with you what is truly valuable — only you can decide what you can’t do without.
Just imagine: Once you’ve finished your move, you’ll be able to enjoy your new place surrounded by the feeling of home.
Related:

Originally published November 2015. … Read More

How to Carve the Best Pumpkin on the Block

To ensure your jack-o’-lantern is primed for Halloween, follow these tips.
While Halloween may look a little different this year, there’s no reason you can’t still have an amazing outdoor display. If you’re not interested in shelling out big bucks for a 12 foot animatronic skeleton, or if your style is more autumn chic than gothic gore, you have plenty of options when it comes to the traditional jack-o’-lantern. Before you cut into your sacrificial squash, check out these top tips for making a carv-tastic display.
Pumpkin selection
There are no rules for what size or shape makes for a great jack-o’-lantern. Any pumpkin can rise to ghoulish greatness. Do look for a pumpkin that isn’t bruised and has no mold around the stem. Who wants to cut into a rotted pumpkin? Also, look for a pumpkin with a flat bottom that will sit firmly without rocking.
Tools
Every job is made easier by the right tools. A kitchen knife is not the best — or safest — thing to use for pumpkin carving. You can get a set of pumpkin carving tools at many hardware or drug stores around Halloween, but you can also use items already in your possession — power drills, awls, wood gouges or even cookie cutters. Don’t forget a big spoon to scoop out the guts!
Carving
Rather than giving your jack-o’-lantern a cap by cutting it at the top, draw a circle on the bottom of your pumpkin and cut your opening there, making sure to angle your blade toward the center to create a ledge for support of the finished cut area. Clean out the guts (save the seeds and roast them for your post-carving snack!) and scrape the insides of your pumpkin until they are about an inch thick in the areas you plan to carve. If you’re using a pattern, tape it on and transfer it by tracing with a poking tool. Then you’re ready to carve! If you’re using a pumpkin saw, it’s easiest to keep the pumpkin on your lap, holding the saw like a pencil and using a steady up-and-down motion. Saw at a 90-degree angle with gentle pressure.
Preservation
To extend the life of your jack-o’-lantern, spritz it with water and keep it in the refrigerator while it’s not on display. Spread some petroleum jelly on the cut edges to keep them from drying out. If your pumpkin starts to shrivel, submerge it in cold water for a couple of hours. It should come back to life. Just make sure to dry it well on the inside to avoid mold. You can also ward off mold and insects by spraying or soaking the pumpkin with a water-and-bleach solution.
Display
If you are using a candle, cut a hole in the top of the pumpkin toward the back to act as a chimney for smoke and heat. A candle will be more secure if you drill a hole for it. You can also use battery-operated LEDs, Christmas lights or even a nightlight to illuminate your pumpkin. If you carve a design in the back of your jack-o’-lantern, you’ll produce a shadowy effect on the wall behind it, making it extra spooky!
However you choose to carve your jack o’ lantern, use your creativity and have fun.
Beyond the jack-o’-lantern
For more simple and spooky outdoor decor ideas, check out these fun Halloween hacks.
[embedded content]
Related:

Originally published October 2014.… Read More

Regain Your Garage: Simple Tricks for Getting Organized

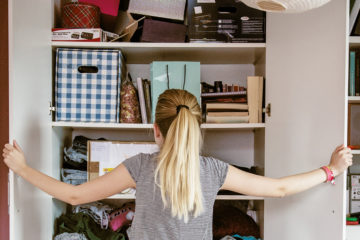
A thoughtful approach to garage storage makes the most of this valuable space and keeps every necessity at your fingertips.
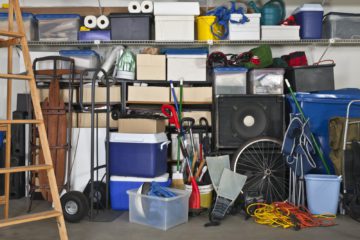
If your house is bursting at the seams, or simply short on storage options, the solution may be as close as your garage. To make the best use of this space, however, you first need to corral its current chaos.
This is, fortunately, a relatively simple task if you incorporate a few good storage ideas. With careful planning and a little effort, you can transform your garage from a messy catchall to an efficient, well-organized household annex.
Divide and conquer
First things first: Get rid of anything you no longer use. After you’ve winnowed down the contents of your garage, sort everything into groups. Keep garden tools with garden tools, and sports equipment with sports equipment. Items used together ought to be stored together.
Where possible, place like items into clear plastic containers with lids. It’s fine to use opaque bins, just be sure to label each one. Stackable containers are especially handy. They keep your belongings clean, protect against insects and rodents, increase the amount of usable floor space, and cut down on visual clutter.
What goes where?
The efficient use of space partly depends on positioning stored items in a thoughtful, strategic way. Are there certain items you’re likely to need on a regular basis, such as cleaning supplies? If so, store them near the door so you can access them quickly and easily. Stash rarely used or seasonal items, like sleds and skis, in harder-to-reach spots.
Off the wall
The key to garage storage and organization is getting things off the floor. Capitalizing on wall space enables you to fit the most into your garage, while keeping it all visible and easy to access. The type of wall storage you choose depends on your storage needs, project budget and personal preferences. Many homeowners opt for one or a combination of the following storage standbys:

Pegboard. A favorite for generations, pegboard is inexpensive and easy to install. Because it can be outfitted with an array of compatible hooks, clamps, bins and shelves, pegboard can be used to store and organize just about anything, as long as the item to be stored isn’t especially heavy.
Open shelving. Whether a wall-mounted track system or a set of stand-alone units, open shelves are affordable, versatile and user-friendly, and they keep everything in plain sight. Plus, depending on their construction, 12- or 16-inch-deep shelves are typically capable of holding heavier items.
Closed cabinetry. If you plan to park your car in the garage, cabinets with doors may be the most desirable option, because closed storage means not having to come face-to-face with paint cans and garbage bags every time you leave or arrive home. Cabinets are available in countless materials and styles, but generally speaking, they are more expensive than other solutions. And because they are unable to accommodate very large items, cabinets are most effective when used in conjunction with another storage system.
Panelized systems. Here, entire walls are covered with specially designed panels that hold any number of companion add-ons, such as hooks and shelves. Unlike pegboard, panelized systems can handle heavier items. But that strength and utility comes at a cost, especially since some proprietary products must be installed by licensed professionals.

Look up
For certain infrequently used belongings, the ceiling provides ideal, out-of-the-way storage space. Ladders and seasonal gear can be kept here, hung by clips or straps fastened to the ceiling joists. Or you can take advantage of hoist pulley systems, which cleverly operate like the cords on window blinds. Bear in mind, however, that ceiling storage must be oriented so that it doesn’t interfere with the operation of the garage door.
Safety steps
As you’re organizing your garage, it’s important to keep safety in mind. It’s unsafe to store gasoline and propane in the garage; a single spark could lead to tragedy.
Likewise, if you have children or pets, you should store hazardous materials like fertilizer and pesticides far out of reach. Locked cabinets are a good solution for these toxic materials, and they’re also a smart place to store power tools and sharp implements.
Related:

Originally published January 2015.… Read More

Prepare for the Ultimate Staycation

Rule #1 of the best week off at home: Plan ahead.
You don’t need to stay in a hotel and play tourist to have a proper holiday. Look no further than your own home for a staycation that dreams are made of.
Make no mistake, an at-home staycation doesn’t just mean a lazy weekend on the couch. Turn your humble abode into a resort made for relaxation with a few days of planning and prep work.
Here’s your guide to creating the ultimate staycation.
Tackle chores in advance
Make a list of chores you want to tackle a few days before your staycation begins. At the very least, cover the basics like washing linens, dusting and vacuuming.
For an added level of sparkle, schedule time to clean your windows. That way when you’re gazing out at your backyard garden or pool (aka your staycation resort spa), your windows will be as spic-and-span as those at a five-star bed and breakfast.
Better yet, for a totally chore-free staycation, consider setting aside extra cash for a housecleaning service to do the work for you beforehand.
Maximize your comfort
Maybe your home is already perfectly comfy and cozy. But for maximum staycation relaxation, why not add a few extra elements to make your home feel like a luxury resort?

Adjust your lighting. Look for soft ambient lighting options to create a calming environment. New lamps for bedroom and living areas and candles for the master bath can completely change the mood of a space.
Add new rugs. Soft, plush area rugs boost the comfort level of a room and make a cozy reading spot if you add a few floor pillows.
Upgrade your bedding. Not only will it feel like you’re truly on a vacation, but new sheets are an added perk after your leisure time comes to a close.

Create designated spaces
Think about what kind of environment will help you reach peak relaxation. You can do a quick makeover of your bathroom to create a calming home spa or carve out a quiet corner for a meditation or reading nook.
If a spa setting is more your style, look at bath pillows, aromatherapy candles and bath oils. Or if you simply crave a reading corner, pick up some new reads that have been sitting on your wish list for too long.
If you have kids, create a designated craft or board game corner, or come up with a few activities they can enjoy while you relax.
Look outside for added comfort ideas too. Whether it’s a hammock, a porch swing or patio furniture, look for ways to blend your staycation lounging with the great outdoors.
On that note, consider setting up your camping gear in the backyard for part of your staycation, or try out a DIY fire pit for late-night chats and s’mores.
Manage meals ahead of time
Don’t waste precious relaxation time planning menus. Pick your favorite family recipes, plan which meals you’ll have delivered and knock out grocery shopping before your staycation begins.
If you enjoy cooking, consider using some of your time off to make more intricate meals than you typically have time for — or bring in a local chef for a cooking lesson.
Plan ahead to make it count
With a few preparatory tasks on your to-do list, you can turn your house into a staycation sanctuary. Map out what you want your down time to look like, and delegate tasks. Soon you’ll be ready for a few days of ultimate relaxation — without ever leaving your home.
Related:

Originally published July 2016.… Read More

1 129 130 131 132 133 134 135 136